Column-level security (CLS) allows organizations to control access to specific Table columns.
In Snowflake, Column-level security is implemented using Masking Policies.
A Masking Policy in Snowflake is a schema-level object that dynamically masks the data returned in a column of a Snowflake object (such as a table or view) at query time. The masking behavior is determined by conditional expressions and context functions, such as CURRENT_ROLE(), SESSION_USER(), or other supported Snowflake identity functions.
Dynamic Data Masking
A Column-based Masking Policy is attached directly to a specific column in a table or view.
The Masking Policy defines how specific column values should be transformed or hidden for certain users or under certain conditions.
Column-based masking policies support highly specific business logic per column or table and provide tight localized control without changing global behavior.
- Use Case Example
Onlycredit_card_numberin thepaymentstable has the rule:- Support role sees the last 4 digits
- Fraud role sees the full value
- All other users see
*****
Before you build anything, decide which of these two patterns you need:
- Full-column masking, mask an entire column the same way for everyone who doesn't meet the Policy's conditions (for example, always mask
SSNunless the role isFRAUD). This uses a Signature Asset Type plus the Snowflake Columns Asset Type. - Conditional (row-level) masking, mask specific rows or cells within a column, based on the value of another column in the same row (for example, mask
first_nameonly wheregroup = 'Restricted'). This builds on the same Signature Asset Type, with an extra Attribute and Ruleset.
Both approaches share the same setup below. Conditional masking simply adds one more Attribute and a Ruleset on top.
Setting Up Your Asset Types
Before you create a Masking Policy, you must complete the mapping for both Asset Types involved: the Signature Asset Type and the Snowflake Columns Asset Type. Mapping means identifying the physical Table and columns the Policy will protect, and linking them to their logical Asset Type and Asset Attributes in PlainID.
A Masking Policy cannot mask an entire column unless you connect both Asset Types to it. The Policy requires the Signature Asset Type (which defines the full masked value) and the Snowflake Columns Asset Type (which defines the specific column and Action). Complete both before you open the Policy Wizard.
Creating the Signature Asset Type
To mask an entire column, no matter which role or condition applies, you need a Signature Asset Type. Unlike the Snowflake Columns Asset Type, PlainID does not create the Signature Asset Type automatically, you must create it yourself.
To create and configure the Signature Asset Type:
- Create a new Asset Type. Set its Asset Source to Request.
- Set "Is used for data filtering?" to Yes. PlainID only shows the Table Mapping option when this is set to Yes.
- Open the Asset Type's Details tab. A new button, Set Table Mapping, appears at the bottom.
- Click Set Table Mapping to link your logical Asset Type with one or more physical Tables or views in Snowflake where the Masking Policy should apply.
- Click Add, then enter the fully qualified path to the Table or view, following the format:
DB_NAME.SCHEMA_NAME.TABLE_NAME. - Click Done.
- Click Add, then enter the fully qualified path to the Table or view, following the format:
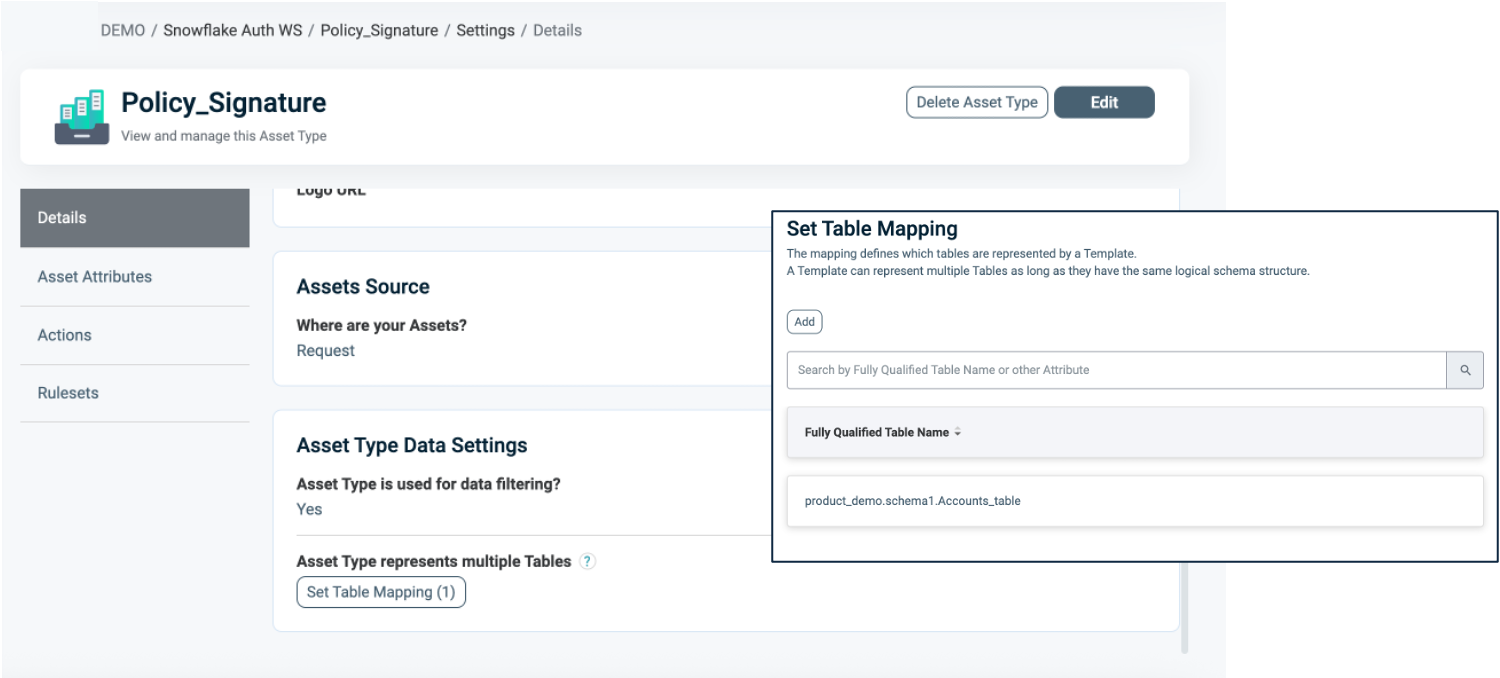
For more information about Table Mapping, refer to Dynamic Data Mapping.
Attribute Mapping
Each Asset Type includes Attributes that represent the columns that define the Policy Ruleset that determines when the Policy applies masking.
You must map each of these columns to the appropriate Table as described below.
To set Attribute Mapping:
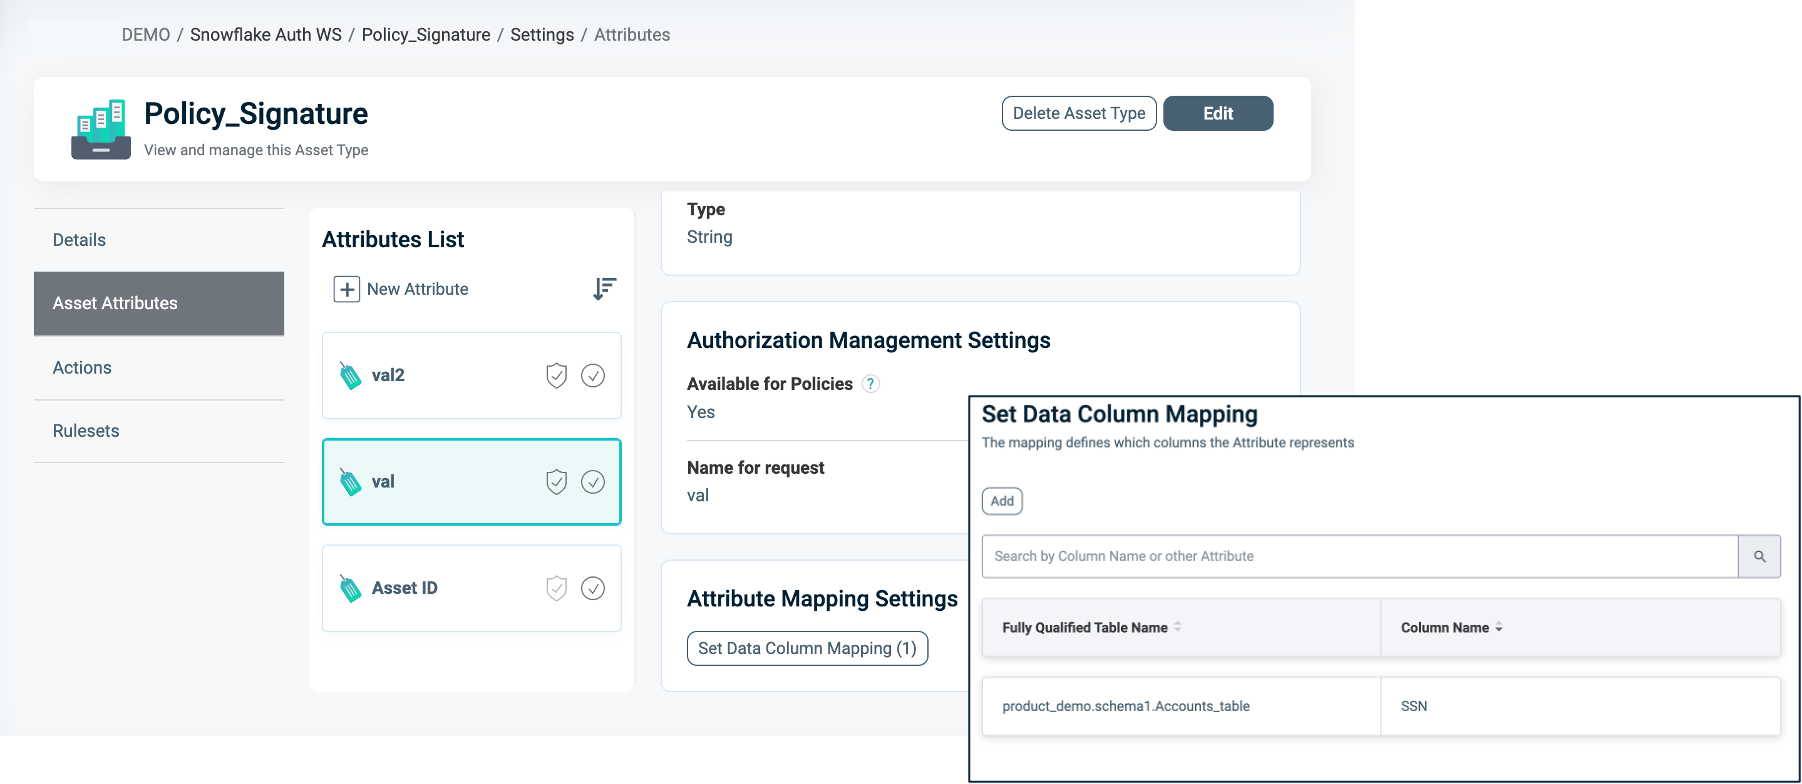
- Create an Asset Attribute that represents the signature, for example, an Attribute named
SSN. Refer to Managing Asset Attributes for more details. - Define the data type (for example, String, Numeric).
- Set Available for Policies to Yes. PlainID uses these Attributes to define the masking logic, and you can use them in Policies.
- Once you save the Attribute, the Attribute Mapping Settings panel opens. Click Set Data Column Mapping to map the logical Attribute to one or more physical Snowflake columns.
- Select the mapping Table from the dropdown (the Table you added in step 4 of Table Mapping above), then enter the column name exactly as it appears in the vendor.
- Note: Ensure the physical columns you want to map are marked as "Use in masking = On" in the relevant Table or view in the Objects side panel within the Integrations.
The Signature Asset Type alone does not enforce masking. You must also complete the Snowflake Columns Asset Type above and connect both Asset Types to the Policy's What section, along with the Action for that column. The Policy will not work with only one Asset Type connected.
Column Asset Type
PlainID automatically generates the Snowflake Columns Asset Type when you create the Policy Orchestration Point (POP). It represents a logical component that holds the available Snowflake columns for masking.
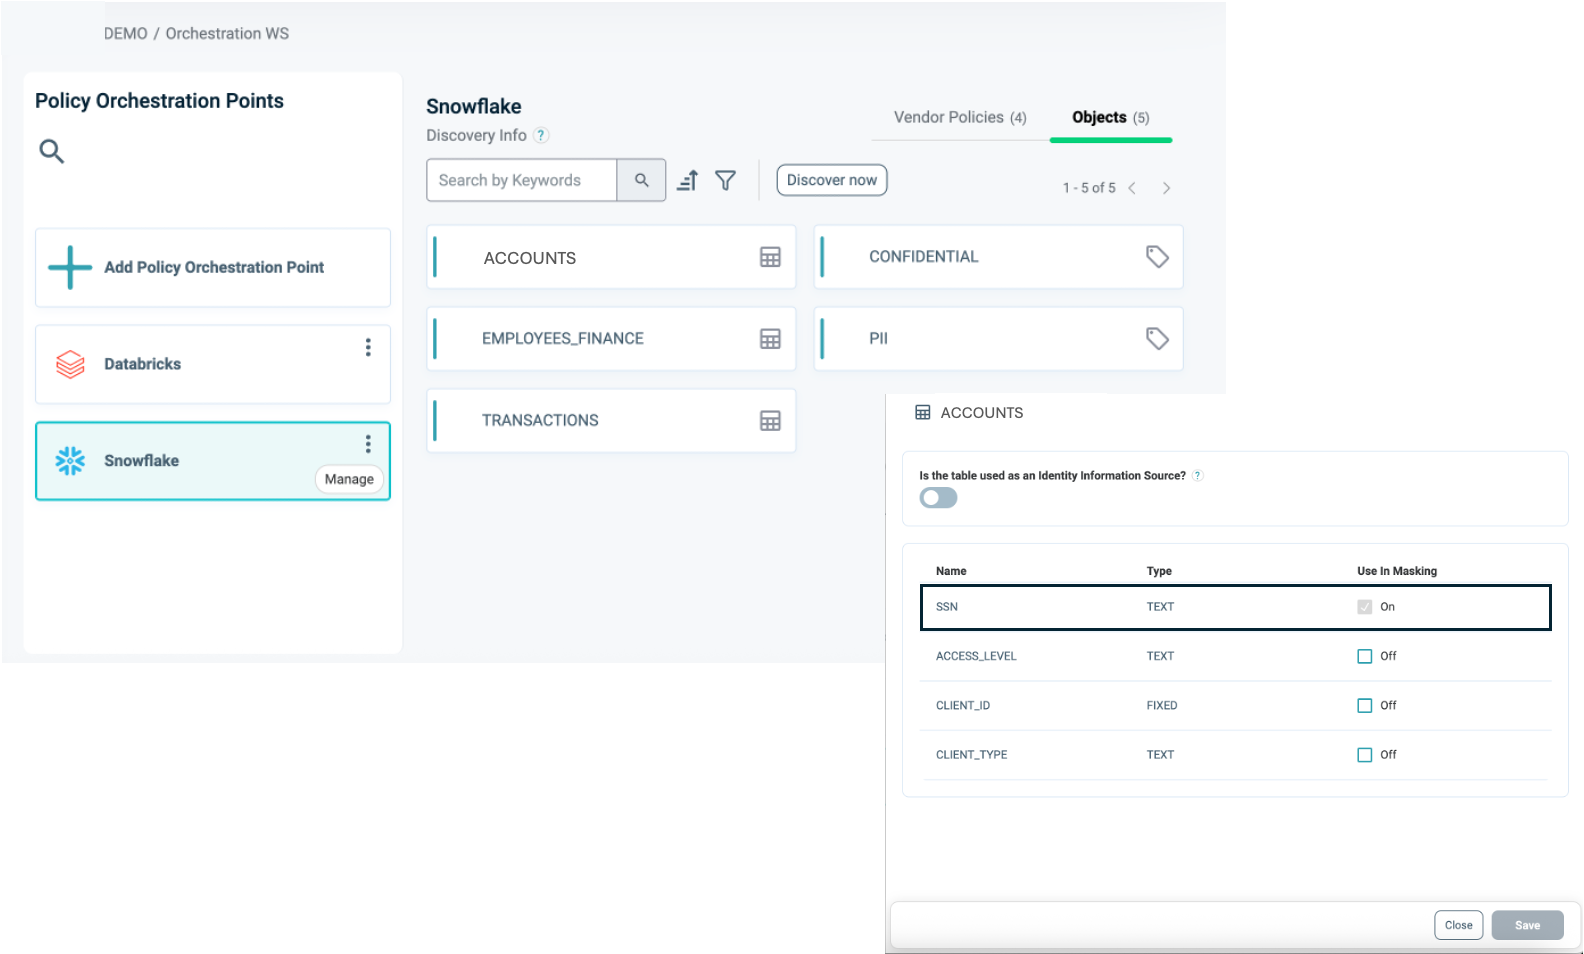
Before the columns you want to mask appear as Assets, you need to identify the Table that contains them:
To identify the Table and expose its columns for masking:
- In the Integration workspace, locate the Table that contains the column you want to mask.
- Mark the checkbox that flags the column, or the Table, for use in masking.
- Return to the Authorization workspace.
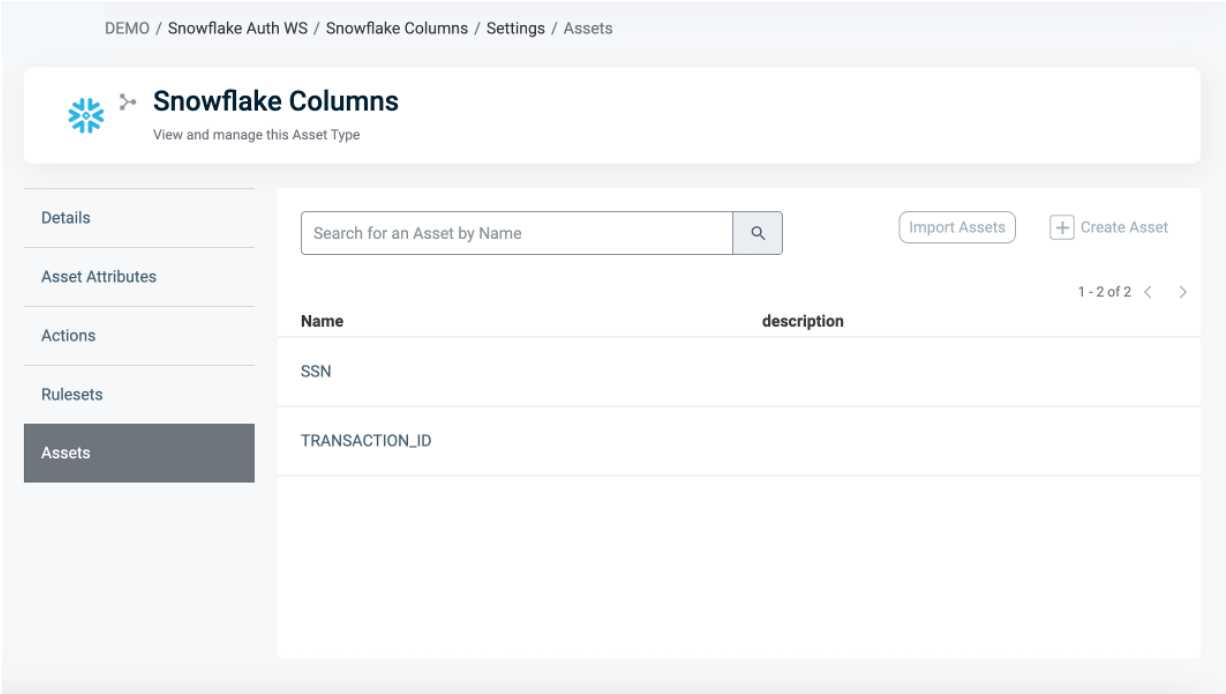
- Under the same Snowflake Columns Asset Type (automatically created), go to Assets. The columns you marked in the Integration workspace now appear here.
Column Assets
The Discovery process generates these columns automatically from the Masking Policy, or you can create them yourself. For more information on how to create new Assets, see Column Asset Types Prerequisites above.
To use Column Assets within a Masking Policy, you must first correctly define the Signature Asset Type's Table Mapping. Refer to Signature Asset Type Prerequisites above for more information.
Linking Both Asset Types to the Application
To use an Asset Type in a Policy:
- Once you create the Asset Type, open the Snowflake Application in your Integrations Workspace.
- Navigate to the Asset Types tab.
- Click Edit.
- Select the relevant Asset Types (both the Signature Asset Type and the Snowflake Columns Asset Type) you want to associate with the Snowflake Application.
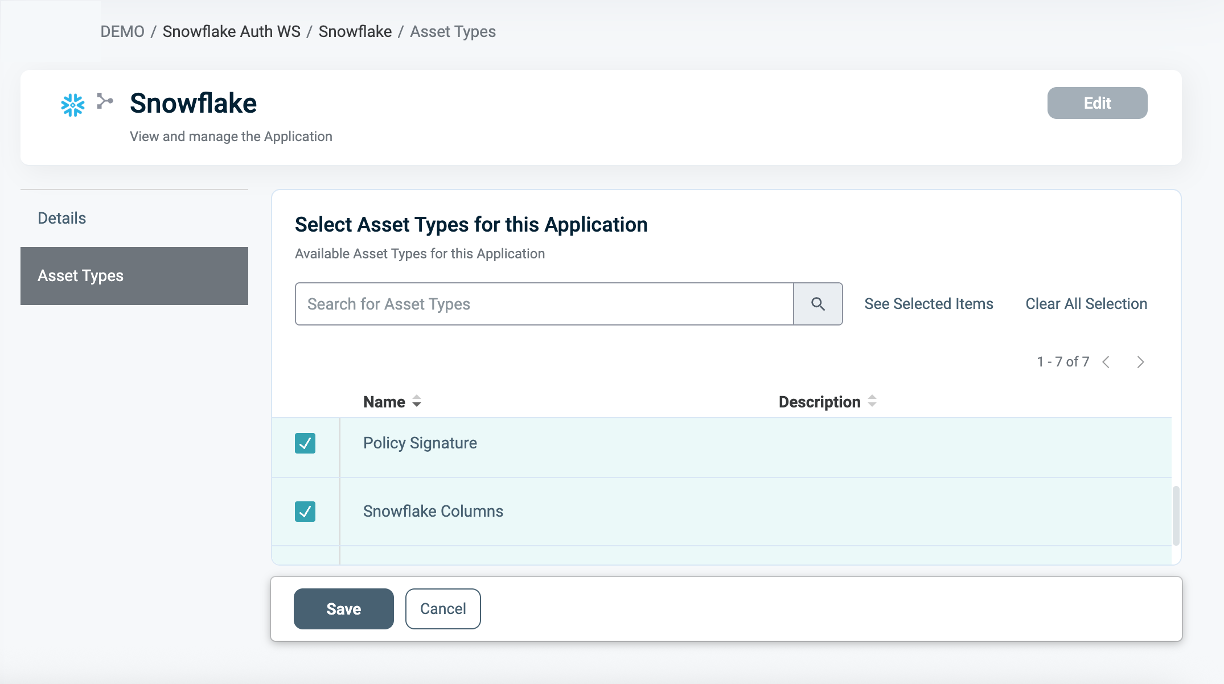
Defining Your Masking Actions
Before you build the Policy, define how masked data should actually look. In the Snowflake Columns / Tags Asset Types, the Actions tab defines how data is masked when a Policy is enforced. The Policy applies masking instructions to the selected Assets.
You can define masking Actions in two ways:
- General masking Actions, specify the masking value directly in PlainID.
- Vendor function masking Actions, call an existing vendor-native masking function (for example, a Snowflake function).
Masking Action Fields
The following fields are used when defining masking Actions:
| Field | Description |
|---|---|
| Action ID | The display name of the masking Action |
| Value | The masking value or expression the Policy returns (for example, 'MASKED' or a vendor function expression) |
| Type | The returned masked value data type. This must match the RETURNS type declared in the Snowflake Masking Policy (for example, VARCHAR, NUMBER) |
General Masking Actions
Masking Actions define the masking logic directly within PlainID.
You can either:
- Use a default masking instruction (for example,
Default for Varchar,Default for NUMBER), or - Create a custom masking instruction
Example
| Field | Value |
|---|---|
| Action ID | Mask String |
| Value | 'MASKED' |
| Type | FUNCTION_VARCHAR or FUNCTION_NUMERIC |
This configuration causes the Masking Policy to return the specified value when masking applies.
Action Type (Function-Based Masking)
When using vendor functions, set the Type field to one of the following:
Function_Varchar, use when the function returns a VARCHAR valueFunction_Numeric, use when the function returns a numeric value
Once you define the masking Action, you can use it in Policies to enforce Column-level masking.
Note: When using function-based masking Actions for Columns, ensure the function return type matches the protected column's data type.
Using Vendor Functions as Masking Actions
PlainID also supports referencing vendor-native masking functions directly in masking Actions.
This capability lets you reuse existing masking logic defined in the data platform without requiring PlainID to discover or manage the function as an object.
This is useful when:
- Masking logic already exists in the vendor platform
- The masking logic requires complex expressions or reusable functions
- Masking behavior depends on tags or metadata
To define a vendor function masking Action
- Open your Policies Workspace (formerly Authorization Workspace)
- Select the relevant Application
- Click Asset Types
- Hover over the relevant Columns (Asset Types) and click Manage.
- Click Actions
- Create a new Action
Example
PRODUCT_DB.SCHEMA1.STR_MASK_FUNC(
  FIXED_FIRST_ARG,
  SYSTEM$GET_TAG_ON_CURRENT_COLUMN('PRODUCT_DB.SCHEMA1.STR_MASK_FUNC')
)
In this example, the Masking Policy calls the vendor function STR_MASK_FUNC and passes the required arguments to apply the masking logic.
Creating a Snowflake Masking Policy
With your Asset Types and Actions ready, you can now build the Policy itself.
Ensure that your Snowflake Application in Integration is switched to Manage mode to start building your Masking Policy in the Policy catalog section. See Managing POPs for more information on how to change the POP Mode.
Masking Policies in PlainID can be created using the following methods:
- Wizard
- Code
- Native
For more information, refer to Creating Policies.
To create a Masking Policy with the Policy Wizard:
-
Input the Policy Details. For more information, refer to the Creating Policies article
-
Select Use Policy For SaaS Applications and select the Snowflake application.
-
Input the Snowflake POP Details specific to the vendor Policy:
- Under the Vendor Policy Kind dropdown, select Masking Policy. (Required)
- Enter a Vendor Policy Name, a unique name for the Policy that will appear in the Snowflake vendor. (Required)
- Note: You can use the same name across multiple PlainID Policies to define multiple logic statements within a single Snowflake Masking Policy.
- Under Vendor Policy ID, note that PlainID generates the ID automatically. It is the ID used in Policy management operations like deploy, update, and override.
- Define the Vendor Policy Order, which relates to the execution order for the logical case statement within the same Vendor Policy ID. (Required)
- The default value is 1. Use this field when enforcing multiple logic conditions for different Identity Groups within the same Policy.
- Enter a Comment, add any additional information or clarifications about your Policy. (Optional)
- Under Database, select the Snowflake database where the Policy will deploy.
- Under Schema, select the schema within the database where the Policy resides.
- Under Owner, provide the POP Snowflake role that manages the Policy.
-
Click Continue.
Who Section
In the Who section, you can assign Column-level access by creating a new Dynamic Group or selecting an existing one. A single Policy can evaluate multiple Dynamic Groups (OR relationship between them), giving you flexibility in defining access control logic. Select Dynamic Groups associated with Identity Attributes defined in your POP.
Dynamic Groups are defined using Snowflake identity functions such as CURRENT_USER(), CURRENT_ROLE(), IS_ROLE_IN_SESSION(), and CURRENT_SECONDARY_ROLES(). You can use multiple Identity functions within the same group to refine access. If you want to apply your Policy logic to all users, you can still connect the default "All Users" Dynamic Group.
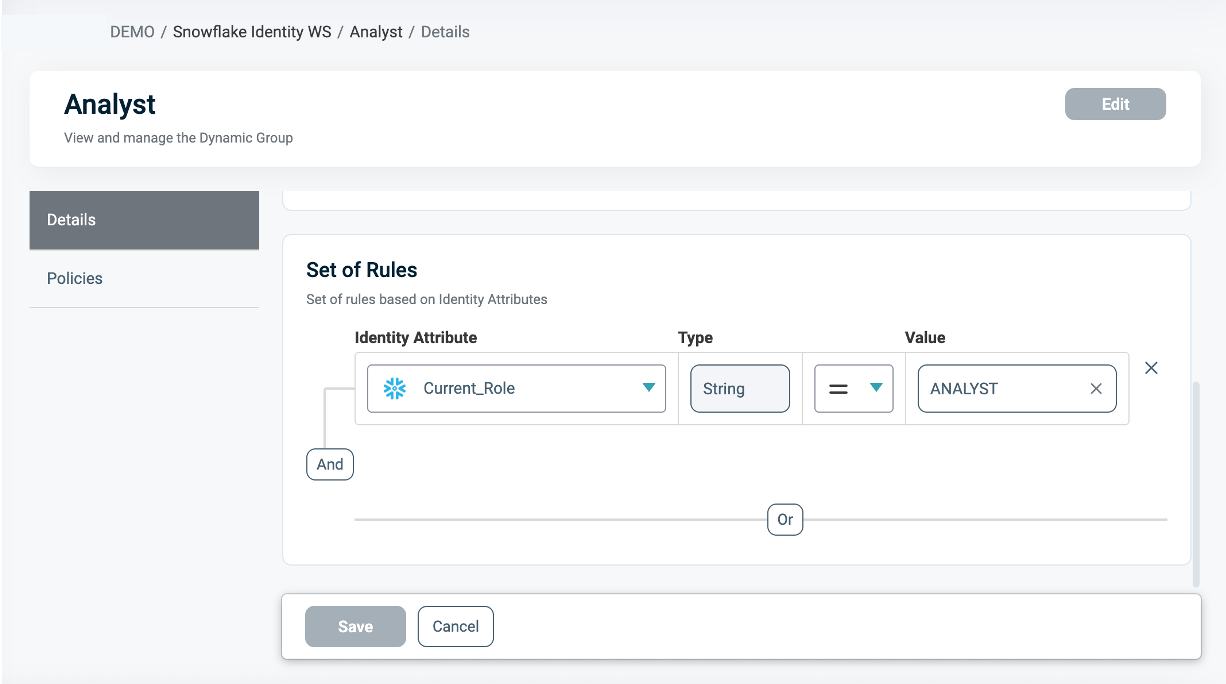
For additional information on how to create a Dynamic group, see Managing Dynamic Groups.
What Section
In the What section, you connect the two Asset Types you already set up above.
A Column-level Masking Policy always requires two Asset Types, connected together. The Policy does not work with only one:
- The Signature Asset Type, which represents the full masked value and requires the Table Mapping and Attribute Mapping steps described in Creating the Signature Asset Type above.
- The Snowflake Columns Asset Type, which PlainID creates automatically and which carries the Action that defines the masking instruction, described in Exposing the Columns You Want to Mask above.
To connect the Asset Types:
- Click Add Asset Type and select the Signature Asset Type you created earlier.
- From the dropdown, select the Signature Asset Type that represents the protected column where you want to apply masking logic.
- You can select only one Asset Type in a single Masking Policy.
- Select an existing Ruleset for your Policy logic or create a new one. A Policy can include a single Ruleset that supports OR and AND relationships, as well as advanced logic operators (
=,!=,>,IN,IS NULL,IS NOT NULL).
Note: Using other complex logic may transform the Policy to a Native Policy when switching to learn mode.- See Defining a Ruleset for Masking Policies to learn how to create a new Ruleset.
- Click Save.
- From the dropdown, select the Signature Asset Type that represents the protected column where you want to apply masking logic.
- Click Add Asset Type again and select the Snowflake Columns Asset Type.
- Select the Masking Action you defined above.
- Select the Asset column to apply masking to.
You can select only one Asset column from the same Table per Policy.
- Click Save.
Both Asset Types must be present and connected for the Policy to mask a column. If you only connect the Signature Asset Type or only the Snowflake Columns Asset Type, the Policy will not enforce masking.
Iceberg Tables are also supported as part of the Table and view Assets. Ensure that you have the correct permissions by referring to the Snowflake Setup article.
In case you want to address any of the following scenarios:
- You want to apply different masking rules to the same column for different user groups.
- You want to protect multiple columns across different Tables within a single Policy logic.
Use the same Vendor Policy ID across multiple PlainID Masking Policies on the same Signature Asset Type.
Within that shared Asset Type, each Ruleset may use different Asset Attributes as needed for its specific logic.
Defining a Ruleset for Masking Policies
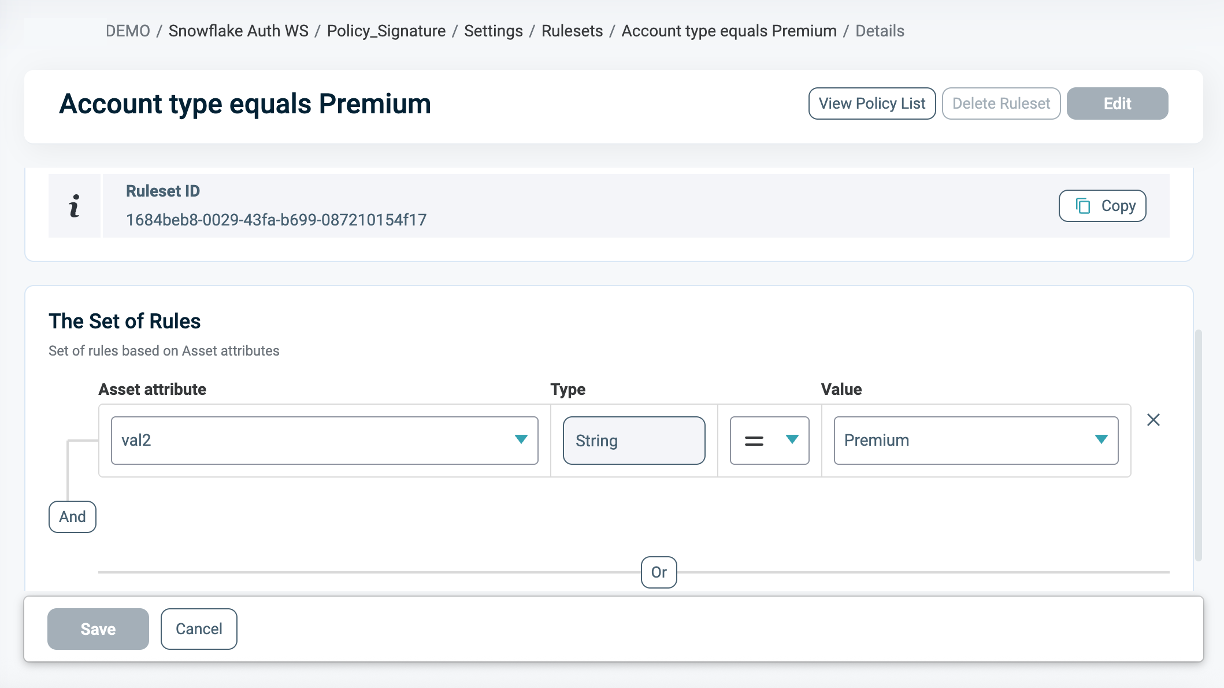
- In the Asset Type, within the Ruleset tab, define the masking logic using the Asset Attributes you created (for example,
Account_Level = 'Premium').
You can use Snowflake Tables as an external Identity Source for contextual or dynamic rules (for example, Department = user.department). See our documentation on Managing Identity Source Tables for more information.
- Use PlainID's logic to combine operators (
=,!=,>,IN,IS NULL,IS NOT NULL) with complex AND/OR relationships.
Note: Using other complex logic may transform the Policy to a Native Policy when switching to learn mode.
When Section
In the When section, you define the Conditions that provide contextual Identity data for your Policy, which determine when the Policy applies.
- Select an existing Condition or create a new one.
- A Policy can include multiple Conditions (AND relationship between them), meaning the user must meet all Conditions to gain access in the Policy. Ensure that you select Conditions from Identity Attributes linked to the POP's Identity Source.
- See Managing Conditions to learn how to create a new Identity Attribute Condition.
- Ensure that the Condition meets the requirements below.
- Click Save.
Defining a Condition for Masking Policies
- PlainID supports only Conditions based on Identity Attributes for use in Masking Policies.
- Ensure that an Identity Source Table is defined within your Policy Orchestration Point (POP).
- Use an Identity Attribute that is mapped to one of the additional Identity Sources associated with the selected POP. For more details, refer to our documentation on Managing Identity Source Tables.
- Within a single Condition, you can only use Attributes from one Source.
Deploying the Policy
Once you complete the Policy, navigate to the Integrations Workspace (formerly Orchestration Workspace) and deploy the Policy to Snowflake.
Snowflake enforces the access decision based on the masking logic you defined in the PlainID platform.
Column-Based Masking Policy Deployment:
Conditional (Row-Level) Masking Within a Column
Beyond masking an entire column, you can mask specific rows, or cells, within a column based on the value of another column. For example, you can mask the first_name column only for rows where the group column matches a certain value, effectively masking at the cell level rather than the whole column.
To configure conditional masking:
- Go to the Signature Asset Type you already created for the column you want to mask (for example,
first_name). - Create a new Asset Attribute that represents the column that drives the condition (for example,
group). - Add an additional Data Column Mapping for this Attribute, mapping it to the physical column that holds the condition value (for example, the
groupcolumn in the same Table). - Create a Ruleset that defines the condition logic using this Attribute (for example,
group = 'Restricted'). - Connect the Ruleset to the Policy so that the masking Action applies only to rows that match the Ruleset's logic.
This way, the same Signature Asset Type can hold both the Attribute you want to mask and the Attribute that determines when to mask it, and the Ruleset ties the two together at the row level.
Snowflake Masking Policy SQL Structure
This table explains the components of a Snowflake Masking Policy in SQL and compares them to their equivalents in PlainID, helping you translate and build your Policies easily within the PlainID platform.
Policy Syntax Table
| Snowflake terminology | Snowflake Syntax | Description | PlainID terminology |
|---|---|---|---|
| Policy Declaration | CREATE OR REPLACE MASKING POLICY <policy_name> |
Defines the Policy name and type (Masking Policy). Used to declare or replace an existing Masking Policy. | Vendor Policy Name, Vendor Policy Kind |
| Policy Signature | AS (VAL1 VARCHAR, VAL2 NUMBER..) RETURNS VARCHAR |
Declares the Policy's input arguments and return type. Arguments are used in the Policy masking logic. The return type of the Masking Policy must match the data type of its first argument. The first argument is the masked value. | Policy Signature mapped to Asset Type. Each argument the Policy uses within its logic becomes an Asset Attribute. |
| Policy Logic | WHEN... |
Incorporates Snowflake identity functions: CURRENT_ROLE(), CURRENT_USER(), IS_ROLE_IN_SESSION(), CURRENT_SECONDARY_ROLES() to determine who should receive access in a given context. |
Dynamic Group |
CASE... |
Use SQL expressions such as CASE statements to define the masking logic. | Policy logic uses the Policy arguments mapped into Rulesets, which can be dynamic (based on external identity data) or static (using fixed values). | |
EXISTS (SELECT... FROM... WHERE...) |
Use SQL subqueries with EXISTS SELECT for dynamic, context-based filtering. | Policy logic uses an external Table mapped into Conditions, where expressions typically compare Attributes to static values. Note that you must define a correlation using one of the Snowflake identity functions (e.g., CURRENT_ROLE(), CURRENT_USER(), IS_ROLE_IN_SESSION()). |
|
| Policy Output | THEN 'MASK' ELSE VAL1 |
Defines the instructions used for masking data. Based on the Policy logic, the output can be the original column value, or a partially masked or fully masked version. The masking instructions apply to the first argument. | Action in the Snowflake Columns Asset Type. |
| Policy Application | Apply to a column: ALTER TABLE <table> MODIFY COLUMN <column> SET MASKING POLICY <policy> USING (<args>); |
Applies the Masking Policy to a specific column. You can reuse the same Policy across multiple columns and Tables for consistent masking behavior. | You define the Column-based masking in the Signature Asset Type Data Settings. The first column is the masked value, mapped as an Asset in the Columns Asset Type. |
Masking Policy Example
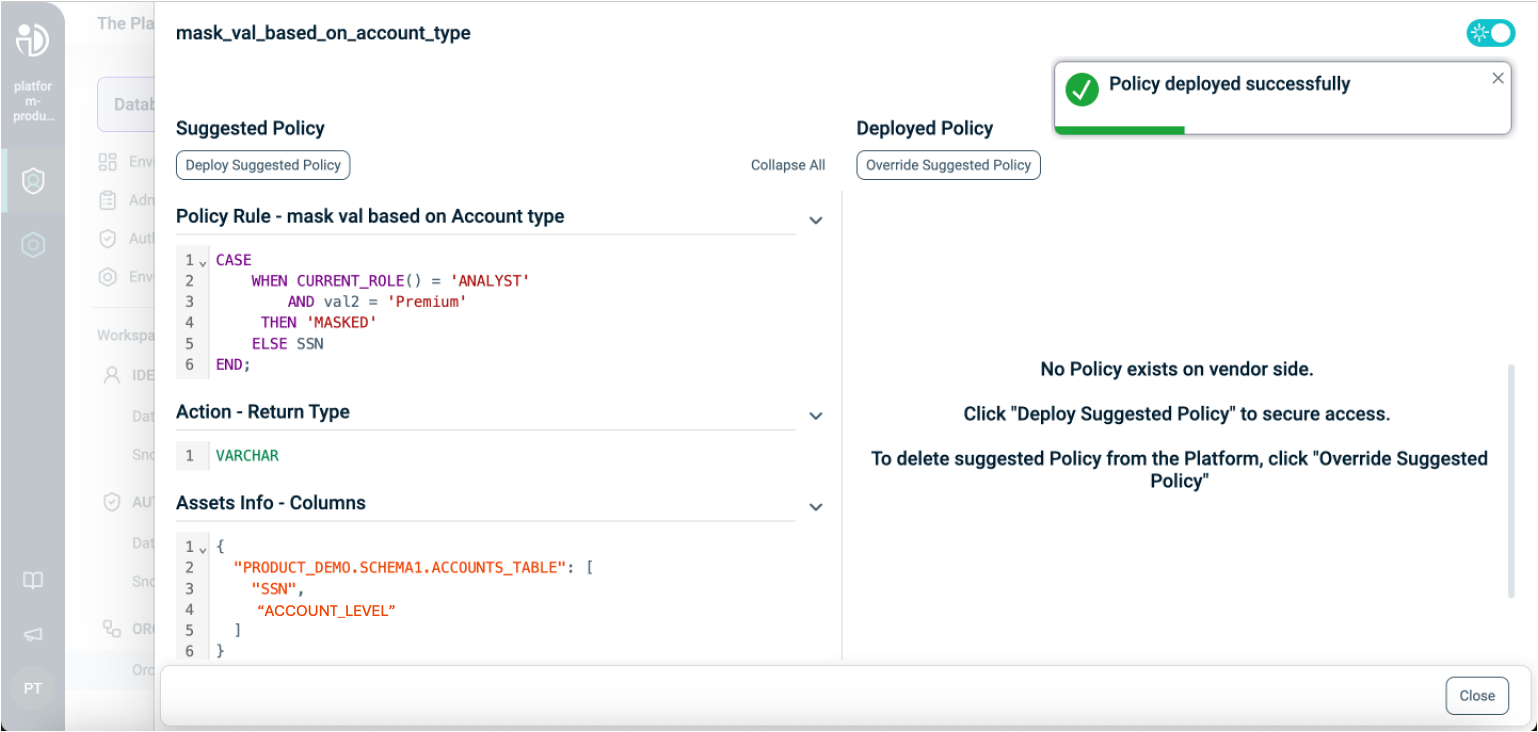
The following example demonstrates a Masking Policy that returns a 'MASKED' value for the Analyst role when the account_level is 'Premium'.
CREATE OR REPLACE MASKING POLICY MaskSSNForAnalystsOnPremium
AS (val STRING, val2 STRING)
RETURNS STRING ->
CASE
  WHEN CURRENT_ROLE() = 'ANALYST' AND val2 = 'Premium'
  THEN 'MASKED'
  ELSE val
END;

ALTER TABLE Accounts_table
MODIFY COLUMN SSN
SET MASKING POLICY MaskSSNForAnalystsOnPremium
USING (SSN, Account_Level);
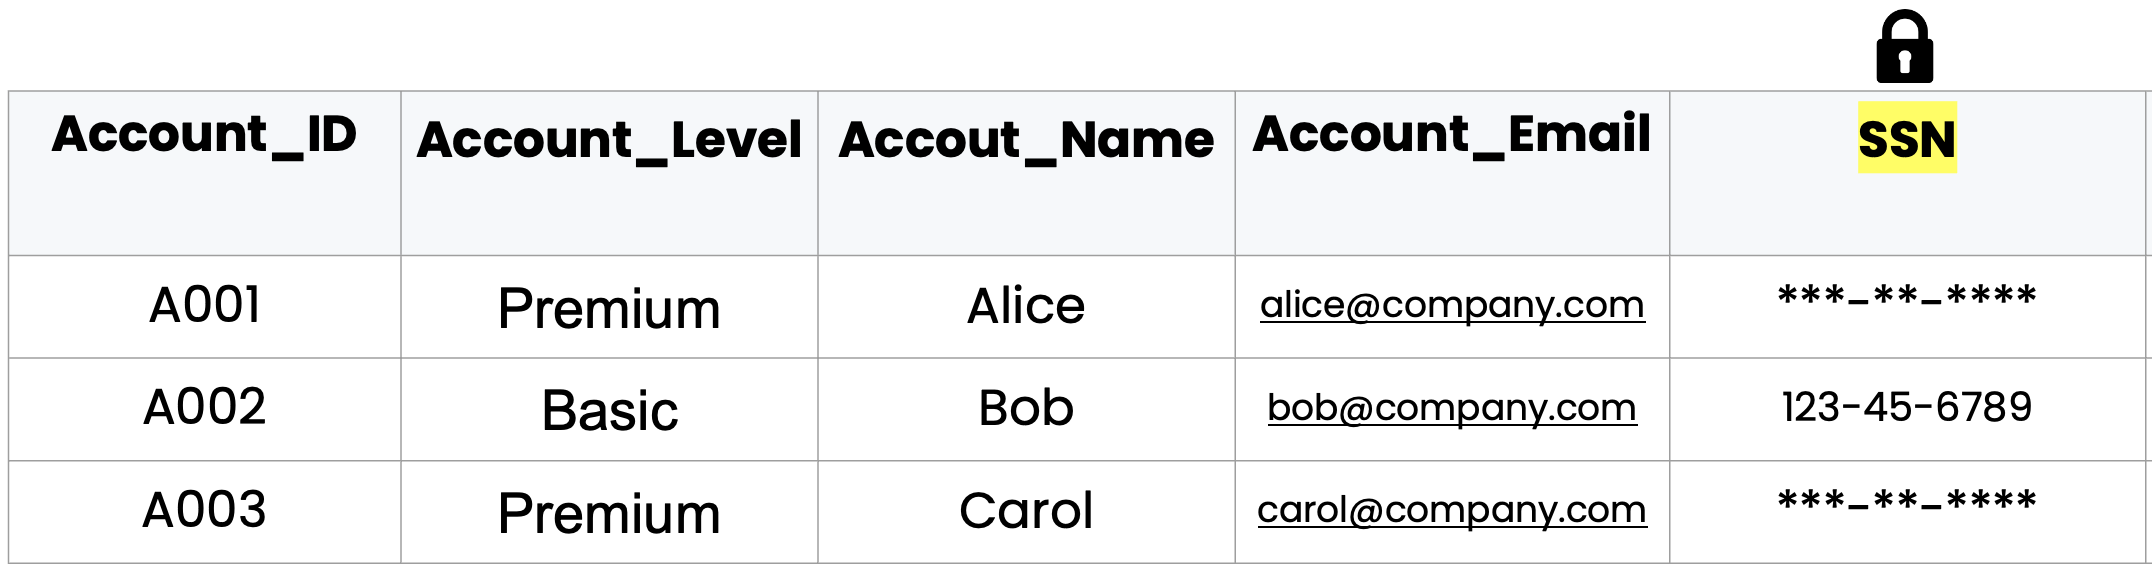
For the current role Analyst, the Policy masks SSN values only for the Premium account level.