The Policy Wizard is an easy, visual way to create Policies in the Platform. Before creating a new Policy, you must have created at least one Asset Type with at least one Application connected to it. Some objects (like Dynamic Groups and Conditions), can be created while creating a new Policy.
During the Policy creation process, you need to specify whether this new Policy is used for Dynamic Authorization Services or for SaaS Policy Management. Once a Policy has been created, it is listed in the Policy Catalog and can be viewed as code, visually in the Policy Map, exported, edited, and/or deleted.
How to Create Policies
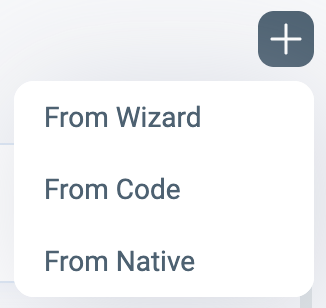
In the Policies Workspace (formerly Authorization Workspace), you can choose to create a Policy by selecting one of the options after clicking the Plus Button ![]()
- From Wizard to start creating a Policy using the Policy Wizard. Refer to our guide in the Policy Wizard for more information.
- From Code to import or insert a file containing the Policy Code. For more information, refer to Policies in Rego.
- From Native to paste Policy Code in the vendor language. For more information, refer to Native Policies.
Policy Wizard
To create a Policy with the Policy Wizard:
- Choose an Policies Workspace from the Environment side-panel.
- In the Policies tab, click the + icon.
- Select From Policy Wizard. The New Policy Wizard is displayed.
- In the Fill in Policy Details screen, enter a Name for the Policy (required).
- In the Generate Policy ID section, select whether you want to input a Custom ID or an Auto Generated ID (one that the Platform creates). The Policy ID must be unique per Environment. It is used as the leading ID in the CRUD API for Policy Management (for more information, see Policy Management APIs).
- If you selected Custom ID, the Policy ID field appears as an editable field. Enter the new Policy ID in the field. The maximum number of characters for this field is 128.
- If you selected Auto Generated ID, a GUID is automatically set as the Policy ID.
Once the Policy is saved, the Policy ID can no longer be changed.
-
Enter a Description for the new Policy (Optional).
-
- Select the Access Type. Options are Allow or Restrict.
- Allow grants access rights to the Identity, if all other aspects of the Policy settings match.
- Restrict denies access based on the Policy settings.
-
Select whether you're using the Policy for the Dynamic Authorization Service or SaaS Applications.
-
Select the Application/s to connect to this Policy.
-
Click Continue to advance to the Who Step.
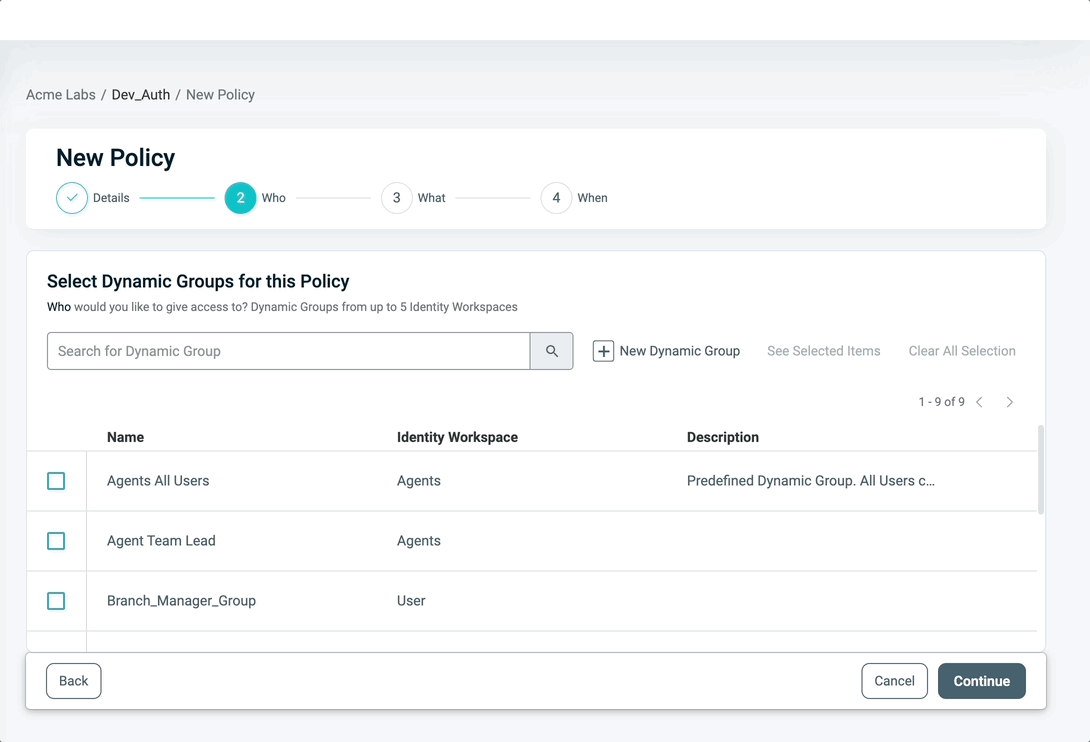
Who Step
The Wizard advances to the WHO step, in which you select the Dynamic Groups which will be given access (or denied access) for this Policy.
- In the Select Dynamic Groups for this Policy screen Select one or more Dynamic Groups to which you have Admin Permissions or Create a new Dynamic Group by clicking New Dynamic Group.
For more information, see Creating a Dynamic Group in the Policy Wizard.
- Click Continue.
What Step
The Wizard advances to the WHAT step where you can select which Assets Types you wish to associate with this Policy.
To add Assets to the Policy:
- Select an Asset Type from the drop-down. The list of Asset Types depends on which Application you chose to connect to the Policy.
- Click on Select Rulesets. A side panel opens where you are required to select at least one Ruleset to use in relation to the selected Asset Type and Action/s. You can also create a Ruleset from this panel.
- After selecting your Ruleset/s, click Manage Rulesets to open the Ruleset side panel if required.
- Select the Assets to use in this Policy
- To add another Action-Ruleset/Asset combination to the Policy, click Add Combination. Note: This button is disabled if no Actions or only one Action is associated with the Asset Type.
- To remove a combination, click on Remove Combination
- Click Save. If you wish to add another Asset Type, click Add Asset Type and go over the points in Step 1.
- Click Continue.
When Step
The wizard advances to the WHEN Step where you can select which Conditions you wish to associate with this Policy.
To create a condition:
- Select the checkbox next to existing Conditions or click the + New Condition. A side panel opens.
- Fill in the Connection details section according to the relevant Condition.
- Click Save.
- Ensure that the relevant Condition is selected in the list of Conditions.
Conditions can also be predefined in the Assets and Conditions section of the Policies Workspace.
- Ensure that the relevant Condition is selected in the list of Conditions.
- Click Done. The Policy is created and the Policy Map for the new Policy opens.
To manage existing Policies (edit, delete, or add Asset Types), see Managing Policies.
By default, all new Policies have a Policy State of Active. This means that they are considered when calculating the authorization decision. For more information, see Managing Policies.
Creating a New Dynamic Group in the Policy Wizard
While creating a new Policy, you may discover that you need to create a new Dynamic Group to help define the Policy. You do not need to exit the Wizard to accomplish this.
After entering the new Policy Name, Description and Access Type, you click Continue, select the relevant Dynamic Group. If you don't see the Dynamic Group, you have the option of creating a new Dynamic Group from within the Wizard.
To create a new Dynamic Group in the Policy Wizard:
- Click New Dynamic Group. The New Dynamic Group side panel opens.
- In the Workspace Name field, select the Workspace in which you want the Dynamic Group created.
- In the Fill in the Dynamic Group Details section, enter the Name and the Description (optional).
- In the Define Dynamic Group Rules, define a set of Rules based on existing Identity Attributes by selecting an Attribute, selecting an Operator, and providing a Value. As needed, use the And and/or OR options to add additional Rules.
- Click Save. The Dynamic Group is created in the specified Identities Workspace (formerly Identity Workspace) and added to the list of available Dynamic Groups to be used in the Policy.
- Click Continue and begin selecting Assets for the new Policy, as detailed above.
Policies in Structured Rego
Policies in structured Rego can be imported and copied into the Platform to promote Policies between Environments. This can be done in the Policies Workspace or using the Import/Export Policy APIs. Only valid Policies can be successfully imported.
Note: A Policy that is Inactive in the source Environment will, by default, be Active when imported into a new Environment. Updating an existing Policy via import does not affect its current Policy State. To deactivate the Policy in the target Environment, see Managing Policies.
Prerequisites for Importing Policies
The following objects are required in the target Environment for successful import and proper Authorization calculation:
- Identity Templates with relevant Identity Attributes defined in the Identities Workspace Settings.
- Asset Templates with associated Asset Attributes and Actions defined in the Asset Type Settings.
Required for Policies to be considered in access decisions:
- Asset Types used in the Policy must be connected to an Application defined in the Policies Workspace.
- The relevant Application must be connected to a Scope defined in the Environment settings.
Without these connections, Policies can be imported successfully but will not factor into access decisions. Connections can be defined before or after import.
Creating a New Policy In Rego
To import Policy code in Rego:
- Select the relevant Policies Workspace.
- Ensure the Policies section is open.
- Click on the Plus button

- Click From Code to open the Create Policy from Code screen.
- Import a
.regofile by:- Pasting the Rego code in the input field.
- Dragging and dropping the file into the input field.
- Clicking Import File on the bottom of the page to upload a file.
You can also import or drag and drop a JSON file containing Rego code.
- Optionally, Download Sample File to guide you on Policy creation.
- After importing, review and edit any errors highlighted in the wizard.
- Click Validate to check the code.
- Click Create Policy to finalize the new Policy.
Native Policies
Importing Native Policies allows you to create and manage Policies directly in a POP vendor’s native language instead of Rego. This is particularly useful for SaaS applications that support native Policy definitions, enabling you to bring existing logic into the Platform without translation. See Snowflake or Databricks Native Policy Support articles for a guide on Policy, tag, table, and column function parameters.
PlainID strongly recommends implementing Policies with tags, table, and column mapping.
Creating a New Native Policy
To create a new Native Policy:
- In the Policies Workspace Policy screen, click the Plus (+) button.
- Select From Native. A new Native Policy screen opens.
- Enter a Label for the Policy.
- In the Generate Policy ID section, enter a POP ID.
The Policy ID must be unique per Environment and is used as the primary identifier in the Policy Management APIs. - Enter a Description for the Policy (optional).
- Select the Application that supports native Policies.
- Provide the POP connection details. For more information, see SaaS Management Vendors.
- In the code screen, paste the Native Policy code in the input field. Refer to Snowflake and Databricks documentation for more information on vendor languages.
File upload and validation for Native Policies is not available yet.
- Add tables, tags, and columns as needed per vendor language. More information on how to use them are available in the Snowflake or Databricks Native Policy Support articles.
- Row Access Policies – Define the Policy logic and specify the relevant tables.
- Masking Policies – Define the Policy logic and specify the tags or columns to be masked.
- Click Create to finalize the new Native Policy.
Check out the video below for an explanantion of the value of Native Policies and a detailed guide on creating Native Policies.