This article provides a complete, end-to-end guide for onboarding to the PlainID Platform and creating your first Policy.
By following this guide, you can:
- Define your Identity and agentic models.
- Connect your protected Assets to the platform.
- Author your first Policy.
- Integrate your application.
- Consume authorization decisions in your application.
After completing these steps, you will move from an empty workspace to a fully enforced access control flow. Your agentic application will no longer make access decisions internally. Instead, it delegates authorization to PlainID and consumes permission decisions securely and consistently.
This is the foundation for scalable, centralized, policy-driven access governance for agentic workflows.
Platform Overview
After logging in, the Environment landing page opens. This is your control plane for authorization.
An Environment represents an isolated governance boundary where Identities, applications, Agents, Policies, and protected Assets are defined and enforced together.
Below is a high-level overview of the main areas in the platform.
Visibility and Monitoring
Access Graph
The Access Graph provides operational visibility and an end-to-end representation of your authorization architecture. This is a view-only section. Access it by clicking on Access Graph in the Environment side navigation bar.
It shows how components are connected through access relationships and Policy enforcement. These components include:
- Identities.
- Applications.
- Agents.
- MCP servers.
- Data sources.
- Protected Assets.
Use this view to:
- Understand system topology.
- Investigate access paths.
- Analyze authorization relationships.
.png)
Administration Audit
The Administration Audit tracks configuration-level changes, such as:
- Policy updates.
- Template changes.
- Structural modifications.
This supports governance, traceability, and compliance requirements. See Administration Audit Report for more information.
Authorization Audit
The Authorization Audit captures Runtime authorization decisions. Each decision record includes:
- Who requested access
- What was requested
- Which Policy was evaluated
- The final decision, allow or deny
Use this report for real-time monitoring, investigation, and troubleshooting. See Authorization Audit Report for more information.
Modeling Workspaces
Within the Environment, the platform is organized into modeling domains:
- Identities: Who is requesting access.
- Agents: Execution entities performing actions.
- Policies: Authorization logic definitions.
- Protection: Guardrails and protected resources.
Each domain represents a building block in the authorization lifecycle. Through this guide, you'll learn how to configure these components.
Next, we'll go over the foundation of every authorization model: Onboarding Flows.
Available Onboarding Flows
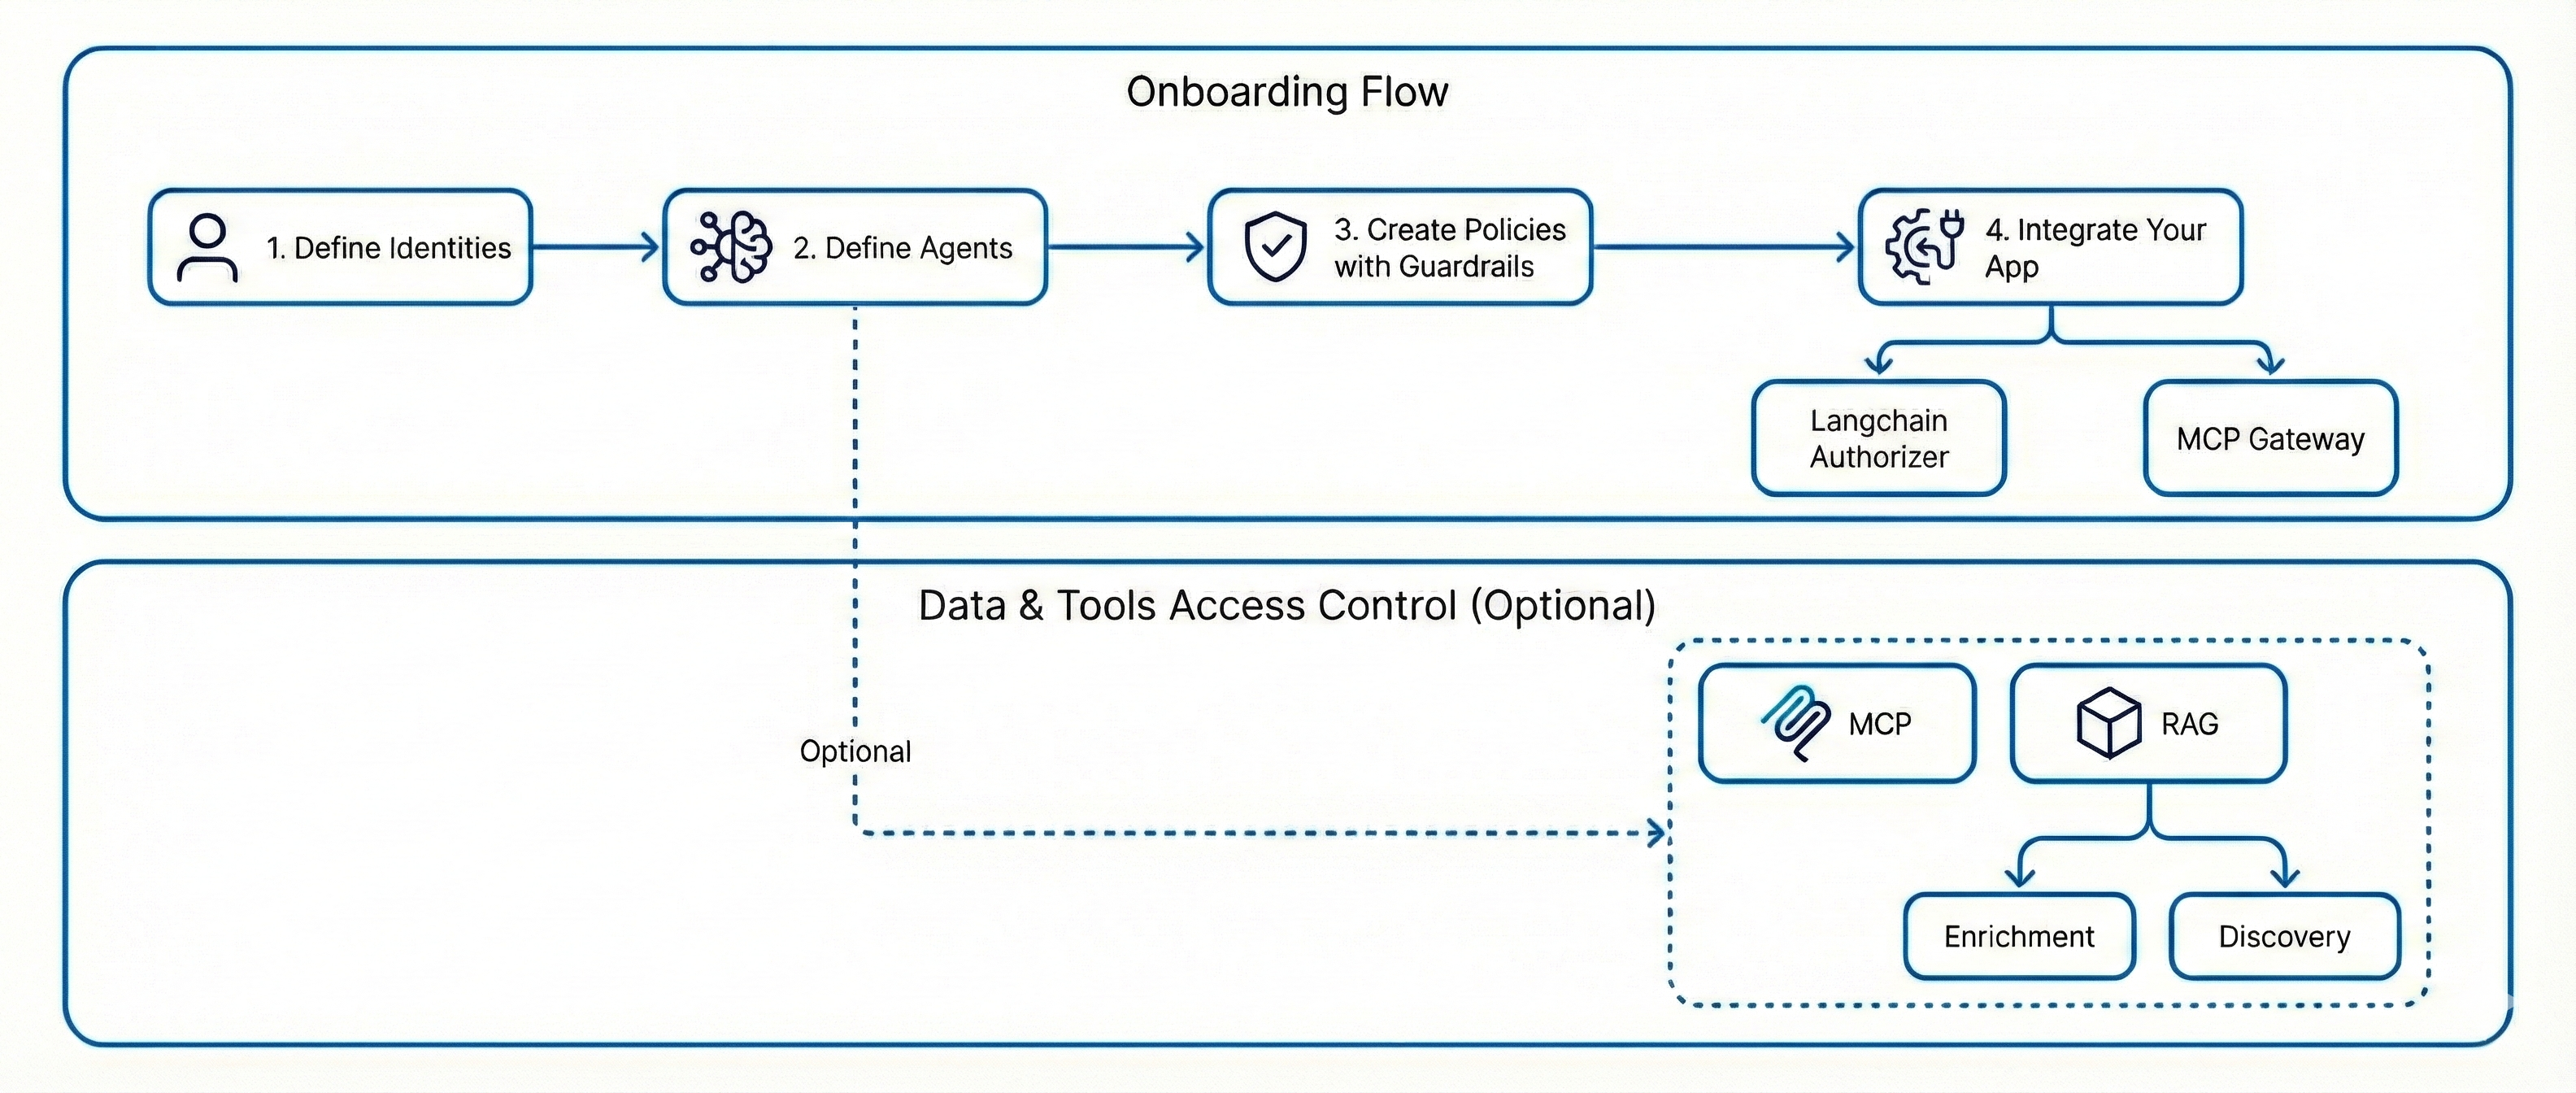
Foundation
Before enabling any protection layer, you must define the core Policy building blocks:
- Identities
- Agents
After this foundation is established, you can activate one or more enforcement layers from the following table:
| Protection Path | Edge Components Required | What It Enables | When to Choose This Path |
|---|---|---|---|
| Prompt and Output Control Only | None | • Prompt guardrails for input control • Output guardrails for response control • Enforcement at the integration layer, such as MCP Gateway or LangChain Authorizer |
• You require LLM level governance only • You are not protecting tools or data layers • You want the fastest time to value |
| MCP Protection, Tool Layer | • MCP Gateway • Discovery Service |
• Tool level authorization • Least privileged control over MCP tools • Runtime enforcement before execution |
• You need to control tool invocation • You require enforcement before tool execution |
| RAG Protection, Discovery Only | Discovery Service | • Discovery of indexes and metadata filters • Policy based governance using existing metadata • Structured, filter-based access control |
• Your vector database contains rich metadata • You do not require document enrichment • You want lightweight governance over retrieval |
| RAG Protection, Discovery and Enrichment | • Discovery Service • Enricher • Classifier |
• Metadata discovery • Machine learning based document classification • Attribute enrichment from vector embeddings • Creation of Policy ready building blocks |
• Existing metadata is insufficient for authorization • You require semantic classification • You need advanced RAG governance |
| Combined Protection, MCP and RAG | • MCP Gateway • Discovery Service • Enricher • Classifier |
• Tool authorization through MCP • Data retrieval authorization for RAG • Enrichment driven Policy modeling • Centralized governance across the agentic workflow |
• You need comprehensive protection across tools and data layers • You want centralized governance across the entire workflow |
This modular architecture supports phased adoption.
Identity Configuration
Identities
Every Agentic Workflow starts with the Who.
Identities represent the actors in your system, users or services that request access to protected Assets.
In the PlainID Authorization Platform, Identities are governed through:
- Identity Templates: Define the structure and Identity Attributes.
- Dynamic Groups: Automatically group Identities based on Attribute Conditions.
- Policies: Enforce access decisions using identities and groups.
In this guide, use the default Identity Template already available in your Environment to create your first Attribute-driven group.
To begin, start by opening the Identities Workspace (formerly Identity Workspace) Settings. Click on the gear that appears after you hover over an Identity.
.png)
Identities Workspace Settings
From this page, you can:
- Manage Identity Attributes. These Attributes enable you to categorize Identities based on their organizational role.
- Edit the Identity Template.
- Create and manage Dynamic Groups.
Ensure that you create an Identity Attribute and Dynamic Group before you create your protected Assets. Refer to the links above for more information.
Protecting Assets
After defining Identities, connect the resources you want to protect.
Protected Assets are architectural layers that perform actions or store data where Authorization must be enforced.
PlainID supports governance over:
- Data Layer: Vector databases such as Pinecone.
- Tools Layer: MCP-based tool servers.
To enable governance over your Assets:
- Create an Integration Point.
- Deploy the PlainID Edge component.
- Run Discovery to onboard your Assets.
Creating an Integration Point
An Integration Point defines which architectural layer the Authorization Platform governs.
It establishes the logical connection between the platform and your protected infrastructure. The Integration Point defines the enforcement boundary managed by the Authorization Platform.
To create an Integration Point:
-
From the Environment navigation bar, next to Workspaces, click the + button.
-
Click Integrations and input a name.
-
In the Integrations Workspace, click Add Policy Orchestration Point.
-
Select the integration type:
MCPfor Tools Layer governance.Vector DBfor Data Layer governance.
(1).png)
-
Input:
- A Display Name
- POP ID
- Description (optional)
-
Select an Identities Workspace
-
Select an Policies Workspace (formerly Authorization Workspace)
- Each Policies Workspace defines a set of Scopes. Any Guardrail, RAG, or MCP created under that workspace automatically inherits those Scopes.
-
Configure your Connection Settings.
.png)
-
Click Create
.png)
Deploying PlainID Edge
The PlainID Edge component enables secure communication between:
- Your Tools Layer
- Your Data Layer
- PlainID Cloud
Edge runs inside your environment and performs:
- Asset discovery.
- Metadata enrichment.
- Policy-ready building block creation.
- Secure communication with PlainID Cloud.
Edge does not expose or transfer raw business data. Refer to the Deployment documentation for detailed instructions or contact PlainID support for more information.
Running Discovery
After deploying Edge and connecting it to your Integration Point, you can run Discovery.
During Discovery:
- Edge connects to the configured layer.
- Fetches available tools, servers, categories, or metadata filters.
- Structures them into authorization building blocks.
- Publishes them to PlainID Cloud.
When the process completes successfully, you can see:
- Discovered MCP servers and tools.
- Discovered vector indexes and metadata filters.
- Newly created Assets available for Policy authoring.
These Assets appear in the Policies workspace and in the Access Graph.
To run Discovery, run the following cURL sample:
curl --location --globoff '{{discovery-agent-url}}:{{discovery-agent-port}}/discovery' \
--header 'Content-Type: application/json' \
--data '{

    "popId": "Pinecone"
}'
You can find the popId under the relevant Policy Orchestration Point under the Integrations Workspace. If you do not have a Integrations Workspace, see Creating an Integration Point.
Policy Authoring
Authoring Your First Policy
With Identities defined and protected and Assets connected, define your Authorization logic.
Policies determine:
- Who can access.
- What Actions they can perform.
- Which Assets they can access.
- Under which Conditions access is granted.
Navigating to Your Policies
To navigate to your Policies
- From the Environment side navigation bar, under Policies, click on a Policies Workspace.
.png)
The Policy Catalog opens.
.png)
The Policy Catalog provides:
- A centralized list of all Policies in the Environment.
- Visibility into policy status and regulatory tags.
- Governance control over your authorization logic.
Creating a Policy
To create a Policy:
-
Click + Create Policy. Refer to the Policy Builder documentation for more information
-
While going through the Policy Wizard, define:
- The target application or Integration Point.
- Relevant Identities or Dynamic Groups.
- Protected Assets discovered by Edge.
-
Click Save.
Application Integration and Runtime Enforcement
Integrating Your Agentic Application
At this point, you should have:
- Modeled Identities.
- Connected protected Assets.
- Authored your first Policy.
The final step is to enforce these Policies at Runtime in your agentic application.
Your application must delegate authorization decisions to the PlainID Runtime.
The Platform supports two integration patterns:
- MCP Gateway
- Langchain Authorizer
MCP-Based Enforcement
PlainID MCP Gateway
Use the PlainID MCP Gateway if your architecture is MCP-based.
The gateway:
- It situated between your Agent and MCP servers.
- Intercepts tool calls.
- Evaluates Policies in real time.
- Allows or blocks execution based on authorization decisions.
Use this option when:
- Agents communicate via MCP.
- You want centralized tool-level enforcement.
- You prefer enforcement at the infrastructure boundary.
Refer to the MCP Gateway documentation for the full instructions.
In-Process Enforcement
PlainID LangChain Authorizer
If your Agent uses LangChain or a similar orchestration framework, integrate authorization using the PlainID LangChain Authorizer.
The Authorizer:
- Hooks into the Agent execution chain.
- Evaluates access before tool invocation or data retrieval.
- Enforces fine-grained authorization inside the application layer.
Use this option when:
- Building custom Agent workflows.
- Requiring in-process authorization checks.
- Needing tighter control over execution flow.
Refer to the LangChain Authorizer documentation for full instructions.
Credentials
To allow your agentic application to communicate securely with the Platform, authenticate using Client Credentials.
Both integration patterns require:
- Client ID.
- Client Secret.
Refer to our API Client Credentials documentation for more information.
Runtime Flow
At Runtime:
- Your application authenticates using the Client ID and Client Secret.
- Authorization requests are evaluated
- Decisions are returned according to active Policies.
You have completed the final step for secure Runtime enforcement.
Your integration is authenticated and ready to evaluate authorization decisions in real time. Your application no longer manages access logic internally. Instead, it delegates decisions to PlainID, enabling centralized, consistent, and policy-driven governance.
You have successfully moved from modeling Identities and connecting Assets to enforcing Policies at runtime. Your agentic application is now fully governed by the PlainID Authorization Platform.
PlainID supports modular adoption. You can begin with foundational controls and progressively extend enforcement to tools and data layers.