The Admin Portal is for Platform Administrators focused on installing and configuring the Platform in order to ensure a smooth deployment. The Admin Portal includes deployment instructions for different environments and configurations based on the needs of your organization.
The in-depth explanations and instructions detail the various features and settings available to complete the process, including:
Some key topics in the Admin Portal are:
- Installing and Deploying PAAs
- Configuring an IDP for the Tenant
- Hybrid Agent Key Settings
- Managing Environments
- Managing Policy Information Points (PIPs)
- Kubernetes Deployment
- Standalone Deployment
PAA
The Policy Authorization Agent (PAA) is a core component of PlainID’s distributed authorization architecture. It enables Policy decisions to be made as close as possible to the consuming application—whether in the Cloud, on-premises, or in hybrid environments.
By handling authorization logic locally, PAAs help:
- Improve performance and reduce latency
- Maintain data privacy by keeping sensitive information within the environment
- Support multi-environment configurations, such as Staging and Production
Each PAA contains one or more Runtime components—typically a Policy Decision Point (PDP) and optionally a Policy Information Point (PIP)—to evaluate access requests and retrieve relevant data.
This article covers the following:
PAA Architecture
PAAs are available for deployment in customer-hosted environments using the following supported methods:
- Kubernetes-based deployment (via standard Helm chart)
- Standalone Service
In each deployment, the PAA includes configuration for Runtime components and supports communication with applications, data sources, and the central Platform.
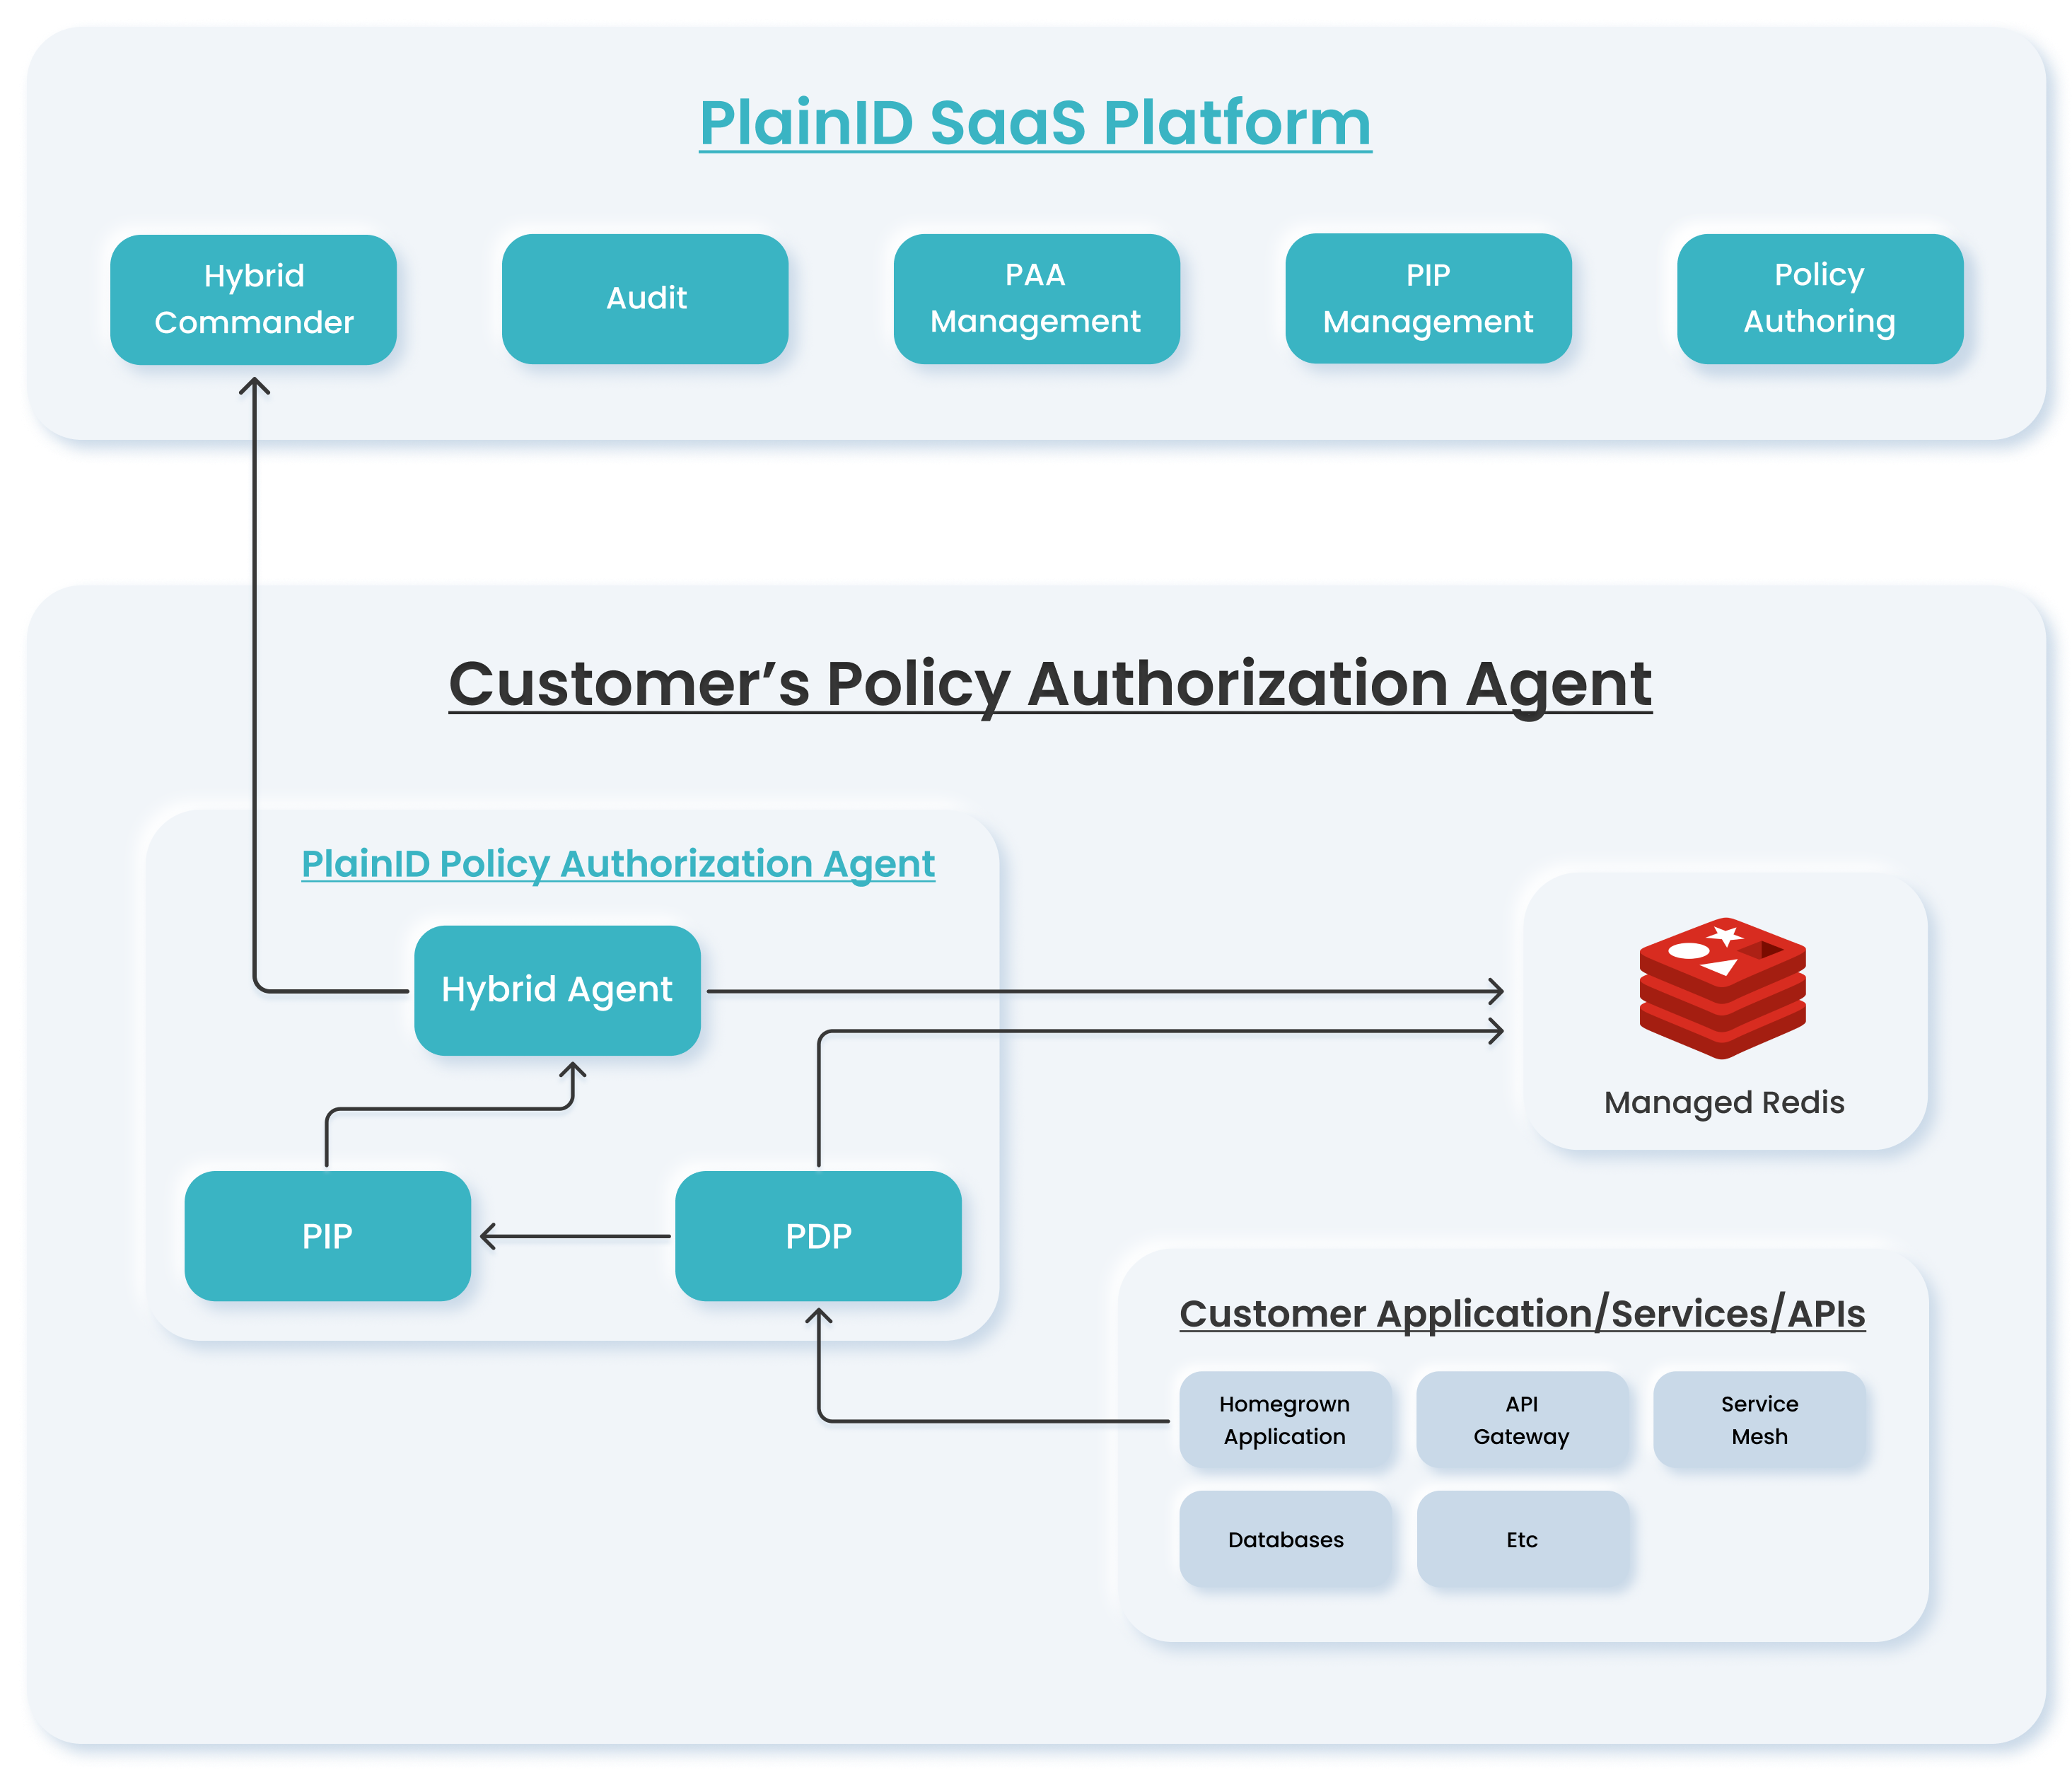
Common Flows
A typical authorization workflow using a PAA includes:
- The user creates and publishes Policies in the PlainID Platform.
- The PAA connects to the Platform and synchronizes the Policies and Authorization logic using Redis. No PII data is stored or transferred.
- At runtime, the application sends an authorization request to the local PDP.
- If Identity or contextual information is required, the PDP queries the local PIP.
- The PIP retrieves data from the local data source and returns it to the PDP.
- The PDP evaluates the request and returns a decision to the application.
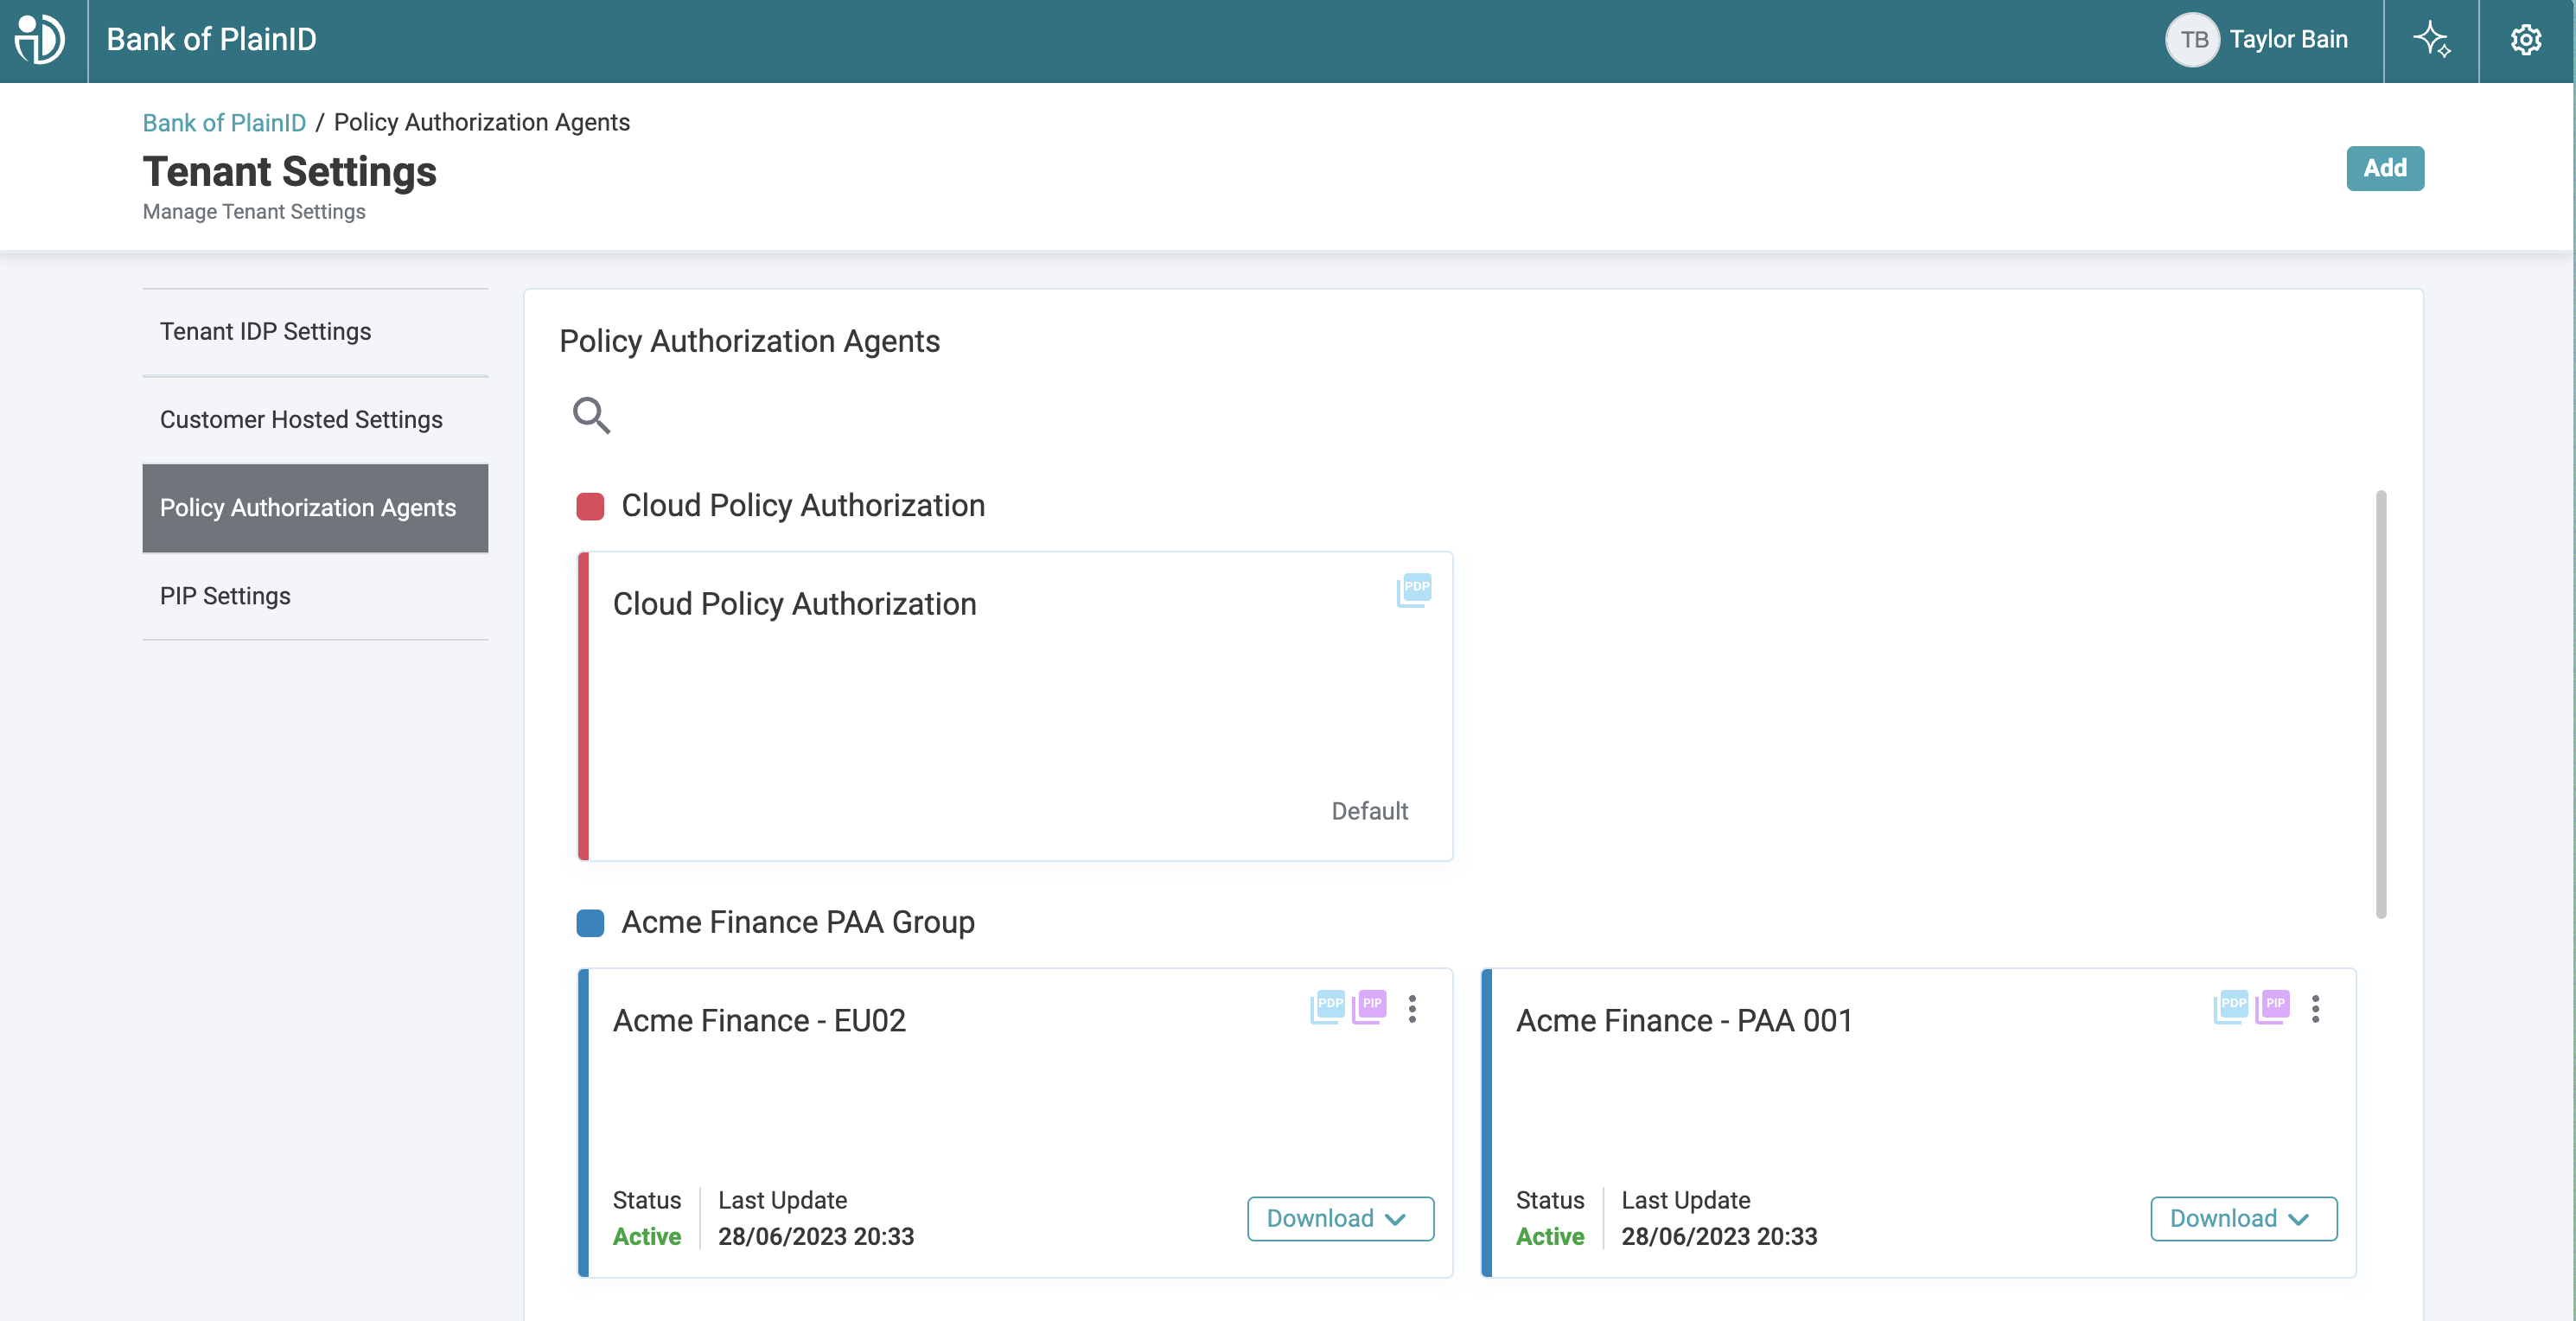
PAA Cards
Once a PAA is created, it is listed on the Policy Authorization Agent tab. Each configured PAA appears as a card, which provides a quick overview and access to key actions.
The first card displayed is the built-in cloud-based PAA, which includes a preconfigured PDP hosted entirely in the Cloud. Additional PAAs appear in alphabetical order. Each card provides:
-
PAA Name
-
PIP icon – visible when the PAA is connected to one or more PIPs
-
PDP icon – displayed when a PDP is connected to the PAA
-
Download button – provides access to installation bundles (Helm or Standalone)
-
Health status and last update time
- If a PAA is created but not yet deployed, the status displays N/A and Not Connected.
- The health status reflects mandatory Agent services only (optional services are tracked separately).

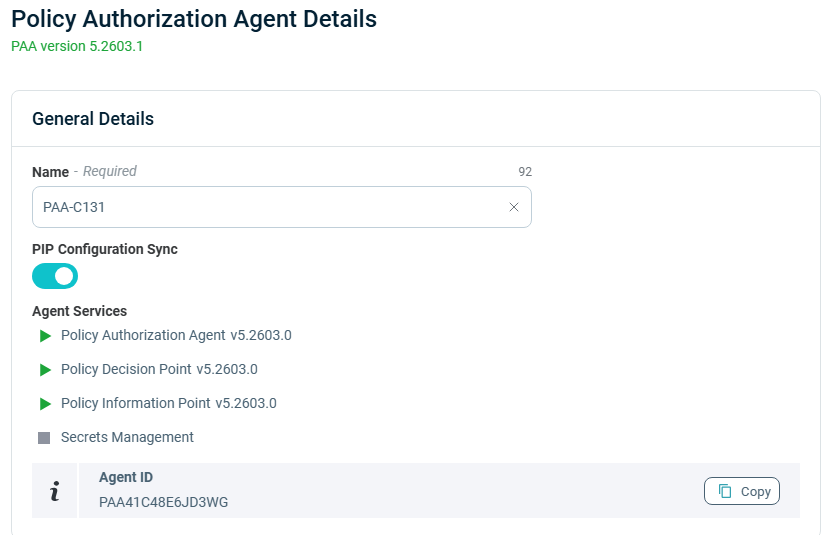
Viewing Policy Authorization Agent Details
At any time, you can view details of a PAA by clicking on the PAA Card in the Policy Authorization Agents screen (Tenant Settings > Policy Authorization Agents or Environment Settings > Policy Authorization Agents).
The Policy Authorization Agent Details side panel opens, displaying the following information:
- PAA Version
- Policy Agent Name (which is editable, enabling you to change it, if needed)
- Agent ID number
- Agent Services:
- Policy Authorization Agent (PAA) version
- Policy Decision Point (PDP) version
- Policy Information Point (PIP) version
Monitoring PAA Health
The Platform provides built-in tools and APIs to monitor the health and status of deployed PAAs. These capabilities allow you to verify that essential services are running correctly, identify errors in real time, and integrate with alerting or observability systems.
To view health details:
-
Navigate to Environment Settings or Tenant Settings > Policy Authorization Agents.
-
Select a PAA card. A side panel opens, displaying details such as:
- PAA Name
- PAA Version See API example for more information
- Agent ID (with copy-to-clipboard option)
- Status of each Agent service
Hover over the status symbols for details.
Agent Service Status Legend
| Symbol | Description |
|---|---|
 |
- Service is running. - Latest version is in use. - No critical errors. |
 |
- Service not using the latest version. - PIP Operator not configured or out of sync. - Redis keys are out of sync. |
 |
- A running service reports an error. |
 |
- Required service not running. - Status not received for five cycles. |
 |
- An optional service is not running (e.g., IDP Webhooks, Secret Management). These are not required for core functionality. |
See Guidelines for PIP Settings in Managing Views for more information.
End-to-End Workflow
The following is a common sequence for configuring and deploying a PAA:
- Create a PAA
- Download the PAA installation bundle (Helm or Standalone)
- Install and configure the PAA
- Define one or more Data Sources
- Create Views for the Data Sources
- Assign the PAA to an Environment and/or Scopes
- Create an Asset Type
- Associate Asset Type Attributes
For step-by-step deployment instructions, see Deployment.
Managing PAAs
Adding a New PAA
- Go to Tenant Settings > Policy Authorization Agents.
- Click Add. The Policy Authorization Agent Details screen opens.
- Enter a Name.
- Select an existing PAA Group or create a new one.
- In Incoming JWT Validation Settings, enter the JWKS URLs.
- Click Save. The new PAA is added to the list.
Renaming a PAA
- Open the Tenant Settings screen and select a PAA.
- In the Name field, enter the new name.
- Click Save.
Deleting a PAA
- Open Tenant Settings and locate the PAA.
- Click the three-dot menu on the card and select Delete PAA.
- Confirm deletion.
A PAA cannot be deleted if it is associated with Assets or Environments. In such cases, remove those dependencies first.
PAA Groups
Organizations often deploy PAAs across multiple regions to improve performance and security. The Platform supports grouping PAAs so they can share the same Data Sources, Data Models, Views, and Asset Attribute associations.
Key points:
- Creating a single PAA automatically creates a new PAA Group.
- Additional PAAs can be added to the same group later.
- The only difference between members of a group is the connection string (credentials, server name, ports, etc.).
Service Health Indication
When the PlainID Agent detects a service issue, it:
- Reports the issue to the Tenant (reflected in the PAA card)
- Logs the error locally in the PAA log file
This supports integration with monitoring systems for proactive alerting and troubleshooting.
Example error message:
{
  "timestamp": "2023-06-26T13:35:40.332+0000",
  "app": {
    "level": "ERROR",
    "service": "agent",
    ...
  },
  "message": "HealthStatus: {\"status\":\"error\",\"message\":\"Service runtime is not alive\"...}"
}
PAA Version API
Use this endpoint to retrieve a service’s runtime version information (service name, semantic version, and Git commit).
To retrieve the PAA version:
http://<host>:<port>/api/version
Method: GET
Authentication: None
Port exposure: 8080
Supported services :
pip-operatoragentruntimesecret-mngidp-webhook
Example Request and Response
curl -s http://idp-webhook.plainid-pdp:8080/api/version
Response (success)
{
  "service": "idp-webhook",
  "version": "5.2611",
  "commit": "a1b2c3d"
}
Response fields
| Field | Type | Description |
|---|---|---|
| service | string | Service identifier (runtime service name) |
| version | string | Service version (semantic version) |
| commit | string | Git commit (short hash) |
© 2026 PlainID Ltd. All rights reserved.
All intellectual property rights in, related to, or derived from this material will remain with PlainID Ltd.
Reproduction, modification, recompilation, or transfer in whole or in part without written permission is prohibited. This material is made available as-is, without any implied warranties, all of which are hereby disclaimed, and PlainID Ltd. shall have no liability in relation hereto.