This guide provides complete instructions for deploying the PlainID Policy Authorization Agent (PAA) in a Kubernetes environment using Helm charts. It walks you through every step of the process, from setup prerequisites and package retrieval to configuration, installation, and advanced customization.
Deploying the PAA through Helm offers a consistent, automated, and scalable approach to managing your Authorization infrastructure across environments. The deployment ensures seamless connectivity between the PAA, the PlainID Platform, and other PlainID services, such as Redis, Secret Management, and the PIP Operator.
This deployment guide walks you through the steps required to install and configure the PAA in a Kubernetes environment using Helm charts. It covers:
- Prerequisites and setup requirements
- Downloading Helm packages
- Configuring deployment settings
- Installing, upgrading, and managing the PAA
- Advanced deployment options, including loading third-party drivers
Download Helm Packages
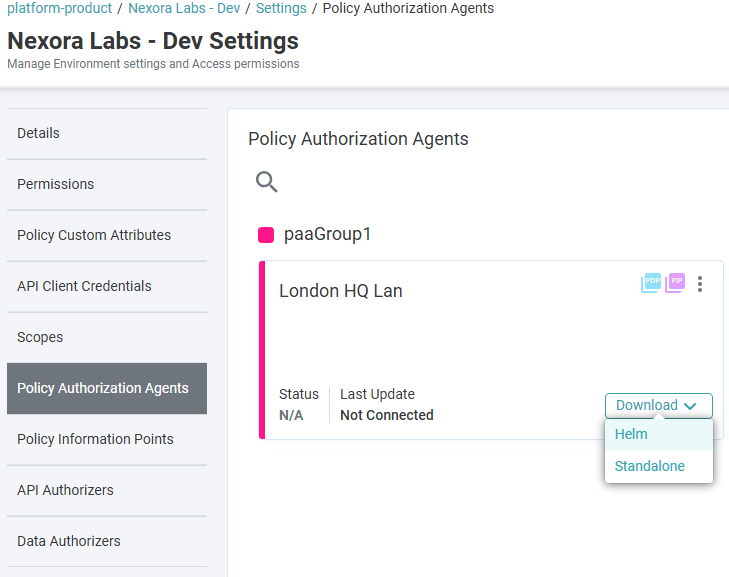
You can download the PlainID PAA Helm packages from the PlainID platform:
- Log in to your PlainID Tenant.
- Navigate to Tenant or Environment Settings
- Click on the Policy Authorization Agent (PAA) card.
- Locate the relevant PAA.
- Click Download and select Helm.
Package Contents and Dependencies
These additional, dependent charts are included by default:
For higher environments (staging, production, etc.), it is recommended to use an external, managed Redis instance.
Prerequisites
Before you begin, ensure the following:
- You have access to the PlainID Platform and appropriate permissions to download Helm charts and retrieve tenant-specific configuration values.
- A Kubernetes cluster is available with
kubectlandhelminstalled. - Access to a container registry (such as Docker Hub) for pulling required images.
- PlainID Tenant ID, PAA ID, and Secret Key are available in the Platform Settings.
Docker Images
Docker images are listed in the images.txt file included with the Helm Chart package.
Refer to the Working with PlainID DockerHub article for details on authenticating with the PlainID private Docker Hub repository.
Kubernetes Configuration
Managing Values Configuration
The Values.yaml and values-custom.yaml are found in the Helm Chart download. The values.yaml contains the default configurations. Any modifications in the values-custom.yaml override what is in the values.yaml and take precedence.
Locate the following variables in your values.yaml (Sample values.yaml) file. Copy and paste the variables in your values-custom.yaml (Sample values-custom.yaml) file.
To manage the values-custom.yaml:
- Open the default
values.yamlfile included in the Helm package. - Copy the relevant configuration blocks (e.g.,
runtime,redis,secrets-mgmt) into a new file namedvalues-custom.yaml. - Edit only the parameters you need to customize, such as tenant IDs, ingress settings, or Redis connection details.
You can review the configurations for different deployment scenarios here:
Basic Kubernetes Configuration Values
| Value | Description |
|---|---|
| tenantId | Tenant ID (from Tenant Settings > Hybrid Agent Keys) |
| agentSecretKey | Agent Secret Key (from Tenant Settings > Hybrid Agent Keys) |
| paaId | PAA ID (from Tenant Settings > Policy Authorization Agents tab) |
| remoteApi | WebSocket URL, e.g. wss://remote.us1.plainid.io/wstunnel, depending on your tenant region |
Configuring External Access to the PDP
Enable Ingress by setting runtime.ingress.enabled to true in your values-custom.yaml (Sample values-custom.yaml) file.
You must also configure the following based on your environment:
runtime.ingress.annotationsruntime.ingress.hostsruntime.ingress.tls
Configuration Examples
Sample values-custom.*.yaml files for various deployment scenarios are available in the ./examples directory of the Helm package.
Secret Management
If working with external Secret Store providers, the Secret Management Service is required
To use it the Secret Management Service, enable and configure the secrets-mgmt service.
For more information, refer to our Secret Management Configuration documentation.
Managing Kubernetes Deployment
Basic Installation
To install the PAA using the default Helm values:
helm install [release-name] plainid-paa
Installation with Custom Values
To install the PAA using your customized configuration:
helm install my-plainid-paa plainid-paa --values values-custom.yaml
Installation with a Specific Release Name
You can specify a release name to help manage multiple deployments:
helm install my-plainid-paa plainid-paa
Uninstalling the Chart
To remove the deployment and all related Kubernetes components:
helm delete my-plainid-paa
Upgrading an Existing Release
When deploying a new chart version or updating configuration values, use the following command to upgrade the existing release:
helm upgrade -i my-plainid-paa plainid-paa --values values-custom.yaml
This method preserves your custom configuration while applying updates or changes.
Alternate Deployment Procedures
If deploying using custom Kubernetes pipelines, ensure that the following have been configured in your pipeline:
Agent Deployment:
Include the PAA version using the following environment variable:
PAA_PACKAGE_VERSION: [PAA VERSION NUMBER]
PIP Operator Deployment:
-
Remove
REDIS_SETTINGS_KEY_NAMEfor each PAA. -
Add:
TENANT_IDPAA_ID
Kubernetes YAML Files Without a Helm Chart
Customers deploying using Kubernetes deployment YAML files without a Helm Chart, follow the PlainID Docker Hub Installation Image Pull Secrets instructions and include it in the relevant Kubernetes deployments/pods:
- theruntime
- pip-operator
- agent
- secrets-mgmt
- idp-webhook
Private Repositories
Customers deploying through their organization’s private repositories are required to prefetch the relevant images and store them in a repository of their choice. Authenticate to the PlainID private repository to pull images from the PlainID Docker Hub and ensure that you have an automated process set up to facilitate access to the PlainID Docker Hub and download images to your organization's private repository.
Deploying the PlainID Policy Authorization Agent (PAA) using Helm provides a scalable and flexible approach for managing access control in Kubernetes environments. By following the steps outlined in this guide—downloading the appropriate packages, configuring values, installing the Helm chart, and customizing advanced settings—you can successfully integrate the PAA into your architecture.
For production-grade deployments, ensure that best practices such as using managed Redis services, enabling ingress securely, and managing secrets appropriately are followed. Refer to the relevant linked documentation for advanced configuration and troubleshooting.
If you require additional help or support, contact PlainID Support.
PlainID’s proprietary software images and any other PlainID Intellectual Property (“IP”) should be stored solely on the organization’s private repository. The use of any public repository for PlainID’s IP is strictly forbidden.