Apigee
    • 10 Apr 2024
    • 7 Minutes to read
    • Dark
      Light
    • PDF

    Apigee

    • Dark
      Light
    • PDF

    Article Summary

    Introduction

    Application and data security are two challenges many enterprises face. At the core of any enterprise security solution are the challenges faced with managing its Authorization Policies. Essentially, WHO (Identity) can do WHAT (Action) with WHAT (Assets) and WHEN (under what environmental conditions).

    The Platform enables you to create and manage fine-grained, flexible access policies that consider a user’s role and other parameters (task, time, membership in a dynamic group, role or title, place, etc.) under specific conditions occurring in real-time.

    Enterprises are faced with determining both the policies related to Authorization and the method by which they can implement these policies. For many, a service mesh can be the transparent infrastructure layer that sits between a network and its microservices. This service mesh can be the ideal location where organizations can ensure data encryption, authentication, and authorization.

    About Apigee

    The Apigee platform enables you to develop and manage backend service APIs by offering a proxy layer through which Access Policies can be enforced across the organizational technological stack with minimal involvement from developers. The Apigee Authorizer becomes a single point of contact, reducing dependency for changes at the developer level.

    Advantages and Benefits

    Authorization Basics and Microservice Fundamentals

    From an architectural point of view, separating management, decision, and enforcement into well-defined components provides many benefits. The primary benefit of creating microservice components is the ability to then optimize each component to focus on the functions each needs to address.

    High performance: In the microservices framework, access decisions are expected to be efficient and fast. The decision on whether an Action can or can’t be performed should be taken in a matter of microseconds or less. Therefore, the authorization decision should be as close as possible to the service to reduce any communication latency, which is common in other types of architectures.

    Tight security: Having the decision within proximity to the service addresses an important security concern. The service doesn’t have to reach out to the network to know whether access is permitted or denied.

    Reduce development efforts: Development of microservices is typically lean and focused on the relevant functionality of the microservice. Supporting authorization enforcement in this type of architecture, reduces the workload from the developer, since access decisions are made and enforced outside of the service.

    Central control: In a distributed architecture central control is crucial, to enable consistency in the access decisions across all components, and full visibility of who has access to what.

    Apigee Workflow

    In the Platform, you can manage access control Policies that answer the basic or the most advanced authorization question – WHO can access WHAT and WHEN.

    For microservices this can translate as follows:

    • Who? Based on the user characteristics of who is accessing the resource.
    • What? Based on URLs, URL payload, headers, and associated actions.
    • When? Based on environmental attributes, such as time, location, events and more.

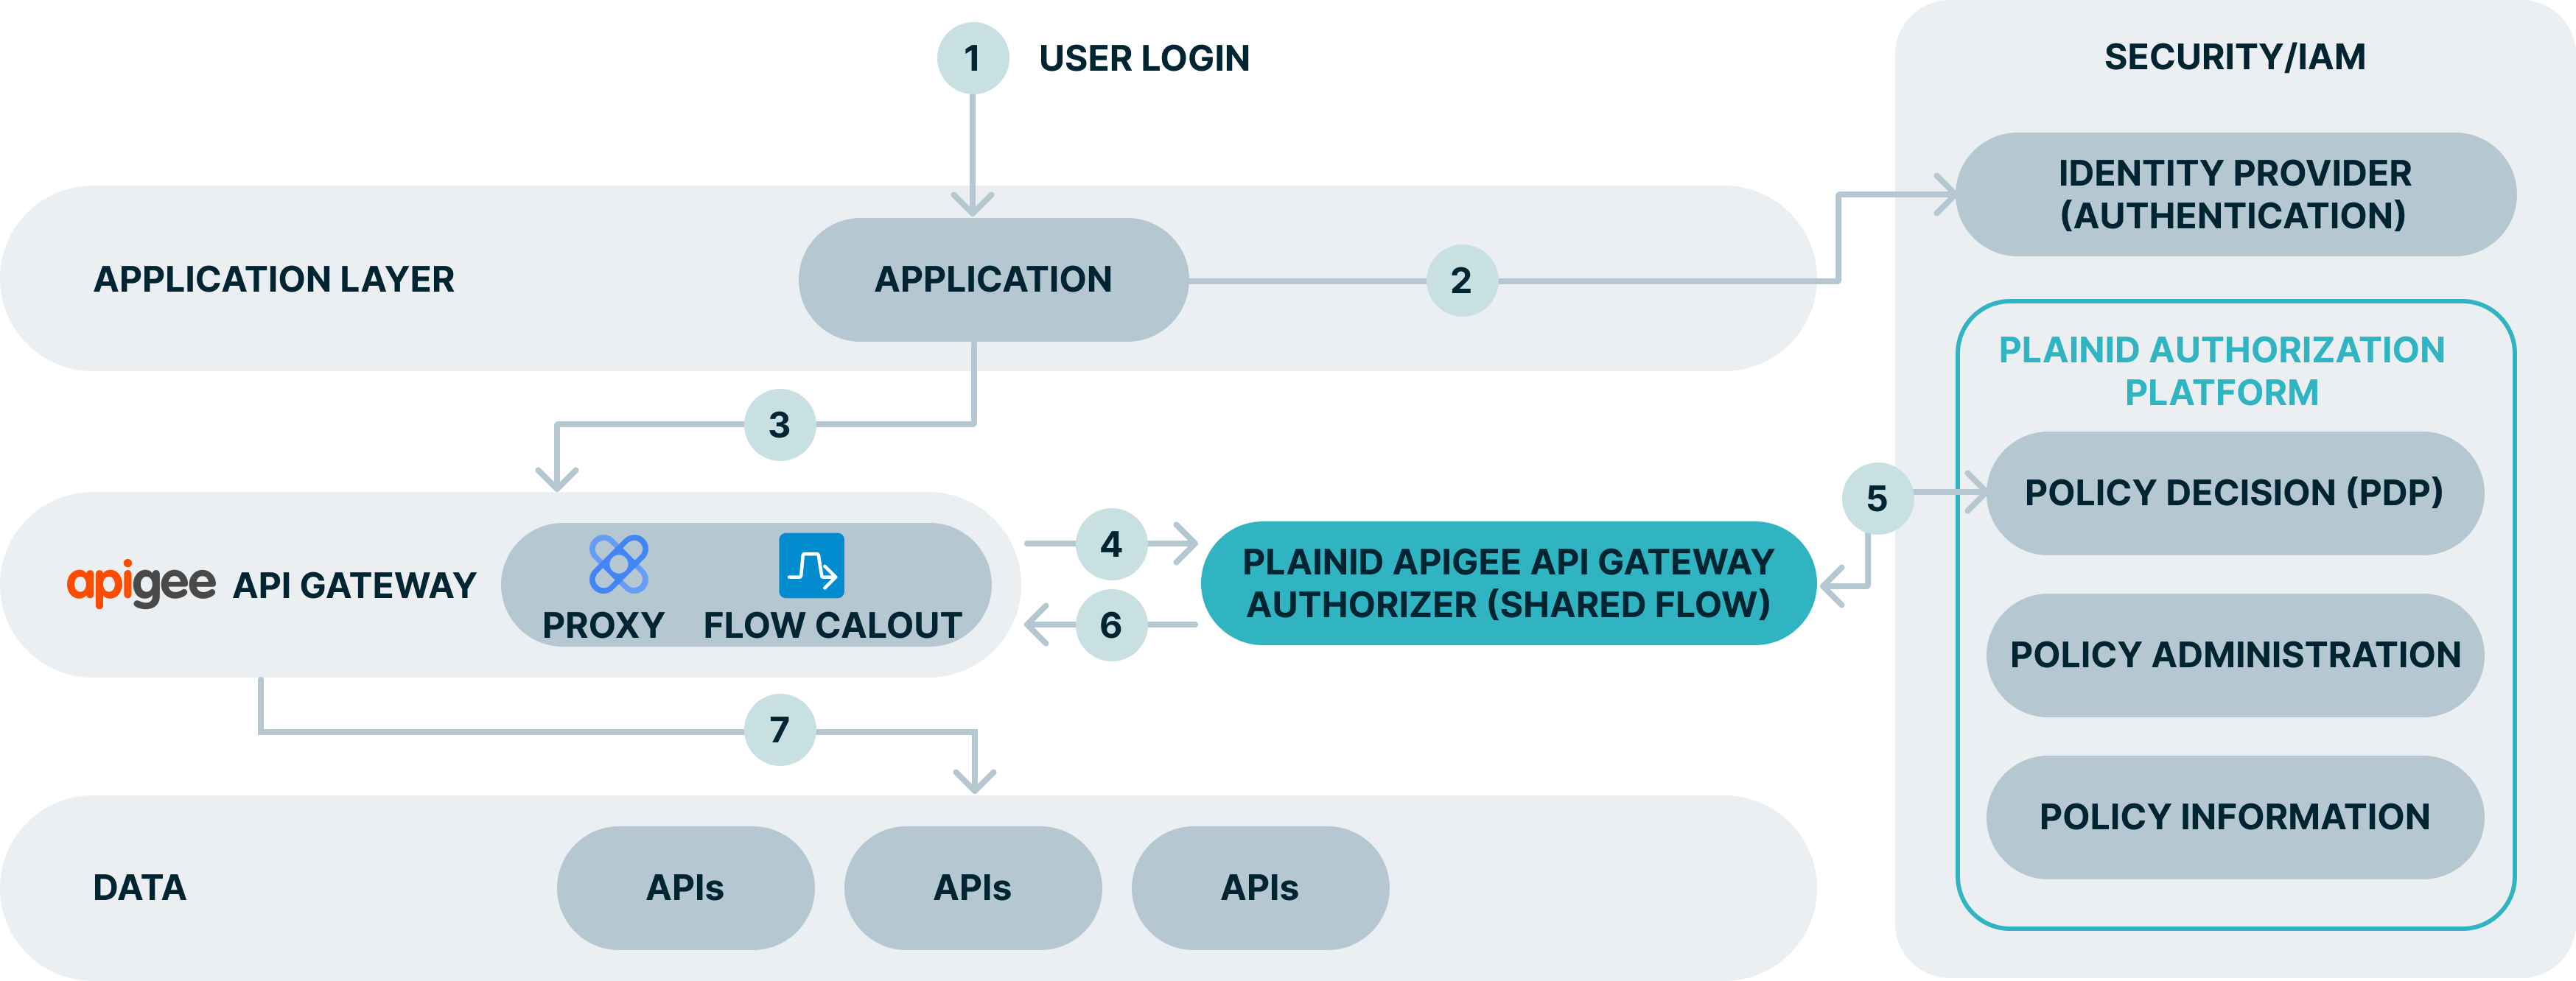
    Apigee Authorizer Workflow

    The following is a typical workflow for the Apigee Authorizer and the Platform.

    image.png

    1. The client (user) sends a request to a business application, which relays this request to the Identity Provider (IDP) to authenticate the user (#1 and #2 above).
    2. The request is intercepted by the Apigee Proxy, which passes it to the PlainID Authorizer (#3 above).
    3. The PlainID Authorizer makes a Permit/Deny decision, based on the defined policies for the organization ((#4 above)
    4. If the Authorization decision is Permit, the API Proxy passes the request to the service container. Otherwise, if the authorization decision is Deny, the request never reaches the actual service container, and a 403 response is returned immediately.

    Mapping Between Access Policy and Authorization Request

    Mapping between the access policy and the actual authorization request should be as follows:

    Access PolicyRequest
    WHO – Identity, for example: “Customer”The Identity is derived from the JWT that is passed in the request header. The Platform can rely on the data provided in the JWT or enrich it with other sources of data to determine the user is a “Customer”.
    WHAT – Action, for example: View Customer AccountsView – can be mapped to the request action: “GET” or derived from the request body (in a POST request). Account – derived from the request URL suffix (in the example) or derived from the request body (in a POST request).
    WHEN (Conditions) - MFAThe Environmental Conditions as authentication methods are derived from the request header.To support the above, the Platform defines structured elements to represent the WHO (the “subject”) and the WHAT (the “object”).

    Subject – is typically the user who is requesting access, defined by the Identity Template.

    Object – is what the user is trying to access, defined by the Asset Template..

    For additional information about API Mappers, check the Working with API Mappers page on the documentation portal.

    Apigee Authorizer Installation

    Prerequisites

    1. An Apigee API proxy.
    2. An Apigee Environment that you can use to deploy your API proxies and Shared Flows.
    3. Permissions on Apigee to create and update Shared Flows, and connect them to API proxies.
    4. PlainID Apigee Authorizer, downloaded from the Platform.

    Obtaining the Apigee Authorizer:

    Click here to learn how to create an Authorizer on the Platform.

    Important

    Ensure that you follow these instructions closely, replace placeholder values with actual values, and verify that all the XML parameters, URLs, and other configuration details are accurate for your specific setup

    Installing the Apigee Authorizer

    Creating a Shared Flow

    1. Access the Apigee section through the Google Cloud console.
    2. Click on the Navigation Menu at the top left.
    3. Hover over Apigee and click on Shared Flows.
    4. Click Upload Bundle
    5. Select the PlainID Authorizer bundle you downloaded from the Platform.
    6. Click on Create.

    It's recommended to use a Shared Flow name which shares the Authorizer Name that was downloaded from the Platform for easier management.

    Updating a Shared Flow

    After the Shared Flow is created, the **Shared Flow Details **page appears.

    1. Click DEVELOP.
    2. Click call-pdp (under Policies).
    3. Update the pdpEndpointV5 property according to the following instructions:
       
      • If using the Platform Cloud PDP:
        Set the pdpEndpointV5 to /api/runtime/5.0/decisions/permit-deny

      • If using the PlainID Authorization Agent PDP (Customer hosted):
        Set the pdpEndpointV5 to /runtime/5.0/decisions/permit-deny
    4. Save the changes and deploy.

    call-pdp.xml Samples

    PDP as part of the PlainID Platform:

    <?xml version="1.0" encoding="UTF-8" standalone="yes"?>
    <Javascript continueOnError="false" enabled="true" timeLimit="2000" name="call-pdp">
      <DisplayName>call-pdp</DisplayName>
      <IncludeURL>jsc://URI.js</IncludeURL>
      <IncludeURL>jsc://parse-headers.js</IncludeURL>
      <IncludeURL>jsc://parse-body.js</IncludeURL>
      <ResourceURL>jsc://call-pdp.js</ResourceURL>
      <Properties>
        <Property name="pdpEndpointV5">/api/runtime/5.0/decisions/permit-deny</Property>
        <Property name="authorizerVersion">1.3.4</Property>
      </Properties>
    </Javascript>


    PDP as part of the PAA (Customer hosted):

    <?xml version="1.0" encoding="UTF-8" standalone="yes"?>
    <Javascript continueOnError="false" enabled="true" timeLimit="2000" name="call-pdp">
      <DisplayName>call-pdp</DisplayName>
      <IncludeURL>jsc://URI.js</IncludeURL>
      <IncludeURL>jsc://parse-headers.js</IncludeURL>
      <IncludeURL>jsc://parse-body.js</IncludeURL>
      <ResourceURL>jsc://call-pdp.js</ResourceURL>
      <Properties>
        <Property name="pdpEndpointV5">/runtime/5.0/decisions/permit-deny</Property>
        <Property name="authorizerVersion">1.3.4</Property>
      </Properties>
    </Javascript>
    

    Connecting the Shared Flow to an API Proxy:

    1. In the left pane on the Apigee Admin console, select API Proxies.
    2. Select the API Proxy to protect.
    3. Go to the Develop tab.
    4. In Policies click Add Policy.
    5. Select the Flow Callout policy.
    6. Name it and give it a display name (e.g., FC-authz-apigee).
    7. Choose the Shared Flow from the previous step.
    8. Click Create.

    Update the Policy Configuration

    1. Select the policy you just created.
    2. In the code editor, update the XML Parameters section.

    XML Code for Adding a Policy to the API Proxy PreFlow:

    <?xml version="1.0" encoding="UTF-8" standalone="yes"?>
    <FlowCallout continueOnError="false" enabled="true" name="FC-3ch0-1.3.4">
      <DisplayName>FC-3ch0-1.3.4</DisplayName>
      <Parameters>
        <Parameter name="pdpUrl" value="https://acme-corp-finance.us1.plainid.io"/>
        <Parameter name="clientId" value="PQ2OUNHDCCCCQ9CDKU13"/>
        <Parameter name="clientSecret" value="vm4jMLCCCCCCsM5N9a46ATYc1InHO31W7537EEEEE"/>
        <Parameter name="authorizerId" value="CCsM5N9a46ATYc1InHO3"/>
        <Parameter name="headerKeysCaseHandling" value="uppercase"/>
        <Parameter name="headerValuesCaseHandling" value="uppercase"/>
        <Parameter name="ignoreHeadersValueTransformation" value="Authorization"/>
       <Parameter name="runtimeFineTune">{"includeIdentity": "true"}</Parameter>
      </Parameters>
      <SharedFlowBundle>3ch0-authz-1.3.4</SharedFlowBundle>
    </FlowCallout>
    

    Configuration Parameters Details

    Parameter NameDescriptionExample
    pdpUrlURL of the component installed in the Platformhttps://acme-corp-finance.us1.plainid.io
    clientIdThe Client ID from the corresponding environment, application, and scope in PlainIDPQ2OUNHDCCCCQ9CDKU13
    clientSecretThe Client Secret from the corresponding environment, application, and scope in PlainIDvm4jMLCCCCCCsM5N9a46ATYc1InHO31W7537EEEEE
    authorizerIdThe Authorizer ID from the API Authorizers tab in your environmentAPJJIUH1BFLOWOW

    Optional Header Parameters

    Parameter NameDescriptionDefaultOptions
    headerKeysCaseHandlingDetermines whether the authorizer should alter the header keys case.lowercaseValue 1: uppercase

    Value 2: lowercase
    headerValuesCaseHandlingDetermines if changing the key name, the value, or both.preserveCaseValue 1: uppercase

    Value 2: lowercase

    Value 3: preserveCase
    ignoreHeadersValueTransformationDetermines which headers to ignore when handling the case.AuthorizationExample: "Authorization, header1, header2"
    runtimeFineTuneThis parameter can be leveraged to fine-tune the PDP calculation with additional supported request properties. Refer to our Authorization APIs documentation for more details on potential properties. This parameter should be passed as a JSON string with the relevant PDP properties and values.If a config key is not added, the default is an empty parameter:
    "meta": {
    "runtimeFineTune": {}
    }
    Example 1:
    {
    ...
    "meta": {
    "runtimeFineTune" : {
    "includeIdentity": "true",
    }
    }
    }

    Example 2:
    {"entityAttributes": {"region": ["US"]},"combinedMultiValue": true}

    Adding the Policy to the PreFlow

    1. Under Proxy endpoints, select PreFlow.
    2. Click Add Policy Step.
    3. Select the Policy you created in the previous step.
    4. Click Add.
    5. Save and Deploy the changes.

    Example of Modified XML Code with Added Parameters

    <?xml version="1.0" encoding="UTF-8" standalone="yes"?>
    <FlowCallout continueOnError="false" enabled="true" name="Flow-Callout-PlainID-AuthZ">
        <DisplayName>Flow-Callout-PlainID-AuthZ</DisplayName>
        <FaultRules/>
        <Properties/>
        <SharedFlowBundle>shared-flow-plainid-authz</SharedFlowBundle>
        <Parameters>
            <Parameter name="pdpUrl" value="https://acme-financing.us1.plainid.io"/>
            <Parameter name="clientId" value="PABCDYDO123J1T36MRMU"/>
            <Parameter name="clientSecret" value="IVJqT21234wfhzqAbcdQpogn1234568zlWVveESzH"/>
            <Parameter name="headerKeysCaseHandling" value="lowercase"/>
           <Parameter name="headerValuesCaseHandling" value="preserveCase"/>
           <Parameter name="ignoreHeadersValue Transformation" value="Authorization"/>
           <Parameter name="runtimeFineTune">{"includeIdentity": "true"}</Parameter>
        </Parameters>
    </FlowCallout>
    

    Once these steps are completed, the requests to the API proxy will be authorized by PlainID through the Authorizer.

    Storing Settings and Credentials

    You can use the Apigee Key Value Maps to securely store different configurations/Attributes (clientSecret, clientId, etc.).


    Was this article helpful?