Authorizing APIs processed by the AWS API Gateway requires setting up an integration between PlainID and the AWS API GW service using PlainID's AWS API Authorizer and the Authorization engine (PAA). The integration setup requires:
- Setting up an AWS API Authorizer in PlainID Platform.
- Setting up the Authorizer in your AWS Console, deploy it and associate it with API services in the AWS GW.
- Modeling of relevant Mappers and Policies in the PlainID Platform to support your API Access use case.
- This is not AWS-specific. Refer to PlainID Documentation or consult with our Global Services team as needed. You can find the relevant information in these pages:
For more information about how to use AWS Lambda, refer to their documentation.
Authorizer Setup in PlainID Platform
The first step of setting up a PlainID AWS API Gateway Authorizer is setting up an Authorizer in the Platform Environment Settings. Refer to Managing Authorizers for more information
Once an Authorizer is defined in the platform you will be able to download the Authorizer's deployment package. The downloaded zip archive, which includes the AWS Authorization Lambda, will help you configure the Amazon API Gateway Authorizer in your AWS console.
Authorizer Setup in AWS Console
Configuring the AWS Management Console to interface with PlainID includes the following steps:
- Setting up an Authorization Lambda:
- Configuring the API GW to use the Lambda:
Creating the PlainID Authorization Lambda
Creating a Lambda Function
To create a Lambda function:
- Open the AWS Lambda Service screen.
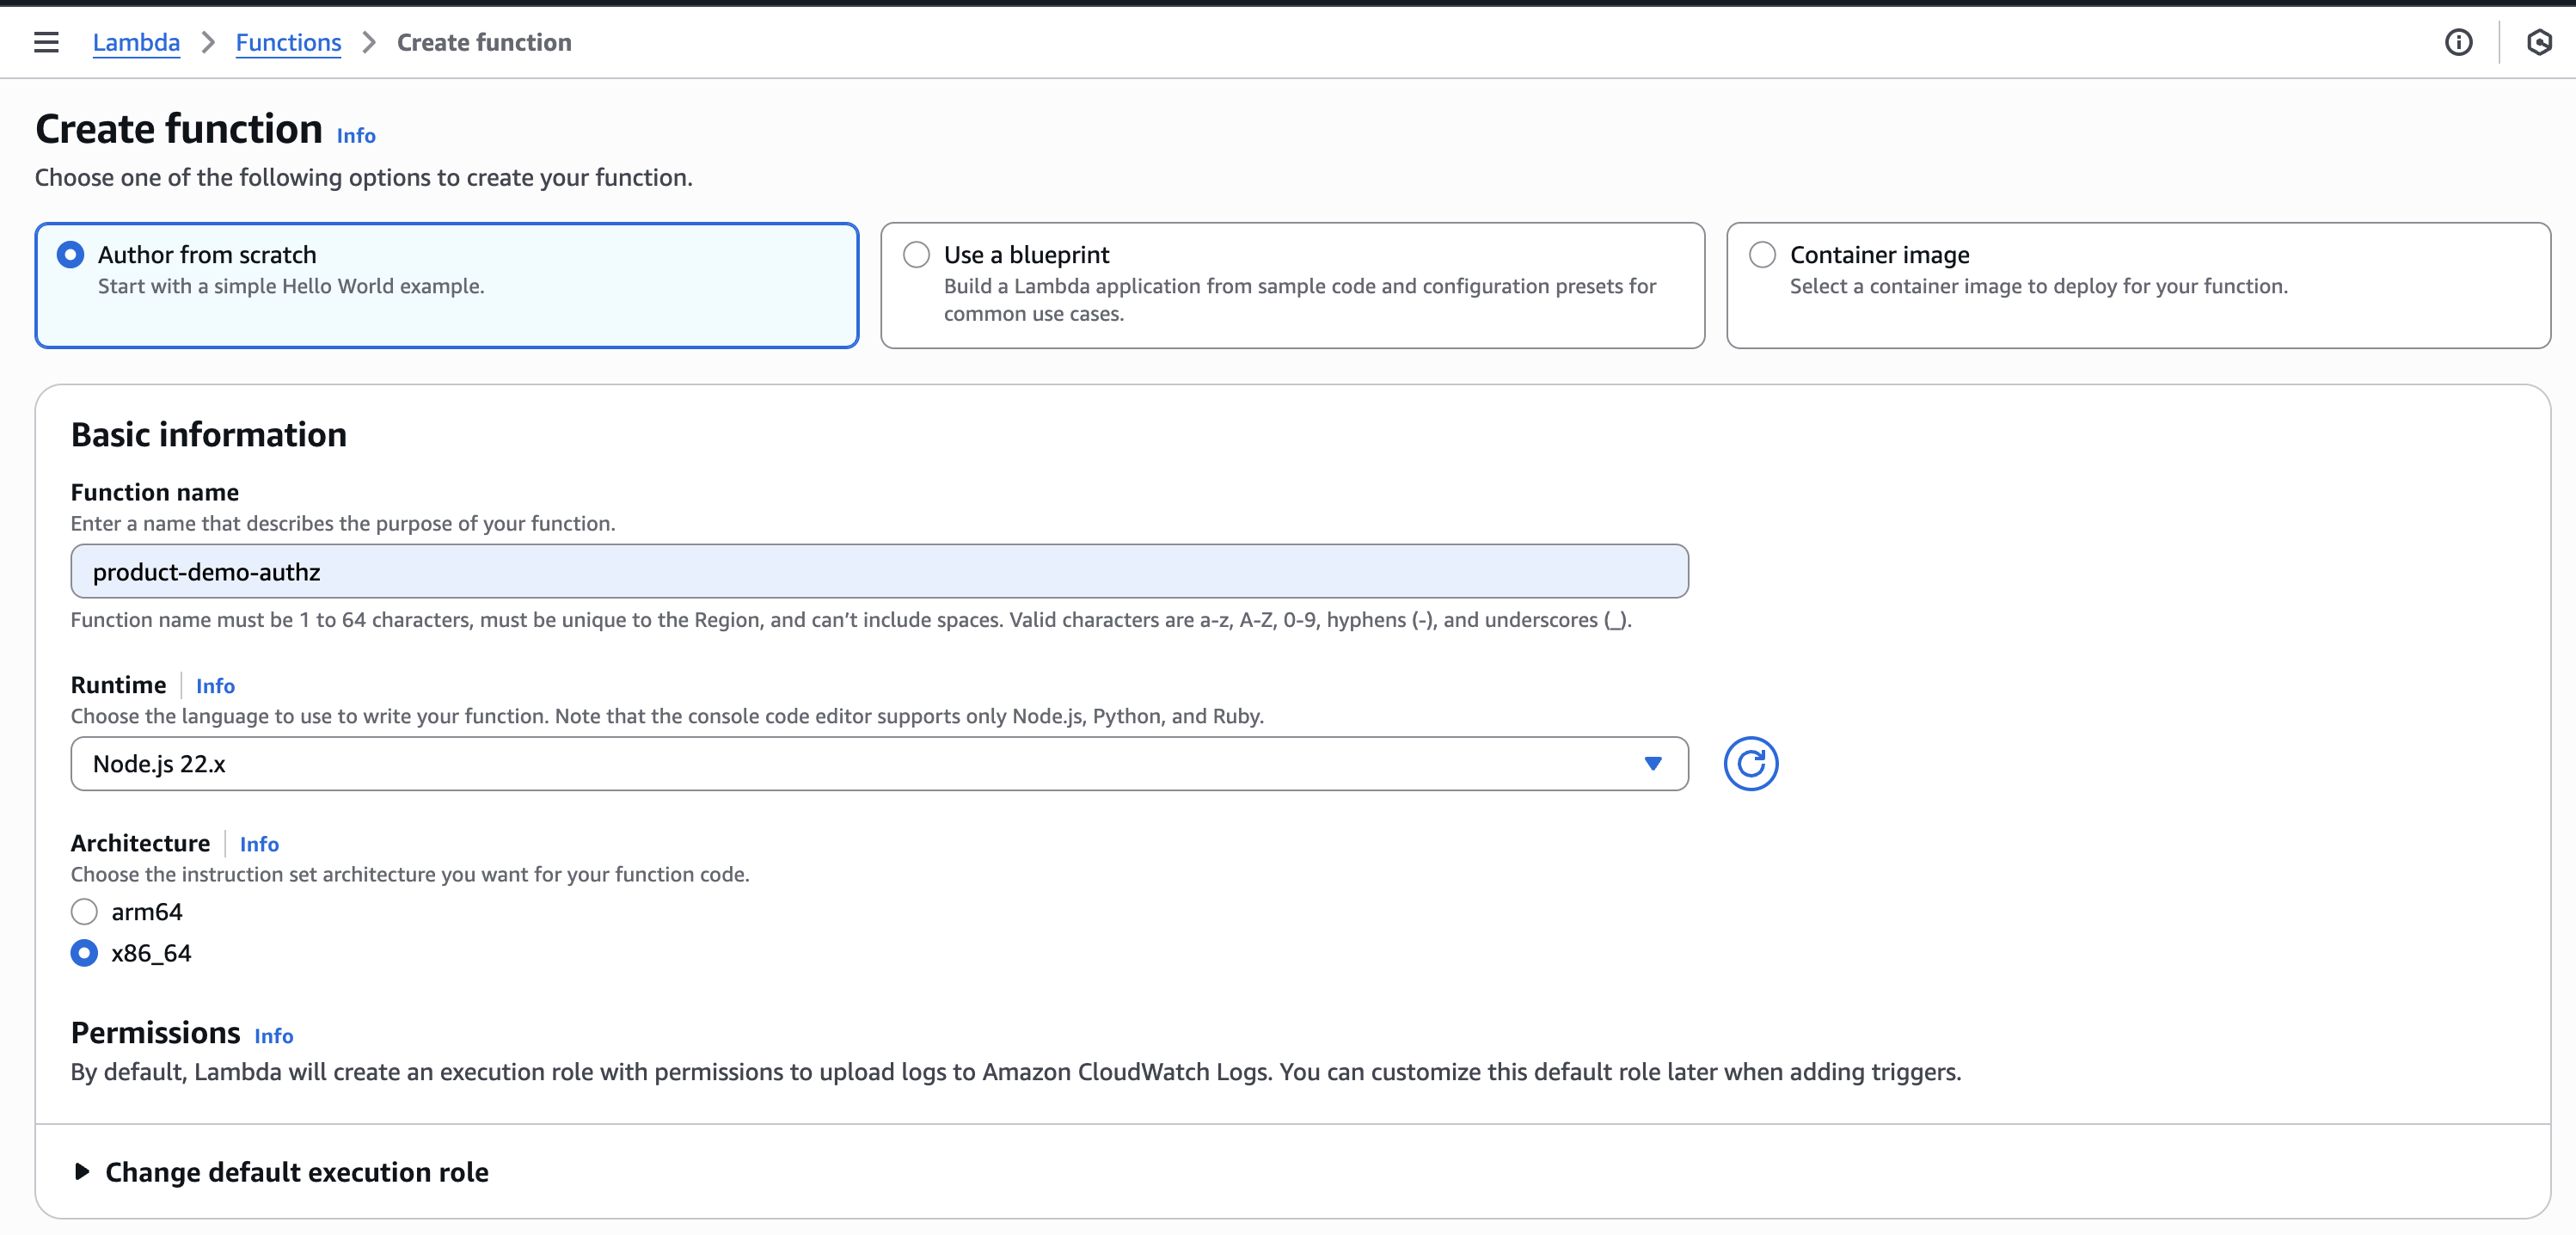
- Click Create function. The Create function screen is displayed.
- Select
Author from Scratch - In the Function name field, enter the name of the function (for example: product-demo-authz).
- Confirm that the remaining settings are configured as follows:
- Runtime is set to Node.js
- Architecture is set to x86_64
- Click Create Function.
 *.
*.
Uploading the PlainID Authorization Lambda Zip Archive
To upload the PlainID Authorization Lambda zip archive:
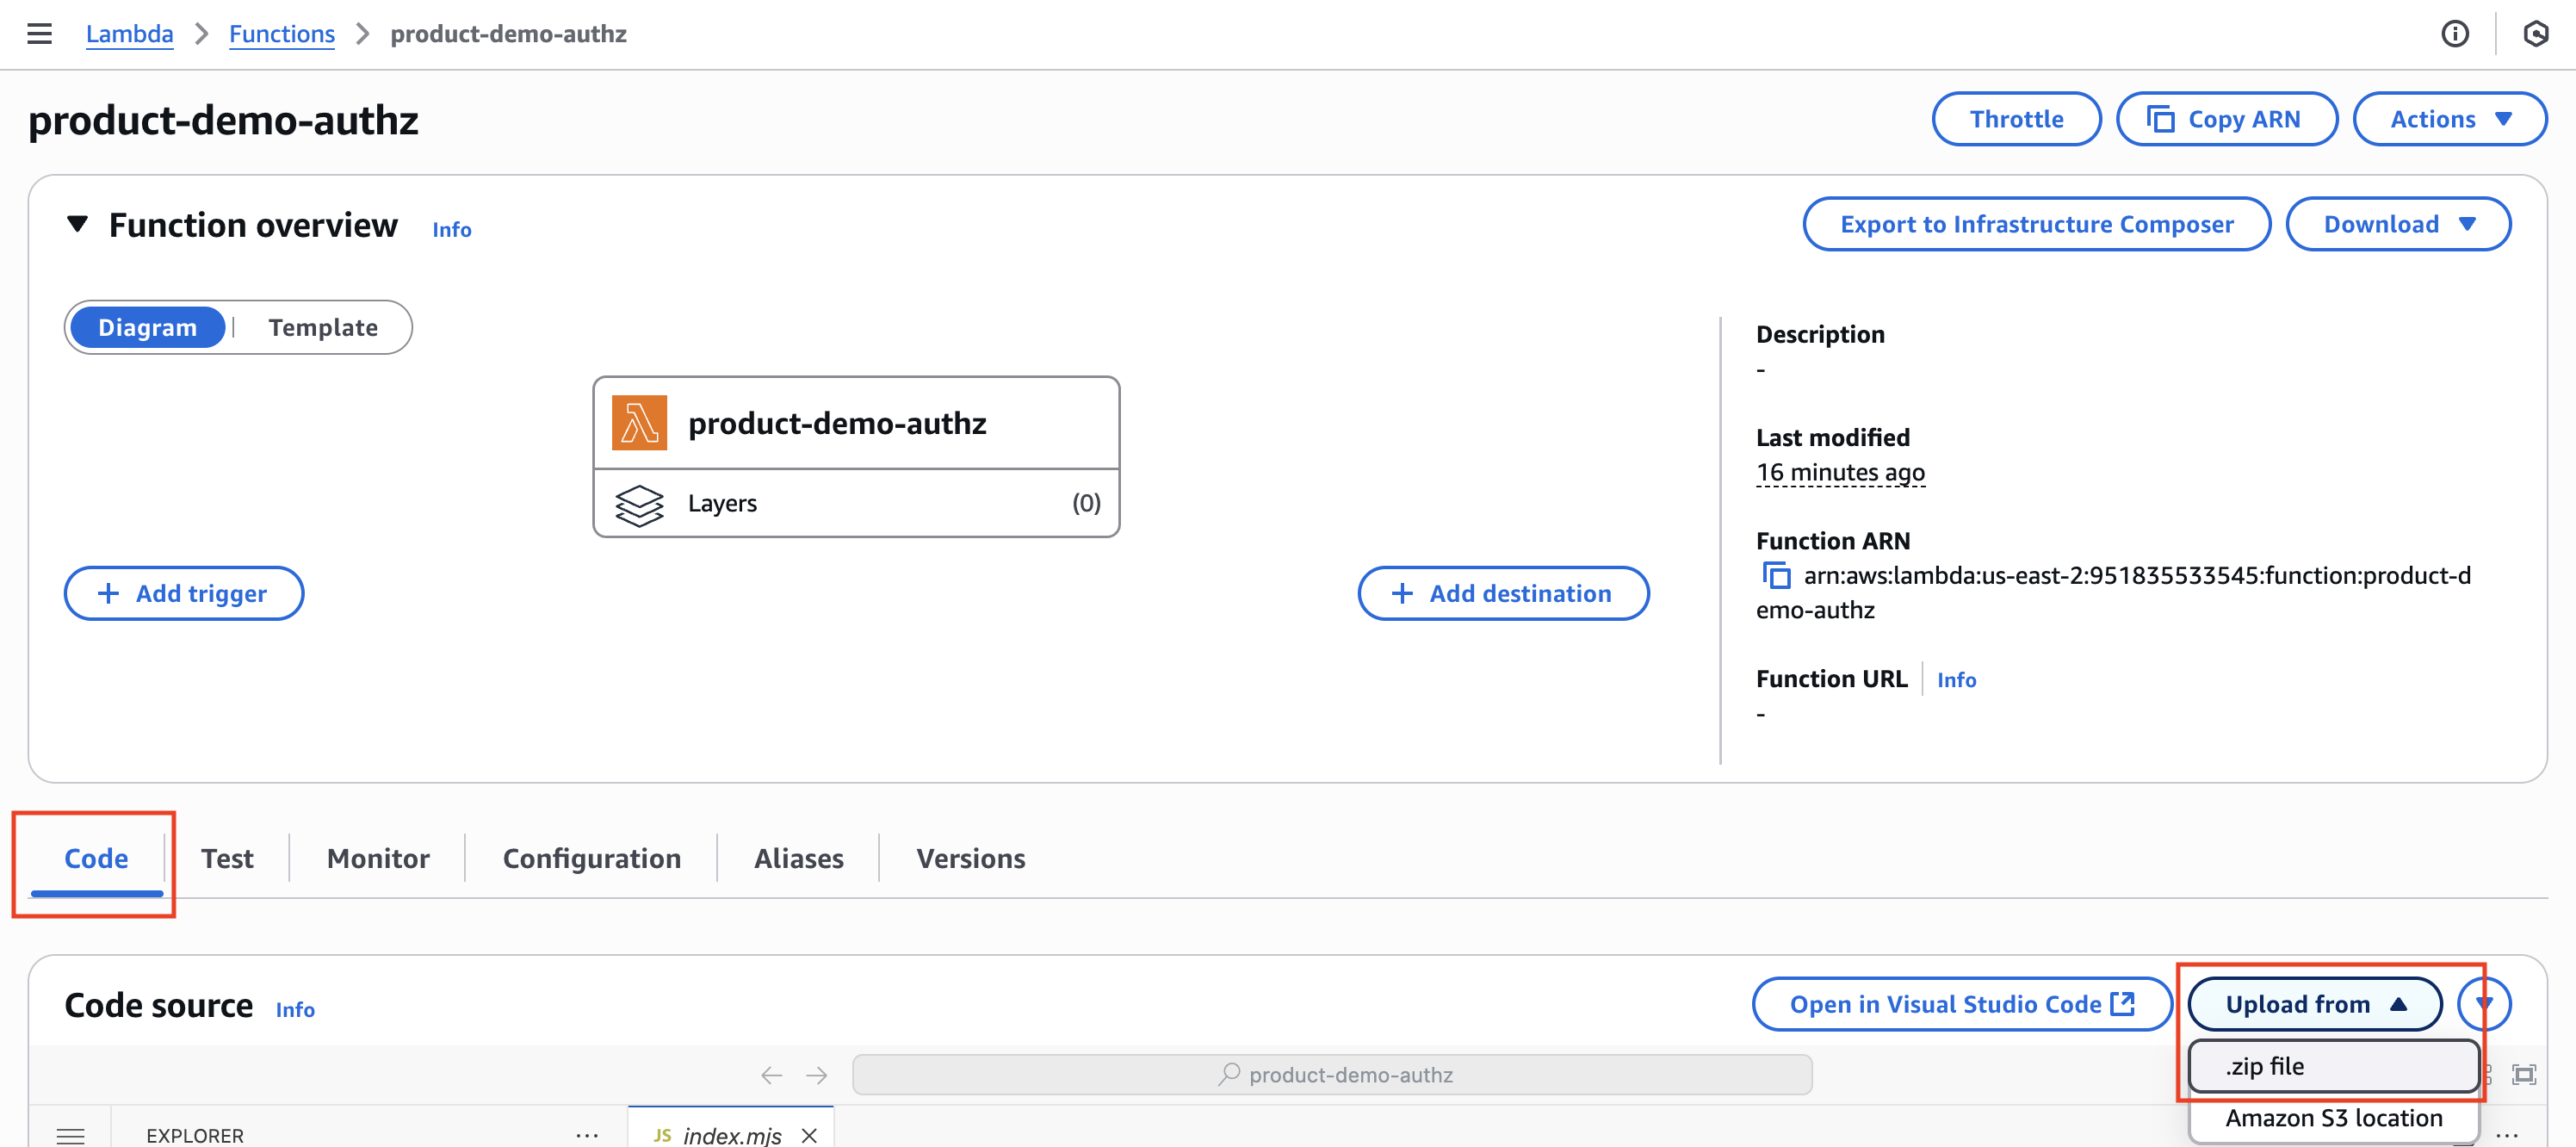
- On the screen of the function you just created make sure you are in the
Codetab - Open the
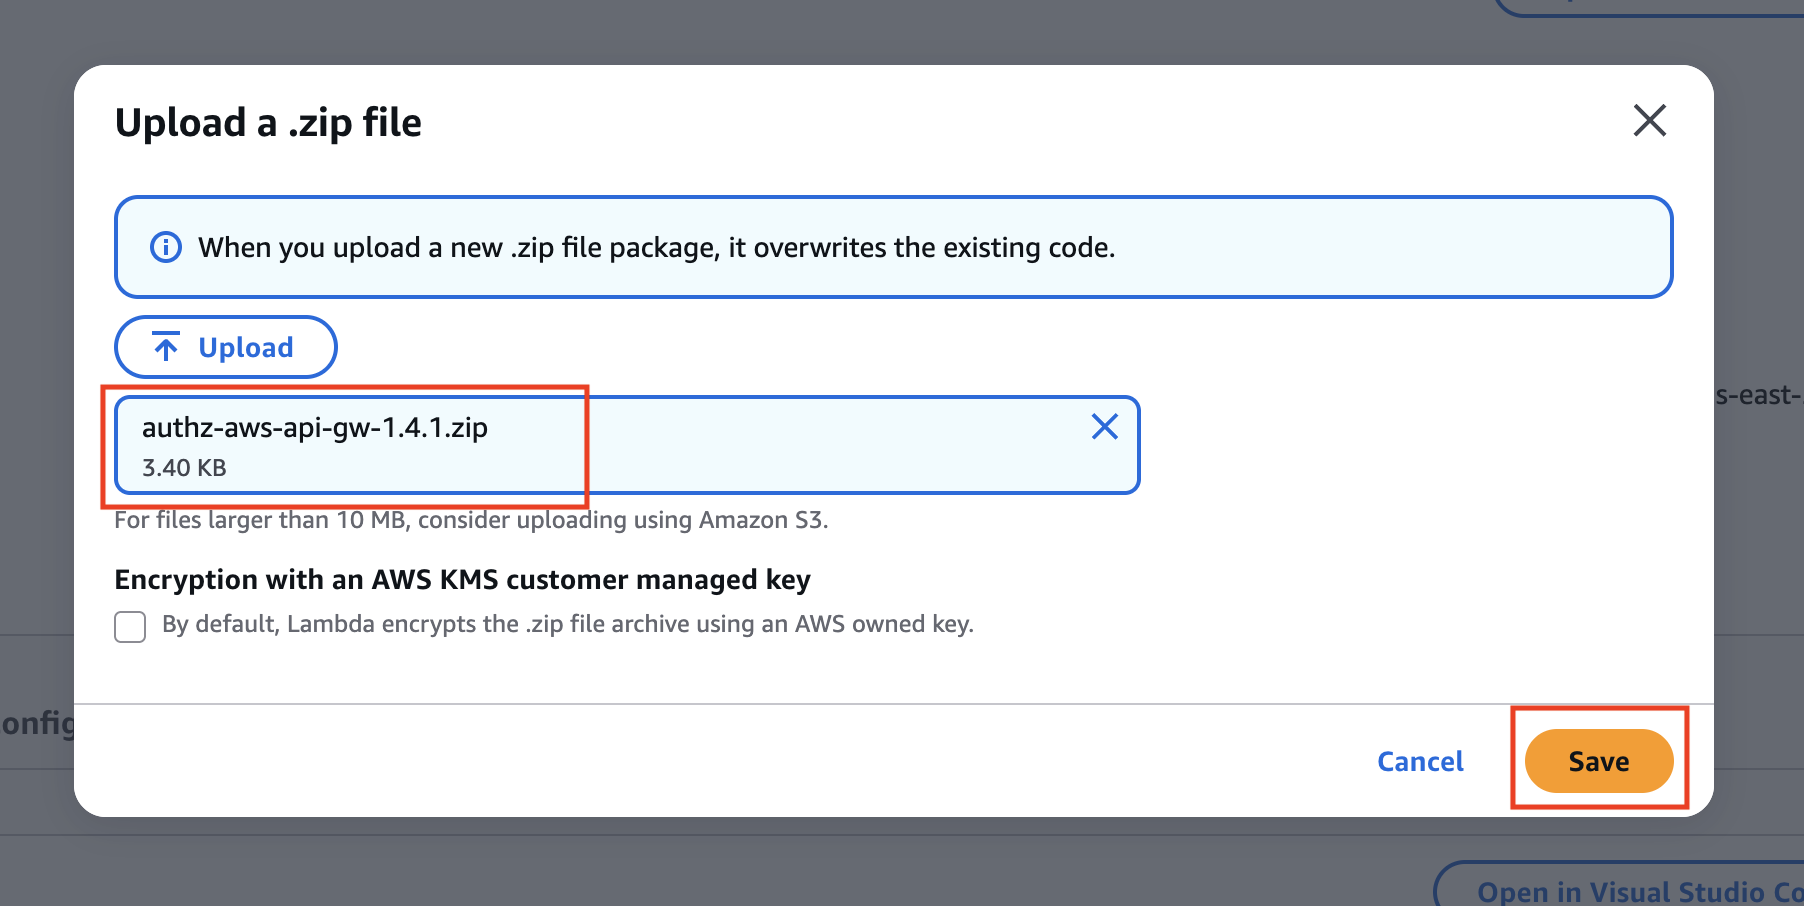
Upload fromdropdown and select from .zip file. - Select the Lambda zip archive that you downloaded from the Platform and Save.
Configuring Environment Variables
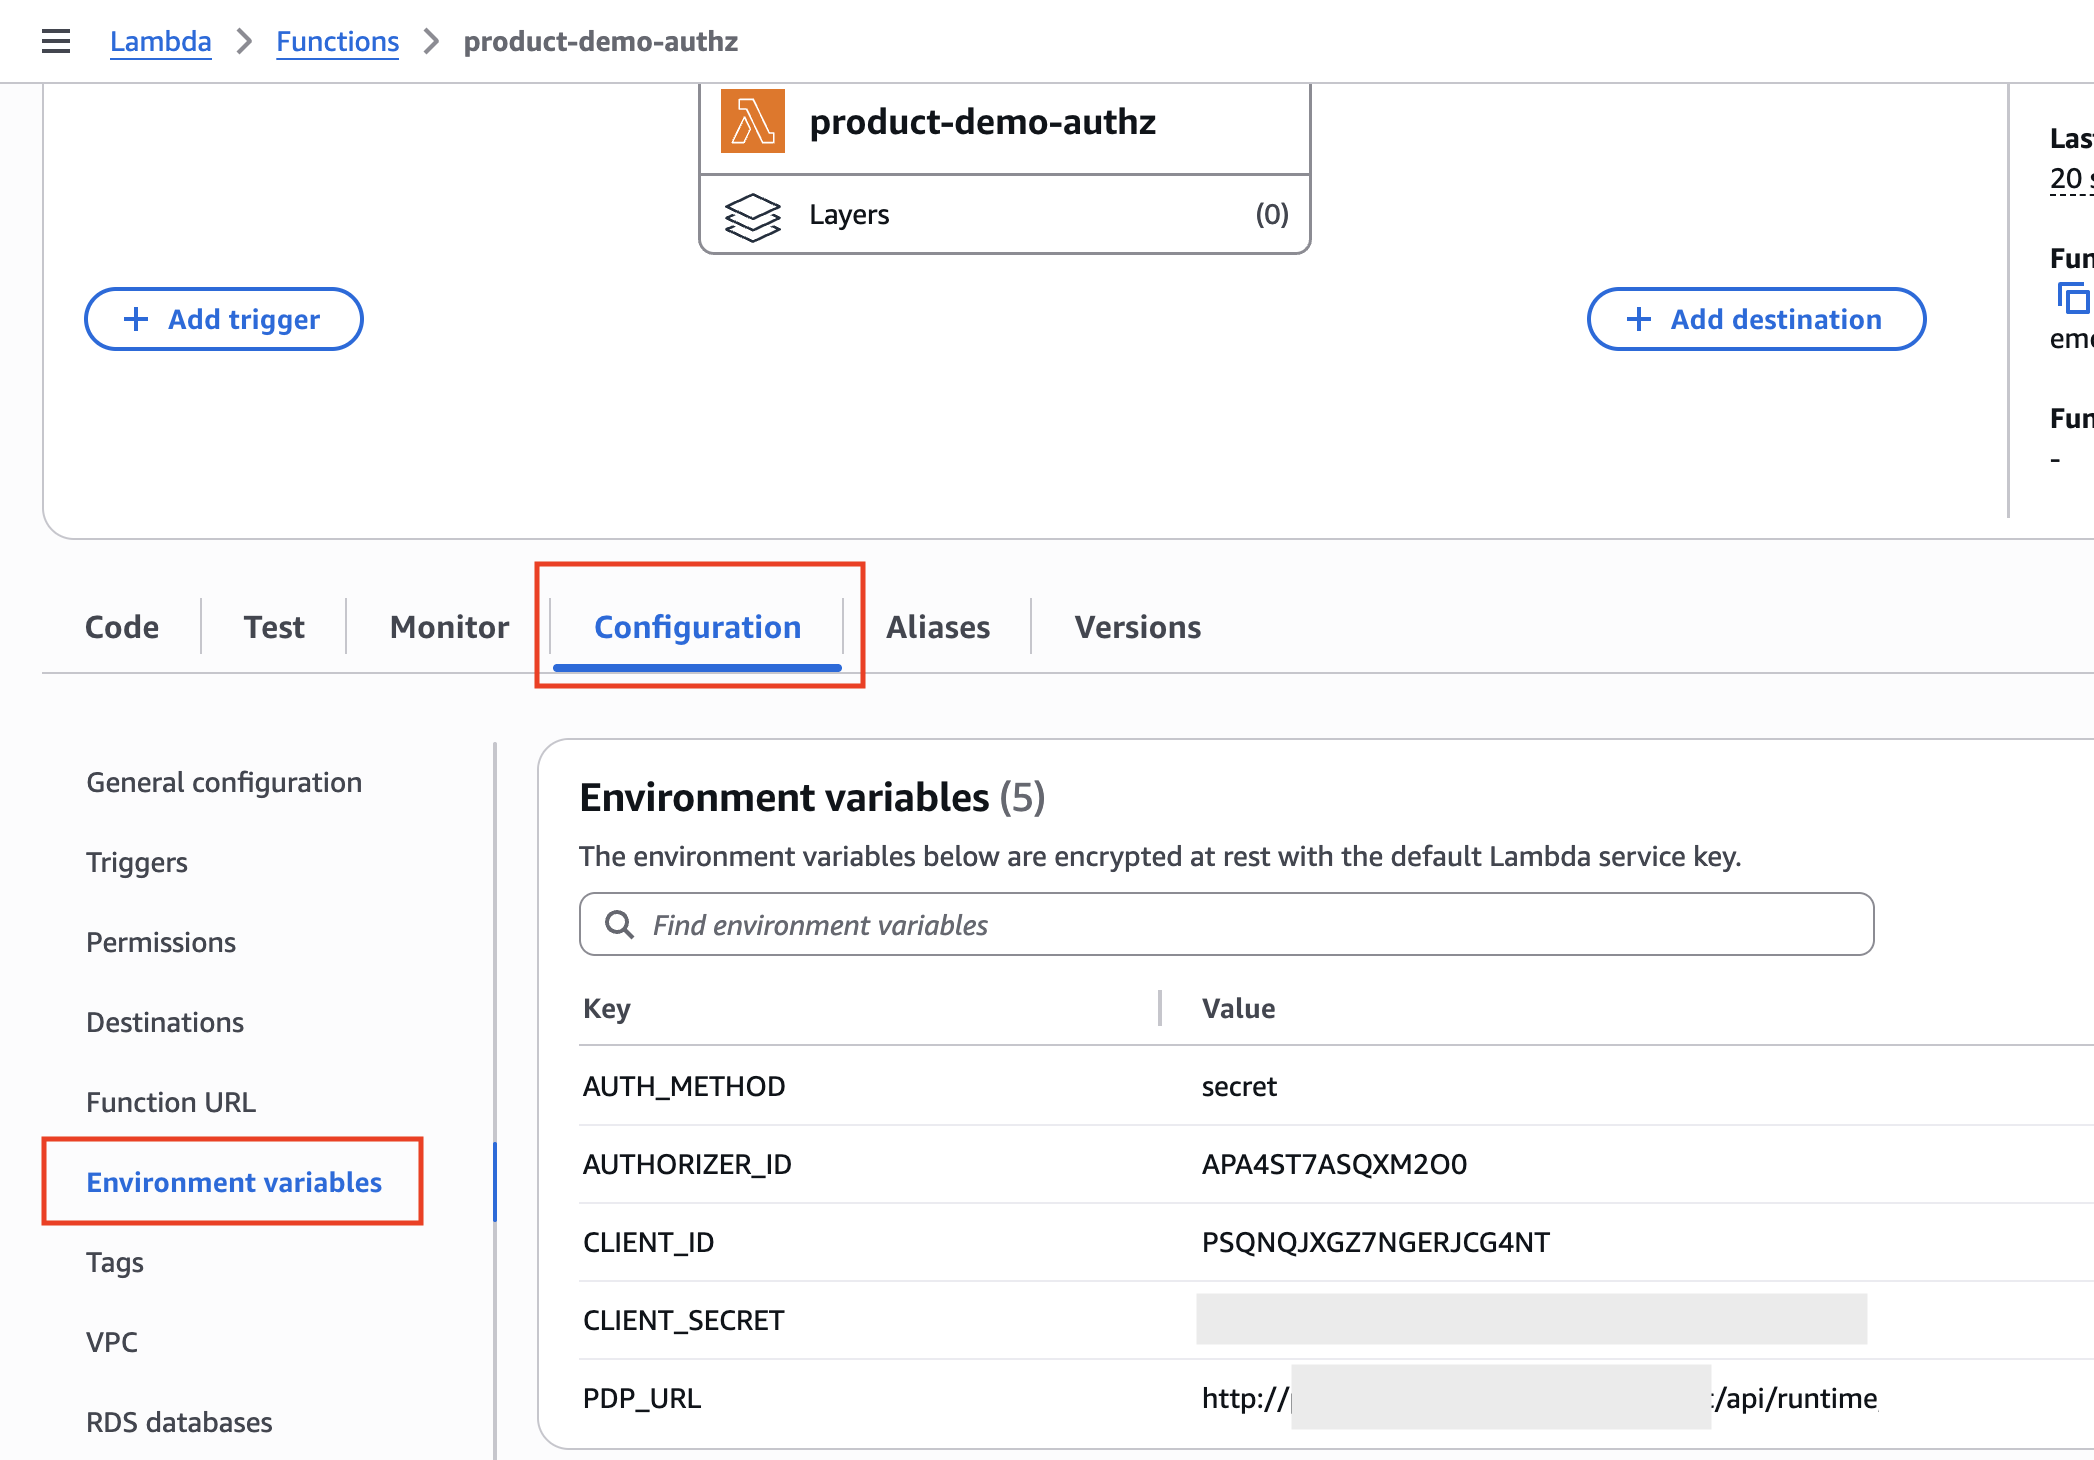
The Authorizer set as a Lambda uses Environment Variables to integrate with PlainID and enforce API access:
| Variable Key | Role/Purpose | Sample Value | Notes/Instructions |
|---|---|---|---|
| CLIENT_ID | Policy Scope identifier used to authenticate PlainID's PDP | DTA43IJZSPYKAVZYYV5Q | Can be obtained from the PlainID Policy Manager SaaS Tenant/Account: Navigate to Environment Settings > Scopes, and get Client ID and Secret if needed. |
| AUTH_METHOD | Defines if the Authorizer authenticates to the PDP using the Scope secret or a JWT (should be aligned with the Scopes Settings in the Platform) | - token - secret |
Token can be used for PDP Authentication, if the API request already contains a valid supported JWT. If a token is used in the AUTH_METHOD, a valid JWT will be sent in the Authorization header instead of the CLIENT_SECRET. If the value is set to secret, then the CLIENT_SECRET is sent to the x-client-secret Header |
| CLIENT_SECRET | Scope secret used for PDP Authentication | XXXX | |
| AUTHORIZER_ID | APA1D318NDQC1DS | Navigate to Environment Settings > Authorizers. then select the Authorizer and copy the Authorizer ID. If you do not have an Amazon API Gateway Authorizer in the list, refer to Managing Authorizers to learn how to add it. |
|
| PDP_URL | The PlainID PDP endpoint that is used by the Authorizer to make Authorization requests and get the dynamic policy-based decision. | http://{pdp-exposed-host}/api/runtime/ | Usually this will be theURL of a PDP deployed as part of customer's PlainID PAA. This URL should be accessible from customer's AWS Environment over https. |
| RUNTIME_FINE_TUNE | Used to pass additional PDP request parameters and flags as part of the Authorization request made by the Authorizer and sent to the PDP | {"includeIdentity": "true"} | Refer to our Authorization APIs documentation for more details on potential properties. This parameter should be passed as a JSON string with the relevant PDP properties and values. Example: {"entityAttributes": {"region": ["US"]},"combinedMultiValues": true} |
| PROPAGATE_JWT | Requests JWT-format responses from the PDP and propagates the JWT in the authorizer context on Allow | false | Boolean string. When set to true, the authorizer sends accessTokenFormat: "JWT" in the PDP request body. See JWT Propagation for more information |
| RESPONSE_JWT_CONTEXT_KEY | Defines the key used to store the propagated JWT in the AWS authorizer context | jwtToken | Optional. When configured, the JWT is added to the authorizer context on Allow decisions. |
To configure the relevant Environment Variables, on the Configuration tab, select Environment variables, click Edit, add/edit the variables and Save.
JWT Propagation
Prerequisites
The Runtime Scope must have JWT response signing configured (private key, audience, expiration). Otherwise, the Runtime returns normal JSON and the authorizer reverts to the standard flow.
When PROPAGATE_JWT=true, the Authorizer requests JWT responses from the PDP by sending accessTokenFormat: "JWT" in the request body.
The Authorizer supports both JWT wrapper responses and standard JSON responses, and automatically detects the response format. If the response contains token and code fields, the JWT flow is used and code === 200 results in an Allow decision. Otherwise, the authorizer falls back to the standard flow using data.result === "PERMIT".
This behavior is fully backward compatible and does not affect existing integrations.
When authorization is allowed and RESPONSE_JWT_CONTEXT_KEY is configured, the JWT is added to the AWS authorizer context using the configured key.
JWT propagation requires JWT response signing to be configured in the runtime scope, including signing key, audience, and expiration settings. If JWT signing is not configured, the runtime returns the standard JSON response, and the authorizer automatically falls back to the standard authorization flow.
Deploy the Lambda
Before completing the Authorization Lambda setup and deploying all changes, you need to make an adjustment to the Authorizer config file:
- Return to the
Codetab - Choose the
config.jsonfile in the files explorer tree. It will be displayed in the editor similar to this{"version": "1.x.y", "pdpEndpointV5": "/5.0/decisions"} - Edit the pdpEndpointV5 by adding the suffix
/permit-denyand becomes{"version": "1.x.y", "pdpEndpointV5": "/5.0/decisions/permit-deny"}
Click the Deploy button to complete the setup and apply all changes.
Authorizer Setup in the API Gateway
Add the Authorizer to a configured API Service
To add the Authorizer to a configured API Service in the Gateway (GW):
- Go to the API Gateway Service.
- Select an API Service configured in the GW.
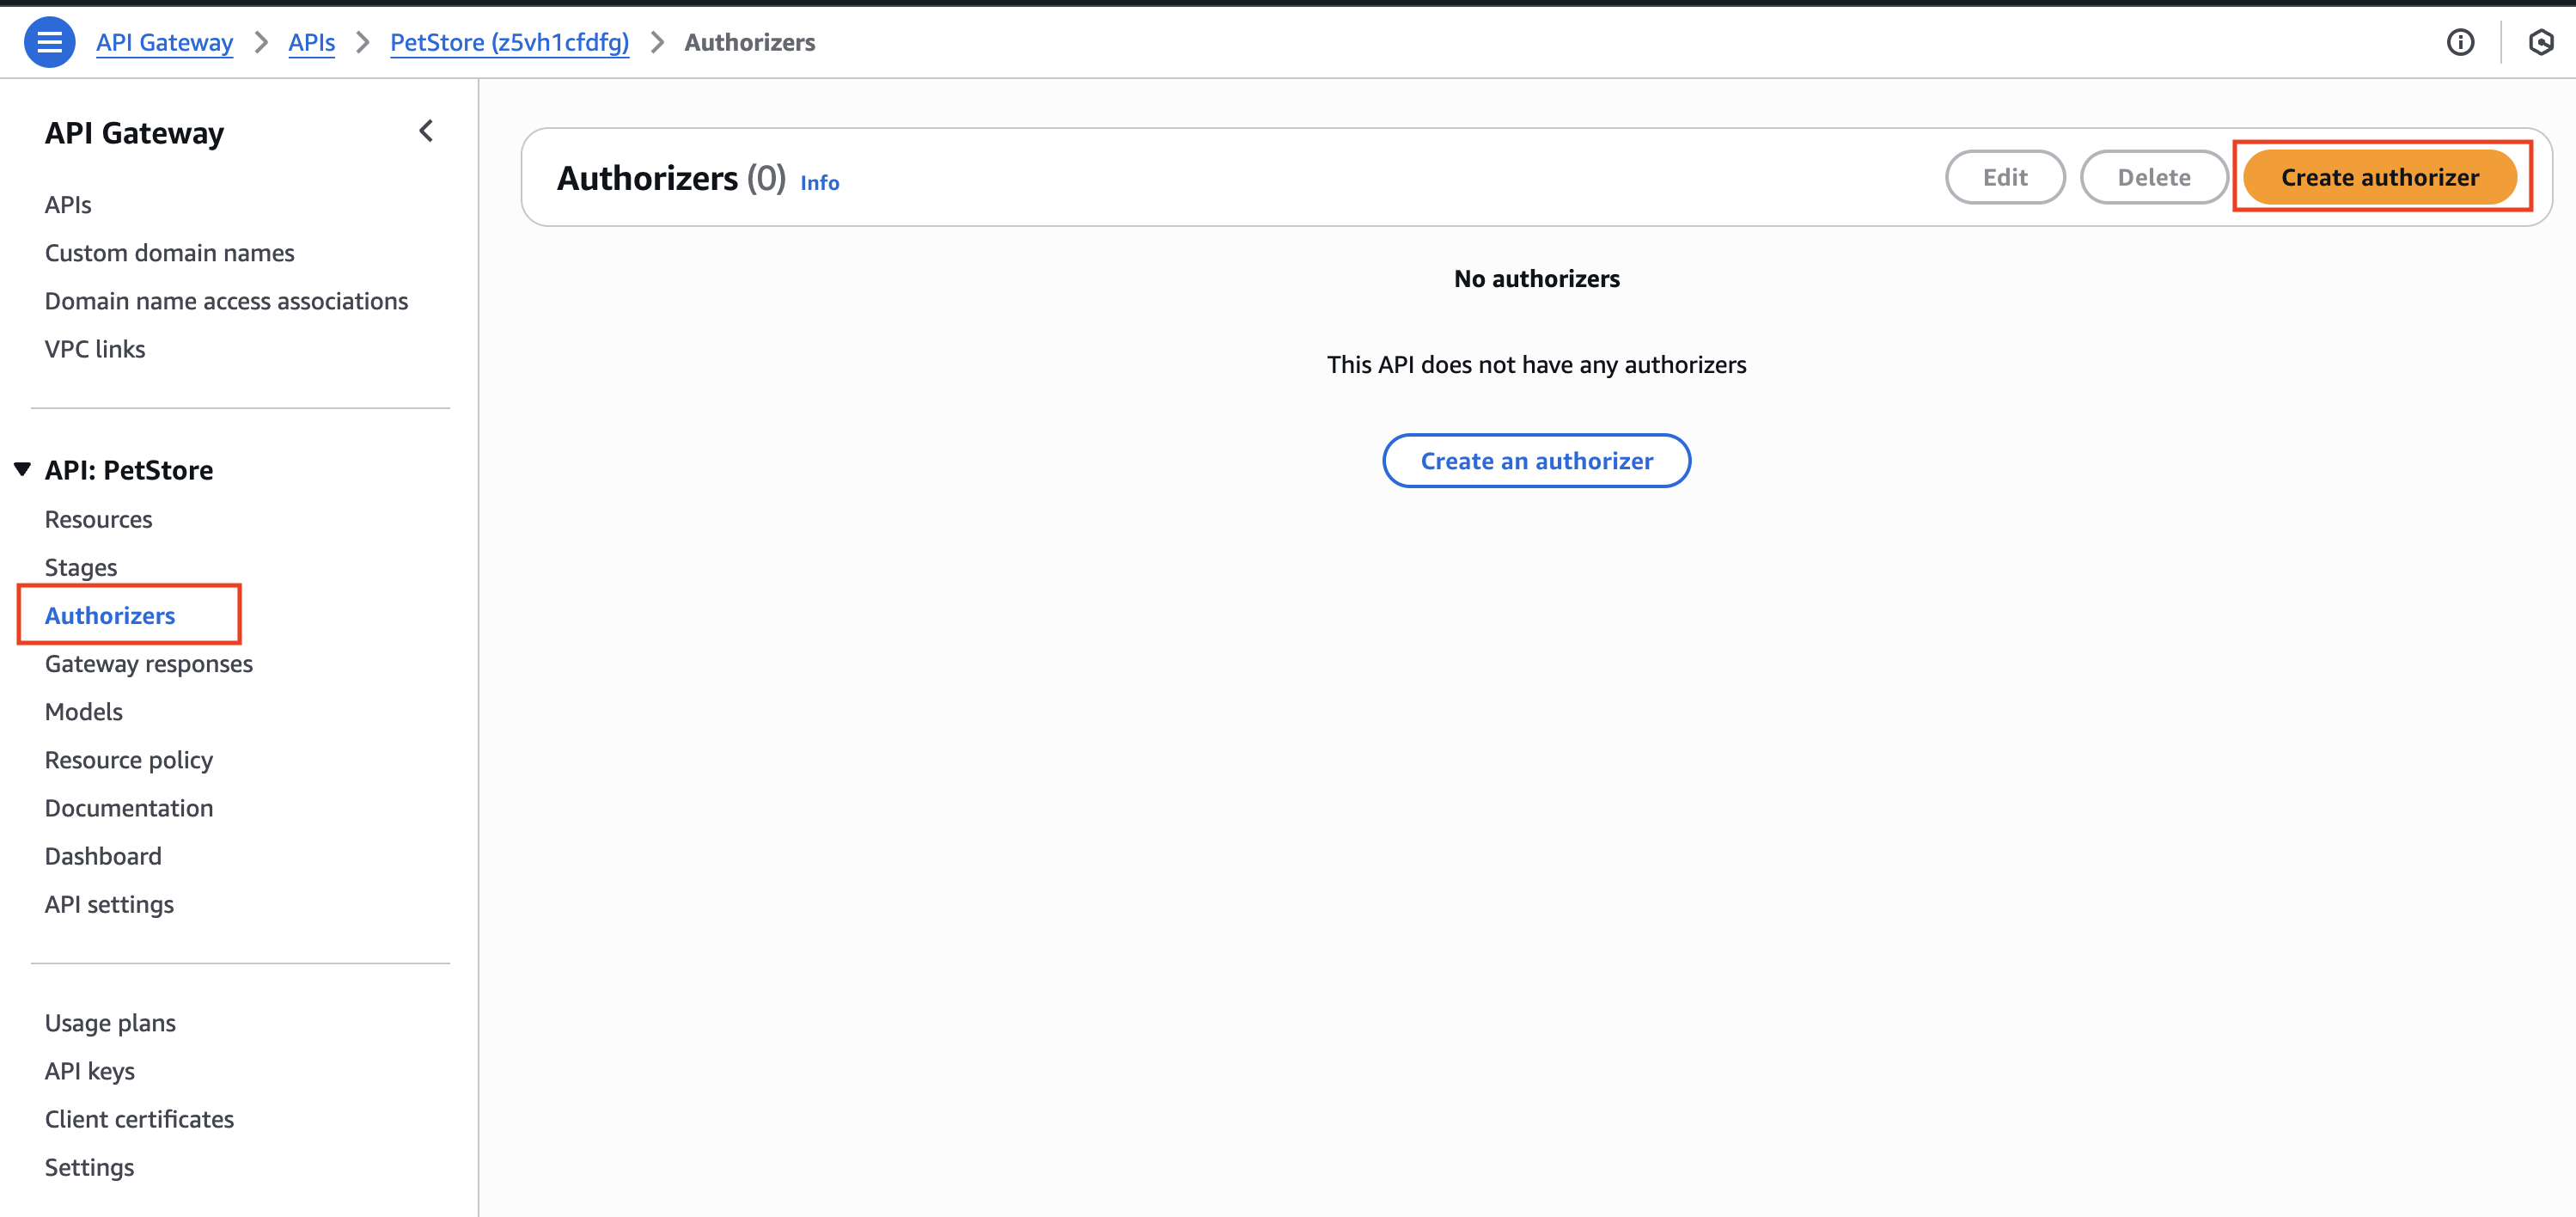
- Select Authorizers from the side menu. The Authorizers screen opens.
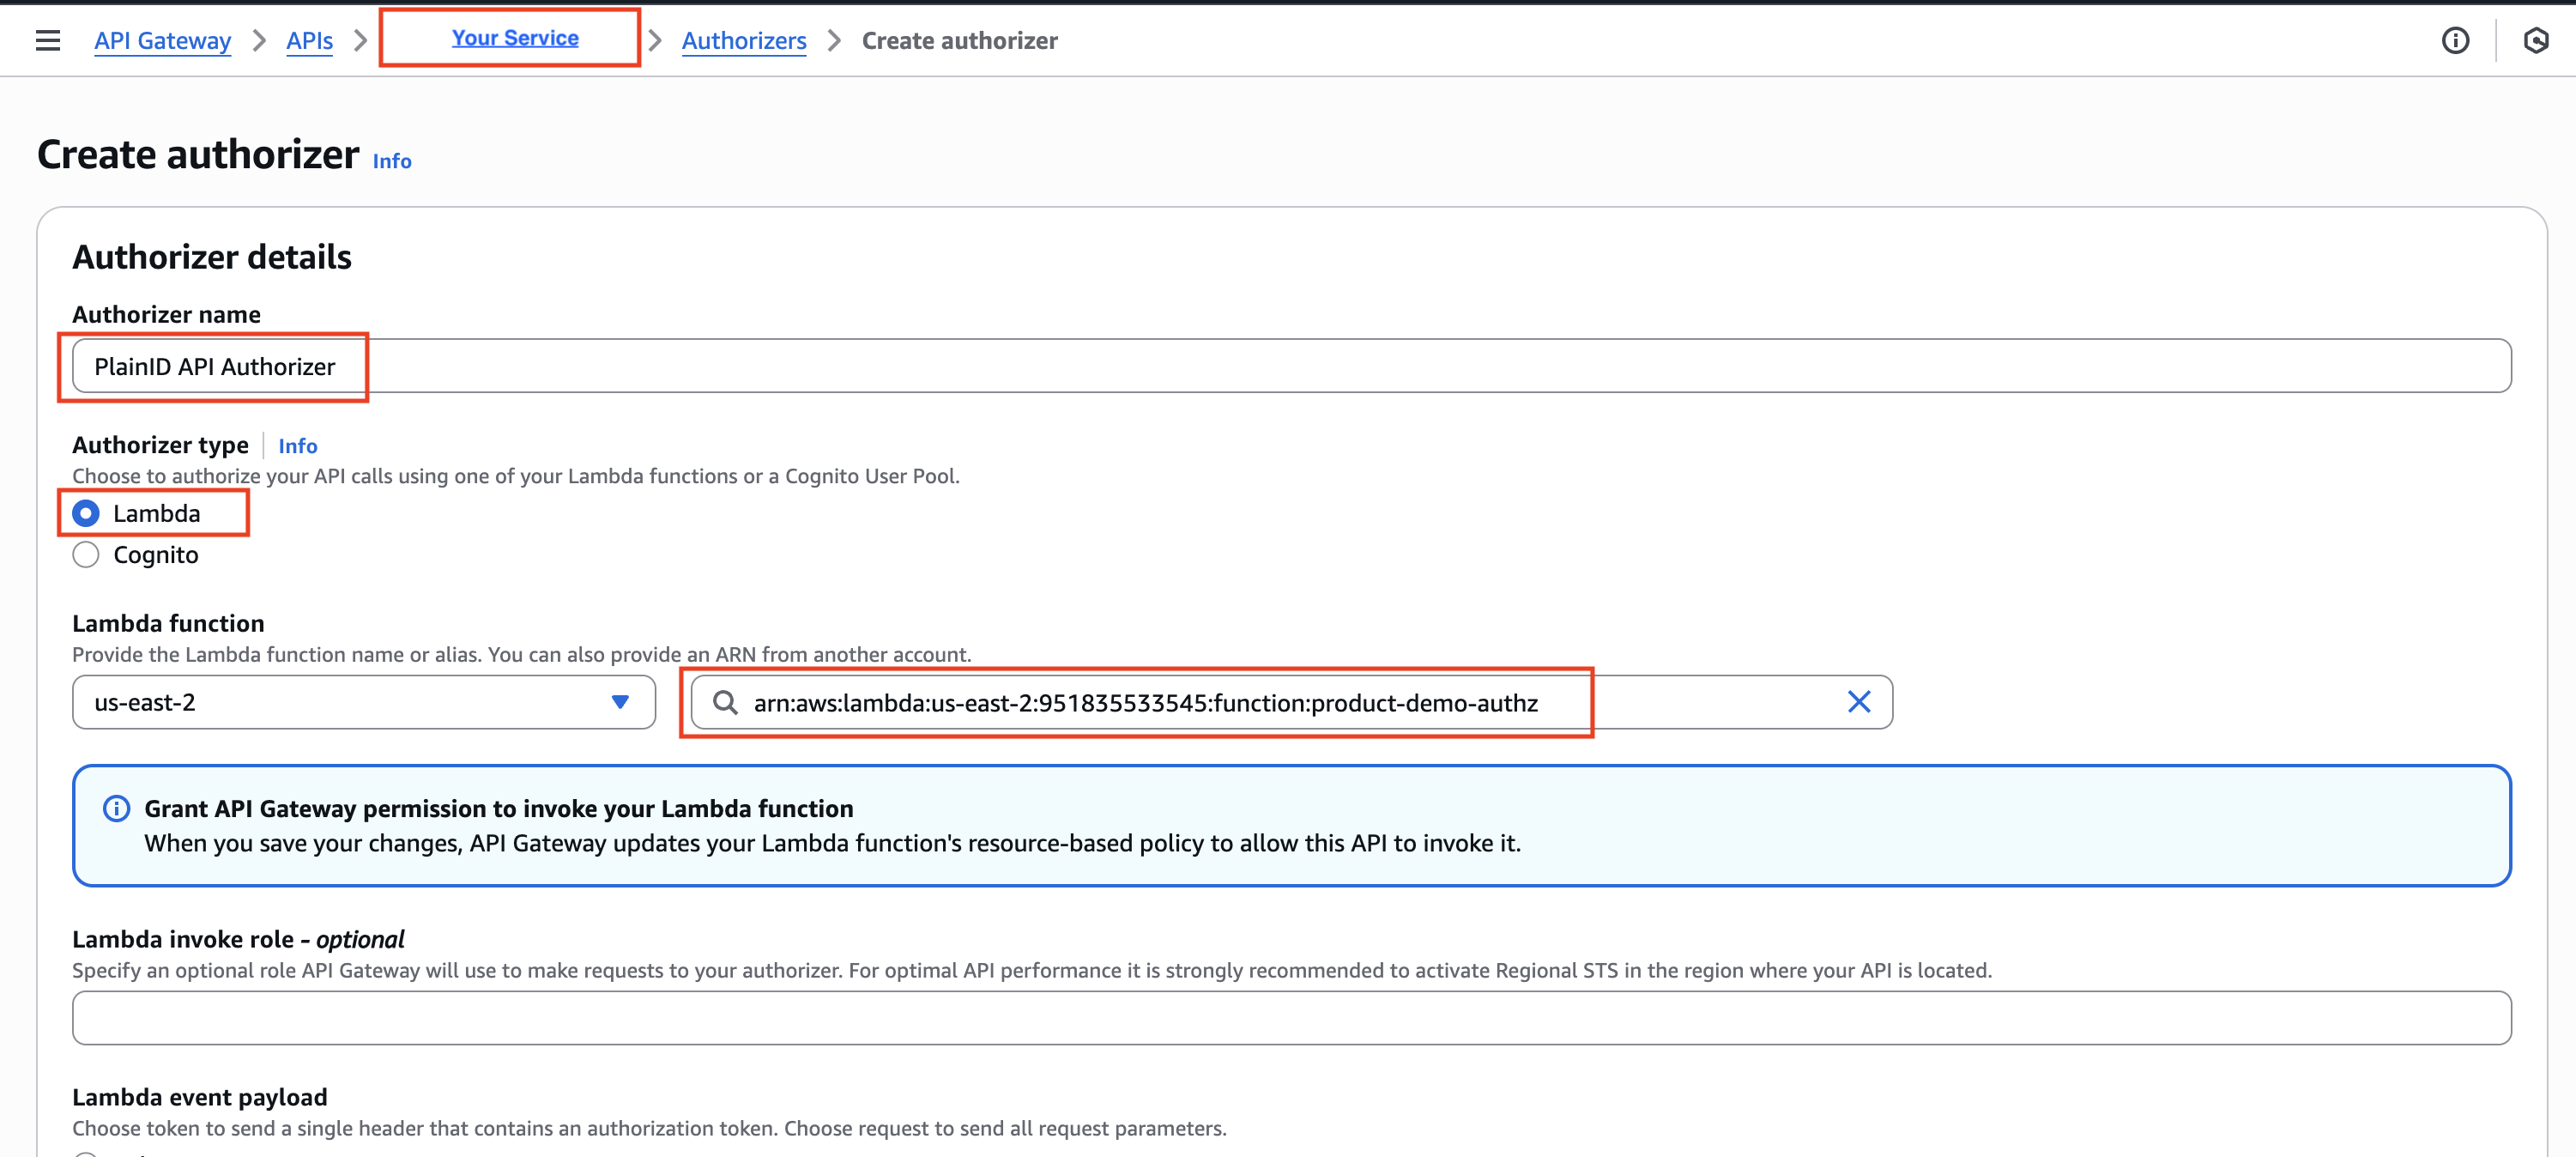
- Click Create New Authorizer, and fill in the relevant information:
- Name - Set an Authorizer name
- Type - Lambda
- Lambda Function - Choose the Lambda configured in previous step
- Lambda Invoke Role - leave empty
- Lambda Event Payload - Select Request
- Identity Sources - Select Header and set to Authorization
- Authorization Caching - For testing, uncheck the box, otherwise set your cache duration preference.
Assigning the Authorizer to an API Method
To assign the Authorizer to an API Method
-
- Go to the API Gateway Service.
- Select an API configured in the GW.
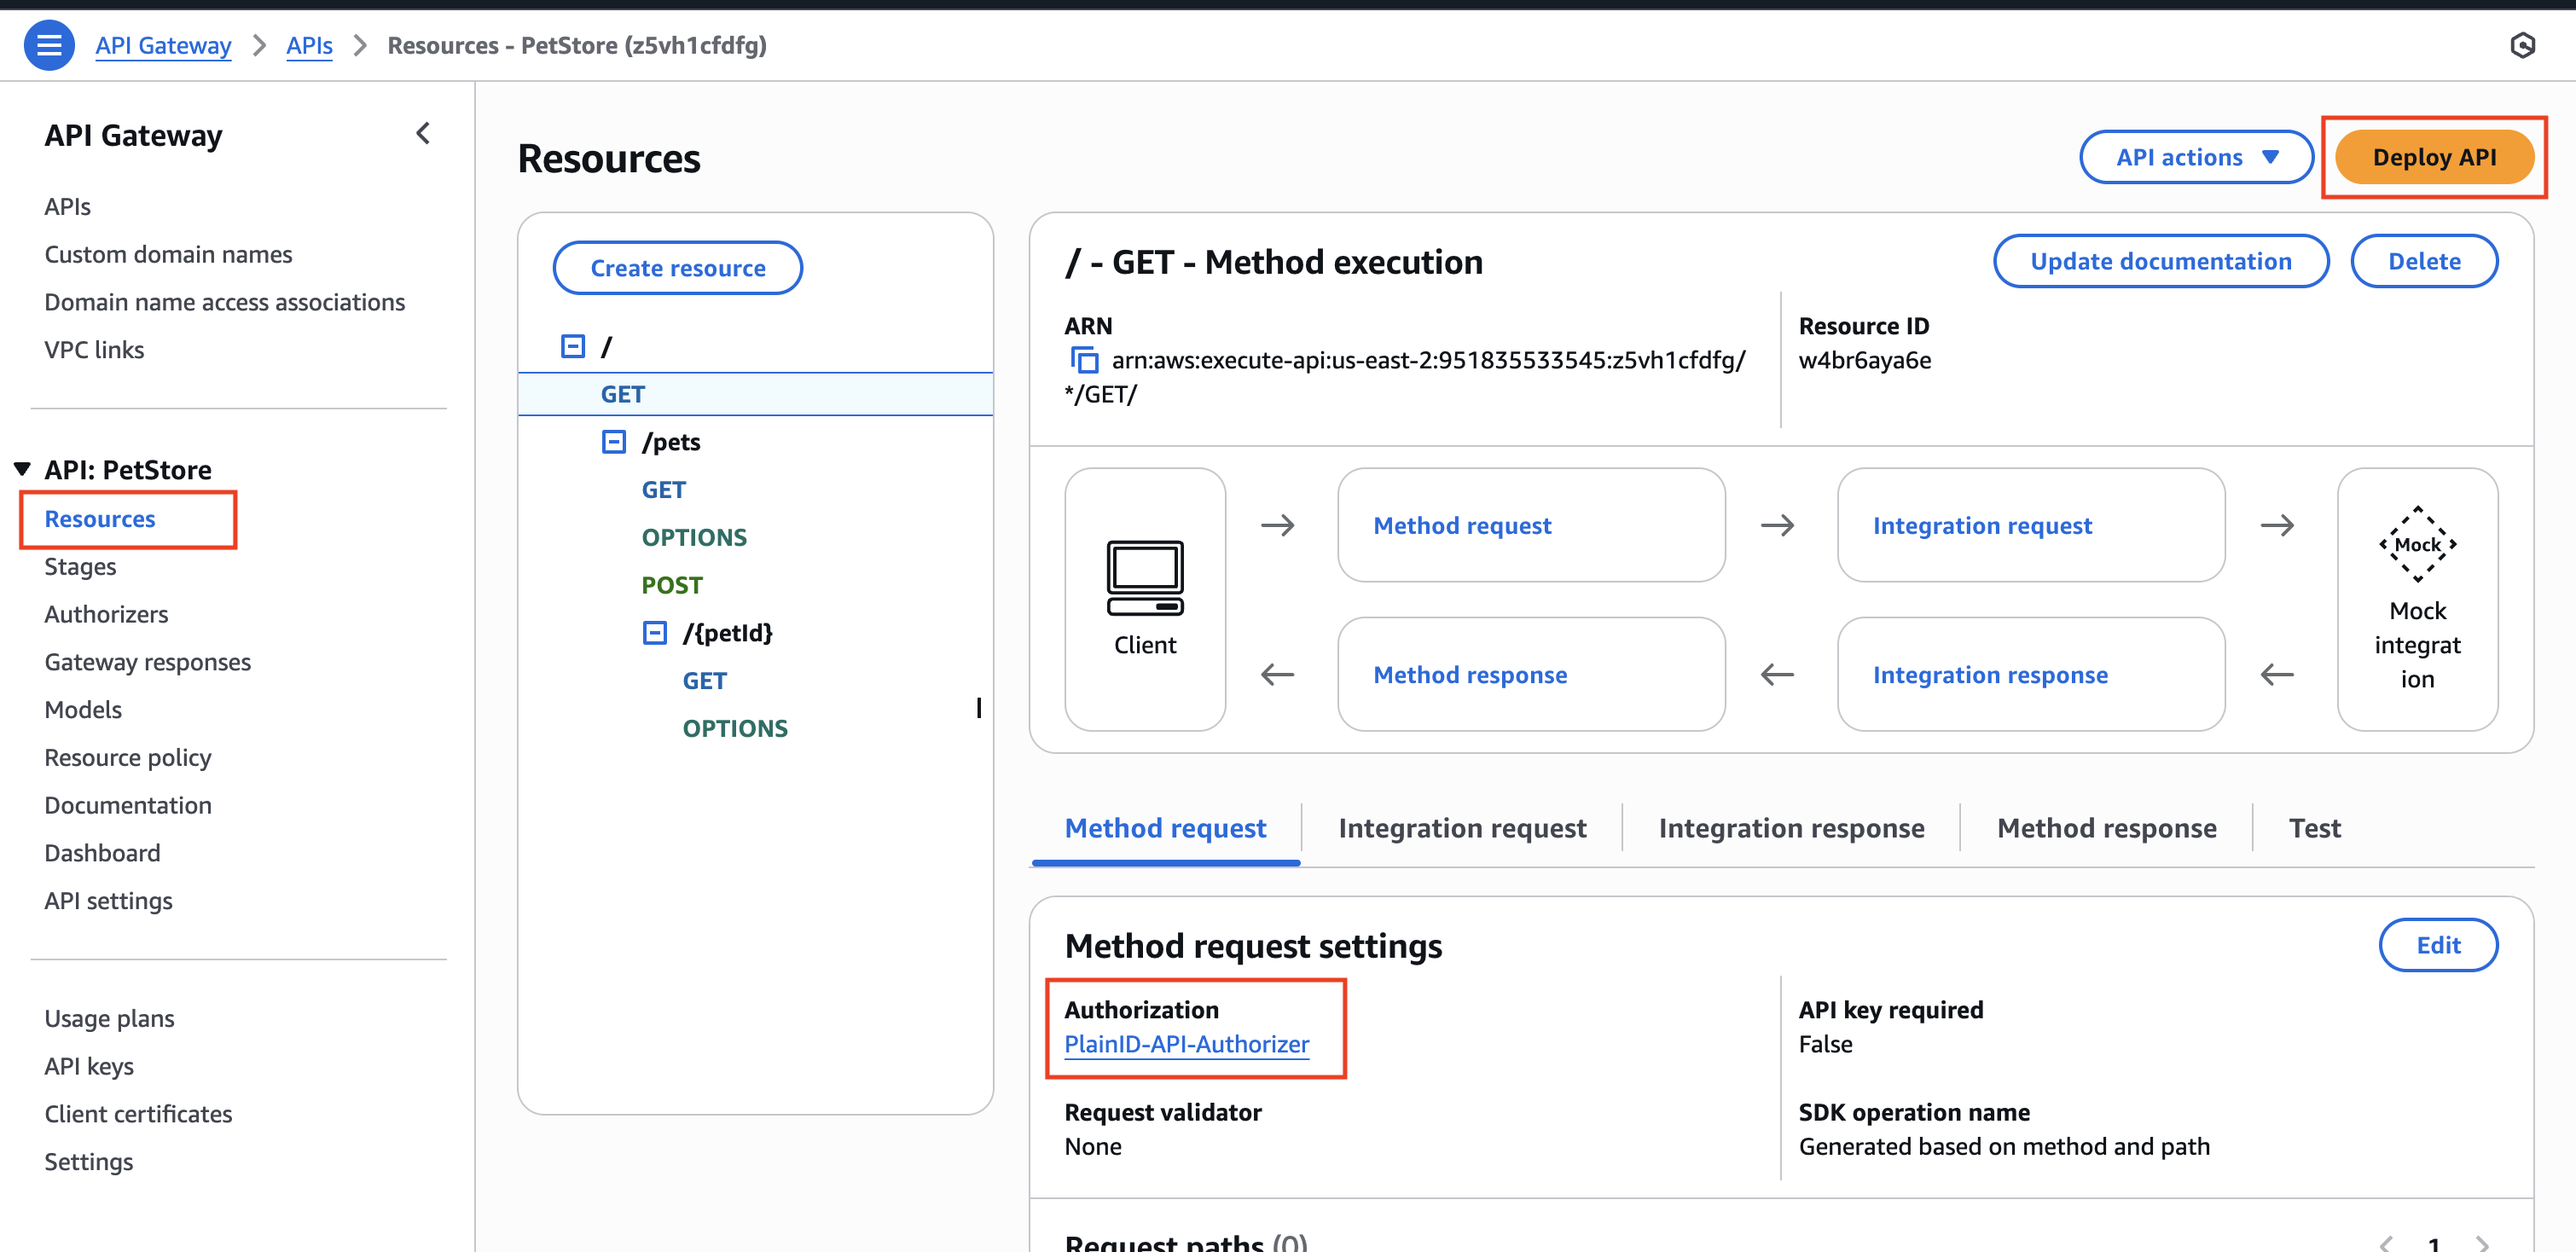
- Select Resources from the side menu. The API's Resources screen opens.
- Select a specific Method Request link:
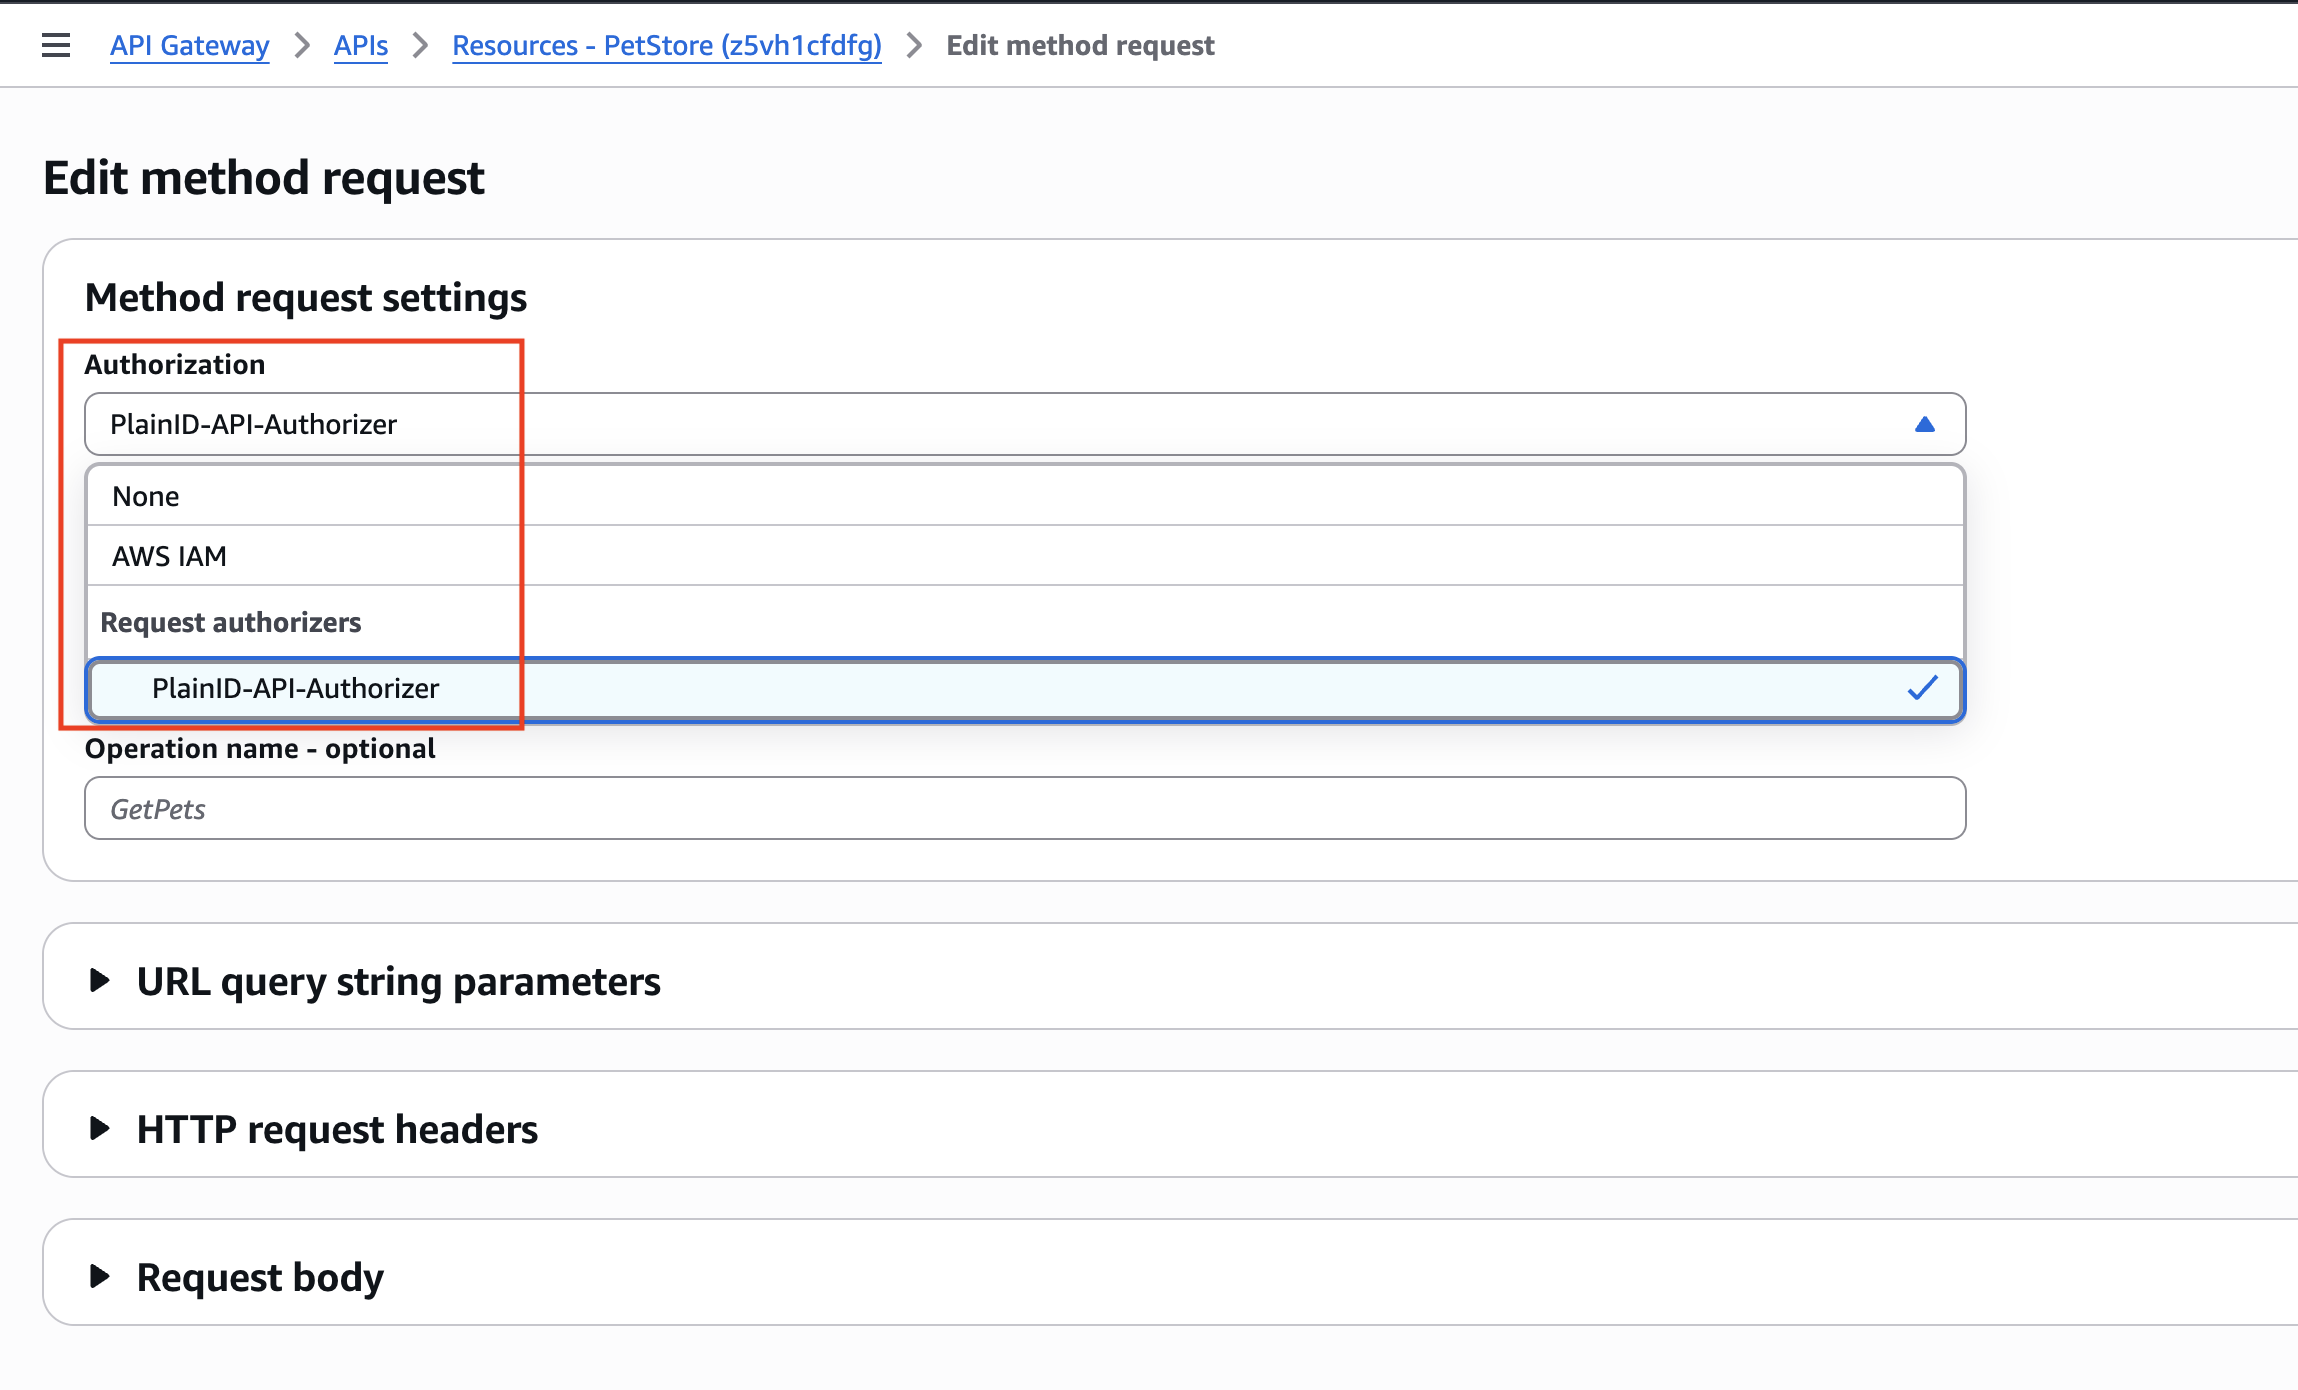
- In the
Method request settingssection, click on the Edit button - Open the
Authorizationdropdown and choose the custom PlainID Authorizer created in previous steps. - Click Save
- In the
- The custom PlainID Authorizer should be displayed as the value of the Authorization field of the method.
- Repeat for each method you want to apply PlainID Authorization on.
- To complete the operation, click Deploy API:
- A popup appears, asking to select an existing stage or create a new stage.
- Select either existing stage or create a new stage, and click Deploy.

Known Limitations
- Request Body Cannot be Used - The Amazon API Gateway does not expose the API Request Body, so the Request Body cannot be used as part of the Policy calculation (cannot be associated/mapped to an Asset Type Attribute or Action)