The PlainID PIP retrieves data from external service data sources that require Authentication before protected API calls can be made. This article explains the supported PIP Outbound Authentication patterns and shows how to configure them using PIP data source settings and the auth-config.xml setup using different Login Modules.
Supported Authentication Flows
The PIP REST Adapter supports three common Authentication patterns:
| Flow | When to use | Login Module |
|---|---|---|
| OAuth2 Client Credentials Flow | The Service Data Source protected by a token generated using OAuth2 ClientID/ClientSecret | com.plainid.pip.auth.oauth.clientcredential.OAuth20ClientCredentialLoginModule |
| OAuth2 Assertion Flow | The Service Data Source protected by a token generated using key-based authentication and JWT assertion signing | com.plainid.pip.auth.oauth.assertion.OAuth20AssertionCCLoginModule |
| REST Token Login / Web Access Management (WAM) Flow | The Service Data Source protected by a WAM or Custom Login service that generates an opaque token or JWT based on User / Password login flow | com.plainid.pip.auth.oauth.custom.TokenRestLoginModule |
Examples in this article use placeholders such as tenant-id, client-id, wam-host, and secret-store. These are placeholders need to be replaced with customer-specific details. However, it is recommended to set real passwords, private keys, and other sensitive params using Environment Variables or secured Secret Store keys to avoid a non-secure clear text setup.
Shared Authentication Configuration Concepts
The Authentication setup concept for each of the REST data services is divided into two parts:
Setup of the auth-config.xml
Each external service Authentication Configuration is defined as an Application Policy inside an auth-config.xml file. The Login Module of the application is set based on one of the three supported Authentication flows. Other Authentication parameters are defined using module-option based on the flow specifics (see below).
Setup of PIP Translator Properties
The defined data source in PIP should include two translator properties referencing the configuration -
- authConf - References the
auth-conf.xmlfile path - securityDomain - References the
application-policy
<application-policy name="example-security-domain">
  <authentication>
    <login-module code="<login-module-class>" flag="required">
      <!-- module-option entries for the selected flow -->
    </login-module>
  </authentication>
</application-policy>
Note: The Security Type field in the PAA section should be set to None when authentication is handled through authConf and securityDomain translator properties
OAuth2 Client Credentials Flow
OAuth2 is an authorization protocol that provides a secure way to access protected data from an Application. The PIP Service can be configured to use OAuth 2.0 to securely access API based data sources, such as SCIM, Azure AD, OData, and REST.
Use the OAuth2 client credentials flow when the target service exposes a standard OAuth2 token endpoint and the application authenticates with a Client ID and Client Secret.
How it Works
.png)
Sample Configuration
<application-policy name="oauth2-azure-ad-staging">
  <authentication>
    <login-module code="com.plainid.pip.auth.oauth.clientcredential.OAuth20ClientCredentialLoginModule" flag="required">
      <module-option name="access-token-uri">https://login.microsoftonline.com/tenant-id/oauth2/v2.0/token</module-option>
      <module-option name="client-id">${env:AAD_CLIENT_ID}</module-option>
      <module-option name="client-secret">{{store=storeName,key=keyName,jsonpath=$.clientSecret}}</module-option>
	  <module-option name="setAuthorizationHeader">false</module-option>
	  <module-option name="scope">https://graph.microsoft.com/.default</module-option>
    </login-module>
  </authentication>
</application-policy>
Login Module
com.plainid.pip.auth.oauth.clientcredential.OAuth20ClientCredentialLoginModule
Module Options
| Property | Description | Mandatory |
|---|---|---|
| access-token-uri | Token endpoint URL of the token provider. | Yes |
| client-id | Client ID registered in the token provider. | Yes |
| client-secret | Client Secret registered in the token provider. We recommend using Secret Manager or Environment Variables rather than clear text. |
Yes |
| setAuthorizationHeader | Controls how client credentials are sent to the token endpoint. true sends credentials in the Authorization header;false sends credentials in the body payload. |
No |
| scope | OAuth2 scope requested from the token provider. Note: Some providers require this to be omitted or empty. |
No |
Authentication to Entra ID Example
Below is an example of the<application-policy> Settings for Entra ID OAuth Configuration:
<application-policy name="oauth2-azure-ad-staging">
  <authentication>
    <login-module code="com.plainid.pip.auth.oauth.clientcredential.OAuth20ClientCredentialLoginModule" flag="required">
      <module-option name="scope">https://graph.microsoft.com/.default</module-option>
      <module-option name="access-token-uri">https://login.microsoftonline.com/********-****-****-****-************/oauth2/v2.0/token</module-option>
        <module-option name="client-id">${env:AAD_CLIENT_ID}</module-option>
        <module-option name=“client-secret”>${env:AAD_CLIENT_SECRET}</module-option>
    </login-module>
  </authentication>
</application-policy>
- The
application-policyname (in the above example isoauth2-azure-ad-staging) should be set as the Security Domain field in the PIP Settings screen when configuring the EntraID Data Source.
OAuth2 Assertion Flow
Some Data Services require an OAuth2 Assertion flow instead of a standard client credential flow. In this flow, the PIP signs a JWT using a predefined Private Key and submits that assertion to the service token endpoint to obtain an access token.
How it Works
.png)
Sample Configuration
<application-policy name="oauth2-assertion-example">
  <authentication>
    <login-module code="com.plainid.pip.auth.oauth.assertion.OAuth20AssertionCCLoginModule" flag="required">
      <module-option name="access-token-uri">https://okta-host/oauth2/v1/token</module-option>
      <module-option name="client-id">${env:ASSERTION_CLIENT_ID}</module-option>
      <module-option name="private-key">{{store=storeName,key=keyName,jsonpath=$.privateKey}}</module-option>
      <!-- If private key is defined inline(not recomended): -->
      <module-option name="private-key">-----BEGIN PRIVATE KEY-----
private key content
-----END PRIVATE KEY-----</module-option>
      <module-option name="scope">okta.users.read okta.users.manage</module-option>
    </login-module>
  </authentication>
</application-policy>
Login Module
com.plainid.pip.auth.oauth.assertion.OAuth20AssertionCCLoginModule
Module Options
| Property | Description | Mandatory |
|---|---|---|
| access-token-uri | Token endpoint URL of the token provider. | Yes |
| client-id | Client ID registered in the token provider. Not required if using the grant-type:jwt-bearer parameter. |
Yes |
| private-key | Private key used to sign the JWT assertion. We recommend using Secret Manager or Environment Variables rather than clear text. |
Yes |
| scope | OAuth2 scope requested from the token provider. Some providers require this to be omitted or empty. | No |
| grant-type | Set to urn:ietf:params:oauth:grant-type:jwt-bearer to use the JWT Bearer flow instead of the standard assertion flow. See the JWT Properties section below for more information. The client-id parameter is not required in this case. |
No |
Note: If the grant-type is not set, it will default to client assertion type"urn:ietf:params:oauth:client-assertion-type:jwt-bearer".
Ensure that you include the client-id if using the client-assertion type.
JWT Properties
When using the Grant Type JWT Bearer parameter, ensure that these properties are set.
| Property | Description |
|---|---|
| jwt.kid | Key ID (kid) included in the JWT header. |
| jwt.iss | Issuer (iss) claim. Typically the service account email or registered client identifier. |
| jwt.aud | Audience (aud) claim. Usually the token endpoint URL. |
| jwt.scope | Scope claim in the JWT payload. Overrides the top-level scope option when set. |
| jwt.exp-seconds | Token lifetime in seconds used to set the exp claim. Defaults to 3600. |
JWT Bearer Grant Type: When
grant-typeis set tourn:ietf:params:oauth:grant-type:jwt-bearer, the JWT claims are controlled directly viajwt.*module options rather than derived from theclient-idregistration. This is required for services such as Google APIs that use service account authentication. Theclient-idoption is not required in this case.
Example:
<application-policy name="google-jwt-bearer">
<authentication>
<login-module
code="com.plainid.pip.auth.oauth.assertion.OAuth20AssertionCCLoginModule"
flag="required">
<module-option name="access-token-uri">https://oauth2.googleapis.com/token</module-option>
<module-option name="grant-type">urn:ietf:params:oauth:grant-type:jwt-bearer</module-option>
<module-option name="private-key">-----BEGIN PRIVATE KEY-----\n...\n-----END PRIVATE KEY-----\n</module-option>
<module-option name="jwt.kid">3243827498fhwiudfhi2</module-option>
<module-option name="jwt.iss">johndoe@email.com</module-option>
<module-option name="jwt.aud">https://oauth2.googleapis.com/token</module-option>
<module-option name="jwt.scope">https://www.googleapis.com/auth/cloud-platform</module-option>
<module-option name="jwt.exp-seconds">3600</module-option>
</login-module>
</authentication>
</application-policy>
:::(Info) (Secret Manager Support)
Secret Manager (SM) support: Only the client-id and private-key can reference secrets using the store format described in the [Secret Management](/v1/docs/secret-management-configuration-1){target=`_blank`} documentation:
`{{store=<storeName>,key=<keyName>,jsonpath=$.<path>}}`
:::
---
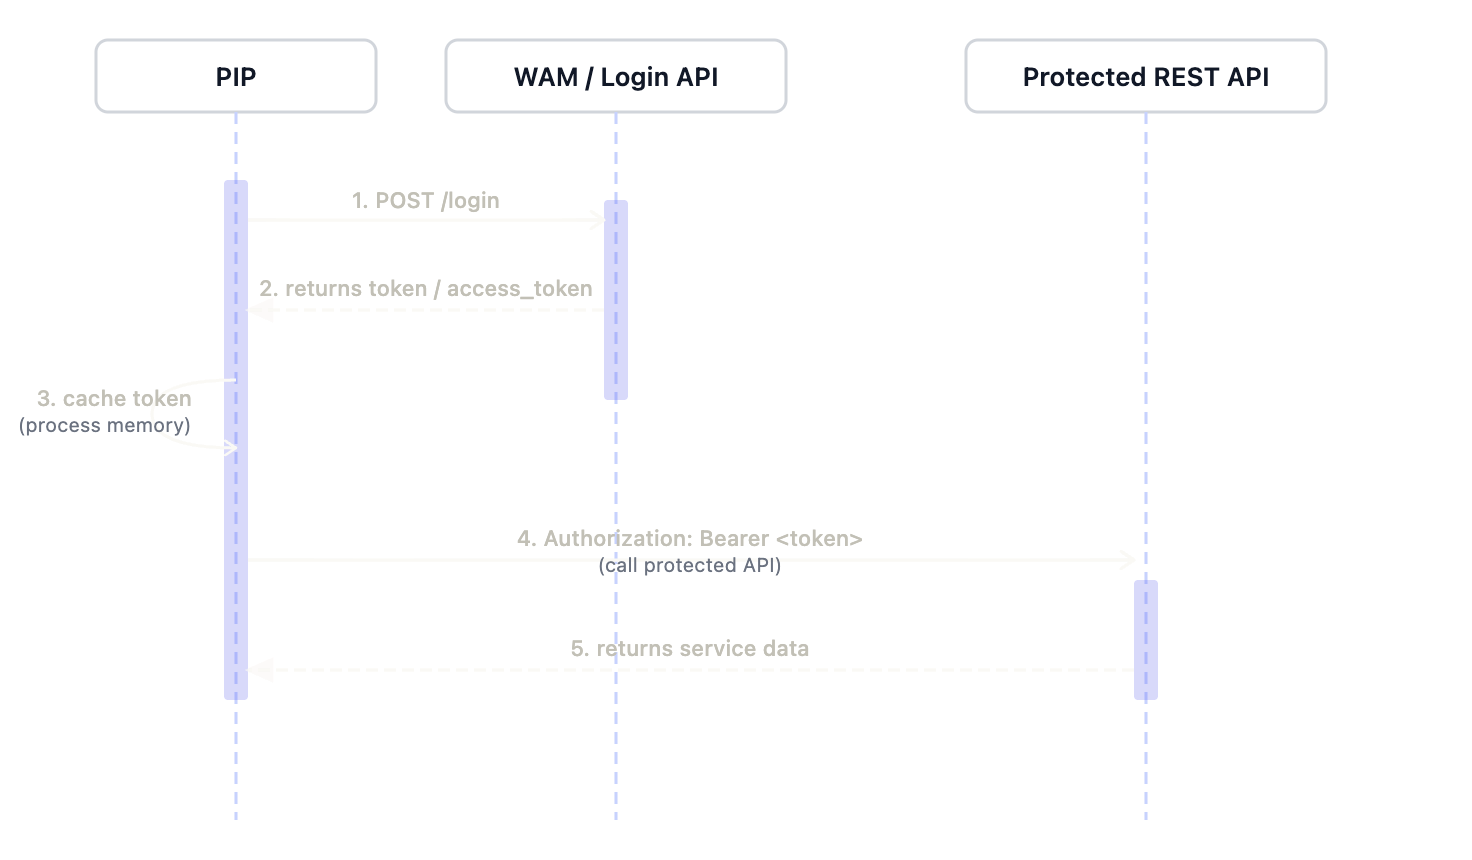
## REST Token Login Flow for WAM-protected APIs
Some APIs are located behind a Web Access Management (WAM) layer or a custom login service that does not support OAuth2. Instead, the client sends credentials to a login endpoint, receives a short-lived token, and uses it as a Bearer Token to Authenticate protected API calls. PlainID supports this pattern using TokenRestLoginModule.
### How it Works
{height="" width=""}
:::(Info) (Saviynt Note)
An example for this Authentication flow is integration with **Saviynt** which uses the `/ECM/api/login` endpoint to authenticate API calls. This requires users to send a username or password. They receive a token from the login response, and then use that token to authenticate subsequent Saviynt API requests and fetch data.
:::
### Sample Configuration
```xml
<application-policy name="wam-service">
<authentication>
<login-module code="com.plainid.pip.auth.oauth.custom.TokenRestLoginModule" flag="required">
<module-option name="url">https://wam-host/login</module-option>
<module-option name="param:username">{{store=storeName,key=keyName,jsonpath=$.username}}</module-option>
<module-option name="param:password">{{store=storeName,key=keyName,jsonpath=$.password}}</module-option>
<module-option name="header:Content-Type">application/json</module-option>
<module-option name="method">POST</module-option>
<module-option name="body">{"username":"${username}","password":"${password}"}</module-option>
</login-module>
</authentication>
</application-policy>
Sample Configuration for Basic Auth Flow
When the login endpoint expects Basic Authentication, set the module-option credential-flow to Basic and the module-option body as empty json {}. The param:username and param:password values are encoded as Basic Auth in user:password and sent to the login endpoint.
<application-policy name="basic-token-service">
  <authentication>
    <login-module code="com.plainid.pip.auth.oauth.custom.TokenRestLoginModule" flag="required">
      <module-option name="url">https://service-host/api/login</module-option>
      <module-option name="param:username">{{store=storeName,key=keyName,jsonpath=$.username}}</module-option>
      <module-option name="param:password">{{store=storeName,key=keyName,jsonpath=$.password}}</module-option>
      <module-option name="header:Content-Type">application/json</module-option>
      <module-option name="method">POST</module-option>
      <module-option name="credential-flow">Basic</module-option>
      <module-option name="body">{}</module-option>
    </login-module>
  </authentication>
</application-policy>
Login Module
com.plainid.pip.auth.oauth.custom.TokenRestLoginModule
Module Options
| Property | Description | Mandatory |
|---|---|---|
| url | Login or token endpoint used to authenticate and retrieve the token. | Yes |
| param: |
Named parameter available for substitution in the body template or for credential-flow handling. Common examples are param:username and param:password. |
Depends on the login API |
| header: |
HTTP header sent to the login endpoint, for example header:Content-Type. Additional HTTP headers can be configured using module options with the prefix header: in the following format: <module-option name="header:{headerName}">{headerValue}</module-option> |
Depends on login API |
| method | HTTP method for the login request, usually POST. | Yes |
| body | Request body sent to the login endpoint. Supports ${param} placeholder substitution. |
Yes. (empty json when using Basic Auth flow) |
| credential-flow | Optional credential handling mode. When set to Basic, username/password parameters are encoded as Basic Auth. If omitted, credentials must be included as required by the login API, inside the JSON body. |
No |
The credentials defined in the username and password parameters can be obtained through Secret Manager support by configuring a secret key syntax, like {{store=<storeName>,key=<keyName>,jsonpath=$.<path>}}, instead of entering clear text credentials. See the Secret Management documentation for more information.
Additional Information
Token Lifecycle and Refresh Behavior
- PIP reads the configured module options from the referenced auth-config.xml file.
- PIP sends the login/token request to the configured url using the configured params relevant for the flow.
3. The login service / authorization server, validates the credentials and returns a token response.
4. PIP Auth module extracts the token and caches it in the PIP process.
5. PIP attaches the cached token to protected API requests as a Bearer token.
6. When the token expires or the protected API rejects it, PIP performs the login/token request again and obtains a fresh token.
Environment Variables
Any module-option can be overridden with environment variable syntax (${env:VAR_NAME}). Tags in between are processed through an Environment Variable translation.
For example: <module-option name=“client-secret”> ${env: CLIENT_SECRET} </module-option>
Secret Stores Support
When configuring authentication flows, you can use secrets to manage authentication credentials securely. Instead of storing credentials in plain text, you can reference them from a secret store, enabling seamless secret rotation and enhanced security.
Sensitive values should not be stored directly in auth-config.xml. Use PlainID's Secret Manager and reference secret keys using the secret key pattern {{store=storeName,key=keyName,jsonpath=$.path}}
Refer to Using Secrets for PIP Data Sources for more information.
PIP Auth Logging & Troubleshooting
Additional logging for can be configured by adding the following section to the auth-config.xml via the custom-values.yaml mechanism:
<logger name="org.teiid.jboss.oauth" level="detail" additivity="false">
    <appender-ref ref="RollingFile" />
</logger>
Use the following troubleshooting matrix to isolate configuration, credential, and token-lifecycle issues.
| Error | Likely cause | Recommended action |
|---|---|---|
| No login module defined for security domain | securityDomain does not match application-policy name, or authConf points to the wrong file. | Verify the authConf path and exact application-policy name. |
| Login endpoint returns 401 | Username/password mismatch, rotated secret, or invalid Secret Manager reference. | Verify secret values, login payload, and login API requirements. |
| Protected API returns 401 | Token missing, expired, malformed, rejected by WAM, or token field extraction mismatch. | Check login response structure, bearer header behavior, and supported token fields. |
| No token activity visible in logs | Logging level is too low for auth modules or REST translator details. | Enable DEBUG/detail logging for the relevant PIP/auth classes during troubleshooting. |
| Connection refused or timeout | PIP cannot reach the login endpoint or protected API. | Check network routing, DNS, firewall rules, and service endpoint URL. |
Auth Setting For PIP Data Sources
As mentioned, the Auth configuration done in auth-conf.xml, should be referenced by PIP data sources using translator properties.
In the PIP settings UI, when creating a data source with adapters that allow/require the usage of OAuth or token logins (e.g., Azure Active Directory, SCIM, REST, or OData v4.0), you will need to reference the auth-config.xml file and the specific application-policy name as the Security Domain:
- In the Policy Authorization Agent section(s), under the Security Type field, choose None.
- In the Translator Properties section, add two new properties with these key-value pairs:
- Key =
authConf, Value = "<path of theauth-config.xmlfile as described above.>" - Key =
securityDomain, Value = "<name of the application-policy you added in the XML for your service>"
- Key =
PIP Deployment Patterns & auth-config.xml
In the Containerized PAA, the auth-config.xml file is located at app/conf/auth-config.xml.
The PlainID PAA Helm Chart includes two configuration files:
- values.yaml - Stores all potential setting parameters, and the default values for the PAA.
- custom-values.yaml - Used to set only the parameters/settings that are modified. As a best practice, we recommend using this file for setting the relevant parameter values by adding configuration values from the values.yaml to the values-custom.yaml file.
You can use the above custom-values.yaml mechanism to inject your auth-config.xml file. You need to add all the XML content, not just your application policies sections, to your custom-values.yaml under this key:
pipOperator:
  plainIDConfig:
    auth-config.xml: |
      <?xml version='1.0'?>
      <policy xmlns:xsi="http://www.w3.org/2001/XMLSchema-instance" xsi:schemaLocation="urn:jboss:security-config:5.0"
        xmlns="urn:jboss:security-config:5.0">
        <!-- Add your XML content here -->
      </policy>
Example for containerized PAA defined in the custom-values file:
pipOperator:
...
  plainIDConfig:
    auth-config.xml: >
        <?xml version='1.0'?>
        <policy xmlns:xsi="http://www.w3.org/2001/XMLSchema-instance" xsi:schemaLocation="urn:jboss:security-config:5.0" xmlns="urn:jboss:security-config:5.0" xmlns:jbxb="urn:jboss:security-config:5.0">
          <application-policy name="entra-id-oauth">
              <authentication>
                 <login-module code="com.plainid.pip.auth.oauth.clientcredential.OAuth20ClientCredentialLoginModule" flag="required">
                    <module-option name="scope">https://graph.microsoft.com/.default</module-option>
                    <module-option name="access-token-uri">https://login.microsoftonline.com/{{azure-tenant-id}}/oauth2/v2.0/token</module-option>
                    <module-option name="client-id">{{client-id}}</module-option>
                    <module-option name="client-secret">{{client-secret}}</module-option>
                 </login-module>
              </authentication>
          </application-policy>
        </policy>
Customer Deployment Checklist
- Identify the authentication pattern required by the target service: OAuth2 client credentials, OAuth2 assertion, or REST token login.
- Register the service application or service user with the token provider or WAM.
- Store client secrets, private keys, usernames, and passwords in a supported secret store.
- Create an application-policy with a clear and unique security domain name.
- Mount or place auth-config.xml where the PIP process can read it.
- Set data source translator properties: authConf and securityDomain.
- Set PAA SecurityType to None when using the external auth configuration mechanism.
- Validate the login flow independently when possible before testing through PIP.
- Test token refresh behavior using a short token TTL in a non-production environment when supported.
- Enable detailed logging only for troubleshooting and disable it afterward to avoid excessive log volume.