You can manage local PAAs in the Platform. This includes adding, editing, and deleting PAAs at the Tenant level. To configure a PAA, you will need information from the Tenant Setting screen including:
- Tenant ID
- Authentication key
- Agent ID
To find these values, select the Hybrid Agent Key settings tab and copy these values. This information is used to configure and set up communication between the PAA (Hybrid Operator) and the Authorization Platform (Hybrid Commander). When you select the Policy Authorization Agents tab, all currently defined PAAs are displayed. Each PAA card represents a PAA Group. PAA Groups can contain a single PAA, or multiple PAAs located in the same or different regions (see Multi-Region PAA Groups).
Each PAA Card displays the following information:
- PAA name
- Icon indicators for components contained in the PAA, for example, PDP and/or PIP
- Three vertical black dots enabling you to delete the PAA
- Download button to download different formats for the installation of the PAA bundle files (for example Helm)
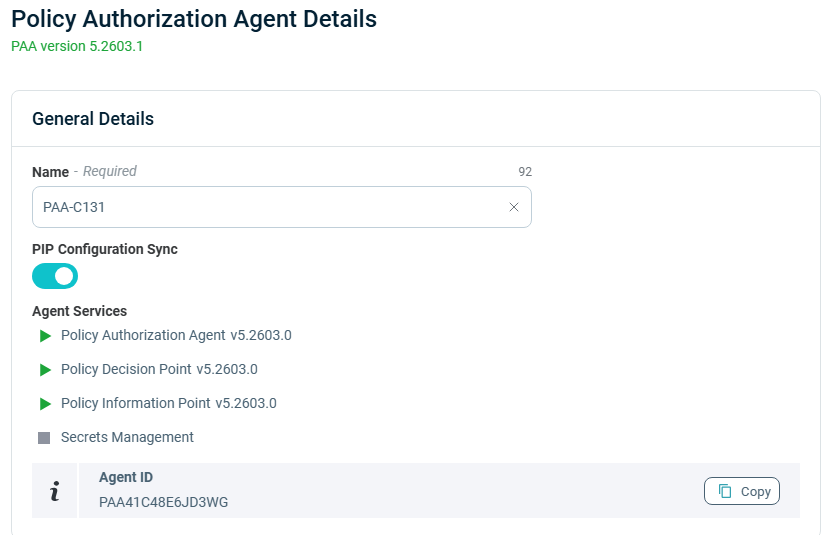
When you click on a PAA card, the Policy Authorization Agent Details for that card are displayed:
This shows PAA version and the currently defined name of the PAA and the Agent ID. You can click Copy to copy the Agent ID to the clipboard. This value is also needed to define the connection between the Hybrid Operator and the Hybrid Commander.
Once you have created the PAA and downloaded and installed the configuration files, you can configure a Policy Information Point for the PAA. For more information, see Data Sources.
Adding a New PAA
To add a PAA:
- On the Tenant Settings screen, select the Policy Authorization Agents tab. The Policy Authorization Agents screen is displayed.
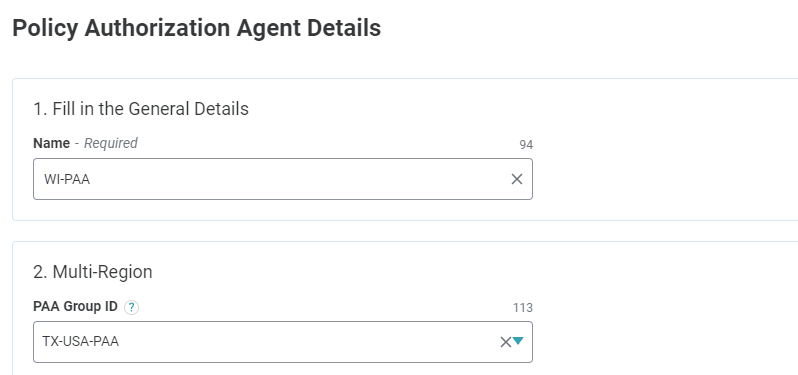
- Click Add. The Policy Authorization Agent Details screen is displayed.
- Enter a Name for the new Agent.
- Select an existing PAA Group or create a new one by entering the name of the PAA Group and clicking. For more information, see Multi-Region PAA Groups.
- In the Incoming JWT Validation Settings field, enter the relevant JWKS URLS. This defines the settings for validating the incoming JWT.
- Click Save. The new PAA is created and added to the list of currently defined PAAs on the Policy Authorization Agents tab of the Tenant Settings screen.
Viewing Policy Authorization Agent Details
At any time, you can view details of a PAA by clicking on the PAA Card in the Policy Authorization Agents screen (Tenant Settings > Policy Authorization Agents or Environment Settings > Policy Authorization Agents).
The Policy Authorization Agent Details side panel opens, displaying the following information:
- PAA Version
- Policy Agent Name (which is editable, enabling you to change it, if needed)
- Agent ID number
- Agent Services:
- Policy Authorization Agent (PAA) version
- Policy Decision Point (PDP) version
- Policy Information Point (PIP) version

For information on how to extract the Version ID through an API, refer to the PAA Version API section in the Admin Portal.
Click Copy to copy the Agent ID number.
Click Save if you changed the PAA name.
As of PlainID's January 2024 release (5.2402), Scope Management allows users to set two new properties affecting how Authorization Requests are authenticated and how the PDP evaluates Identities.
Existing Scopes operate in backward compatibility mode, with no change in behavior. The new properties are not defined by default to maintain backward compatibility, and existing Scopes are marked as incomplete. Users are advised to update the latest Policy Authorization Agent (PAA) and configure Scopes by selecting an Identity Matching Type and a Scope Auth Method based on their use-case. Once saved, the Scope will function according to the new settings.
Note that the JWKS Settings option in now in the Scope section.
The JWKS URL can be set up in the Scope.
If a JWKS URL is already defined, the field will be read-only and can be copied.
PlainID recommends copying the JWKS settings to the relevant Scope before it is deprecated entirely.
For details on Identity Matchers and Scope Authentication, refer to Managing Identity Matchers and Managing Scope Authentication.
Installing a PAA
Download bundles are available on the Policy Authorization Agent screen in Tenant Settings > Policy Authorization Agents. For assistance in installing and configuring a PAA, contact the PlainID Technical Support Team.
Changing the Name of a PAA
You can change the name of the PAA as it appears on the Policy Authorization Agents tab.
To change the name of a PAA:
- Open the Tenant Settings screen and click on the PAA you wish to rename. The Policy Authorization Agent Details screen is displayed.
- In the Name field, enter the new name.
- Click Save.
Deleting a PAA
You can delete a PAA within a Multi-Region Group that is no longer needed.
To delete a PAA:
- Open the Tenant Settings screen and locate the PAA you wish to delete.
- In the upper right area of the PAA card, click the three vertical black dots and select Delete PAA.
- A confirmation message appears, asking you to confirm that you want to delete the PAA. Click Delete. The PAA is deleted permanently.
You cannot delete a PAA that is currently associated with Assets and Environments. If you try to delete a PAA that is the last one within its group and is still being used in Asset Types or Identity Sources, an error message will be displayed. The message will provide details about the specific locations where the PAA is being used. Ensure you delete the relevant Identity Attribute sources and Asset Types listed in the error message before attempting to delete the PAA again.
Multi-Region PAA Groups
By default, the Cloud Policy Authorization PAA will be used when operating with a single, hosted PAA within the Authorization Platform.
However, many organizations operate across multiple regions and networks, creating local repositories (databases, user directories, etc.) to enhance performance and security. The Authorization Platform's Multi-Region Group functionality allows organizations to manage PAAs across various regions and networks.
In the Platform, a single set of Data Models and Views is created for each PAA. Each PAA is considered both an individual node and a Group (in this case, a group of one). When forming a Group, every PAA in the group shares the same data source, Data Model, Data Model properties, Views, and Asset Attribute associations. The only difference between the PAA Group members is the connection string (including credentials, PI/Server name, Ports, etc.).
Creating a Multi-Region Group
Once you've added a single PAA, you can create additional PAAs and group them with the first PAA or create additional Multi-Region Groups.
To create a multi-region PAA configuration:
- Create a new PAA and, in the Multi-Region field, enter the name for the new Multi-Region Group in the Add to Group field.
- Click Add Value. This will create a Multi-Region group, which will appear when you save the PAA.

- Continue creating the PAA (as detailed above) and click Save.
- To add additional PAAs to the Group, create each PAA individually, and in the Add to Group field, use the drop-down option to select the Group to which you want to add the PAA.
- Click Save. The new PAA is added to the selected Group.
If you are not using PAAs in a multi-region configuration, each time you create a new PAA, leave the Multi-Region field blank. Each time you create a new PAA, you can select the region in which you wish to include the PAA. If you want to create a new Multi-Region group, leave the Multi-Region field empty and a new group will automatically be created and available for future PAAs to be added.
To learn more about installing and deploying PAAs, click here.