The API Mappers define the relation between the Applications, Asset Types, and Identity Sources in the Authorization Platform to the APIs used to access or use your organization's business Applications.
API Mapper Workflow
Creating and applying API Mappers is typically done in the following stages. Note that until you create the API Mapper, the option to associate it to an Asset Type is not visible. To effectively use API Mappers, you should:
- Create an Application
- Create an Asset Type
- Create an API Mapper
- Associate the Asset Type to the Mapper
- Associate Identity Sources to the Mapper (optional)
- Define the Asset Attribute Mapping Logic
- Define the Action Mapping Logic
- Prioritize the Mappers
API Mappers within the Authorization Platform are created for and must be unique in an Application (click on an Application in the Platform and select the API Mappers tab).
In addition to a Name and Description (optional), each API Mapper is assigned these mandatory fields:
-
A Match Type: The type of matching used for the mapper. Options are Exact, Wildcards, or Regex Match.
-
A Match Value/Pattern - A Match Value or Pattern is a unique value used to map API URLs, enabling the Authorization Platform to match and authorize requests efficiently. It enables flexible and dynamic API URL matching for Authorization purposes. The match Value/Pattern supports,exact matches, wildcards and Regex for flexible URI matching:
- Exact Match
- A matching URI without wildcards or Regex.
- Wildcards
- A single asterisk
*acts as a wildcard for a single segment of the path. It can be used in two ways: - To match a full segment, like
/accounts/*/id, where*can represent any one segment (e.g.,/accounts/123/id). - As part of a segment, such as
/acc*/details/id, where the*substitutes part of the segment (e.g., matching/accounts/details/idor/accounting/details/id). - A double asterisk
**is a multi-segment wildcard, allowing it to match multiple segments. For example,/accounts/**would match any path starting with/accounts/and continuing with any number of additional segments, such as/accounts/user,/accounts/settings/profile, or/accounts/user/posts.
- A single asterisk
- Regex
- Matching a URL segment can be done using
.+\/(which is equivalent to*/). - Matching multiple segments can be done using a pattern like
.+without / in the middle to specify the segment slashes. - Matching a partial segment like ../../account-xxx/../../.. can be done with a Regex pattern similar to this:
.+\/.+\/account-\S*\/.+ - Escape your Regex pattern if using special characters.
- Regex Example
- Input:
- URI:
../../Users/user123/profile - Regex:
.*\/Users\/[A-Za-z0-9]+\/
- URI:
- Explanation:
- URI: Represents the resource path,
../../Users/user123/profile. - Regex: Matches any URI in the following form
/Users/{alphanumeric characters}/...
- URI: Represents the resource path,
- Input:
- Matching a URL segment can be done using
- Exact Match
-
Asset Types
- Defines which Asset Type/s are associated with this Mapper. For example, associating the Asset Types Loan and Account means the Mapper is connected to these business resources. The purpose of associating Asset Types to a mapper is to create a link between the physical layer—the API request—and the logical layer, which represents the protected resource (the Asset Type). This association ensures that dynamic Authorization is applied based on the business resources the API grants access to, allowing for fine-grained control over which logical assets, such as Loan or Account, are accessible and require protection.
-
An Identity Source (optional)
- Defines which Identity Source is associated with the mapper. This association adds granularity by specifying which Identity Source should or should not be used for access evaluation for a particular API.
API Mapper Example
An Authorization Policy might be created to ensure that bankers can only access accounts in their region. To determine the appropriate Authorization Decision, the Authorization must be provided with key Attribute information. Within the Authorization Platform the bank may create a rule that states that the Attribute for the Bank Account Location must match the Location Attribute of the user.
The bank would begin by creating an Internal Bank Portal Application. An Asset Type would contain the Attributes required. For example: the first and last name of each banker. The banker's department, branch, bank_region, and userid might also be included in this Asset Type definition.
Another Asset Type might be included for the bank's servers where the accounts are maintained. Here too, there might be Attributes such as account_type, server_type, server_department, server_region. Ultimately, the API Mappers would be responsible for providing the server_region and bank_region Attribute values to the Authorization Platform either in the actual Request or by pointing the Authorization Platform to where these Attributes are available.
All currently defined API Mappers associated with an Application are listed in the API Mapper List on the Application's Settings screen. When you click on an API Mapper, the Details section displays the current parameter definitions for that API Mapper, including:
- API Mapper name
- Description (optional)
- Active (Yes or No)
- Match Type
- Match Pattern
- Asset Types (associated to this Application)
- Identity Source
Adding an API Mapper
To add an API Mapper:
- Select the relevant Policies Workspace (formerly Authorization Workspace).
- Select an Application. The Application Settings screen is displayed.
- Select the API Mapper tab. The API Mapper List is displayed.
- Click Create. The API Mapper Details screen is displayed with the parameters that need to be defined.
- Enter a Name for the new Mapper.
- Enter a Description for the new Mapper (optional).
- By default, the Mapper is Active. If you wish to disable it initially, click on the blue Active slider. The slider will turn gray and the Mapper will be inactive.
- In the Settings section:
- Select a Match Type. It can either be an Exact, Wildcard, or Regex Match.
- Select a Match Value/Pattern. The value (Exact Match) or pattern (Wildcards or Regex) that the API URL matches against. If matched, this API Mapper is used and the associated Asset Type(s) will be processed accordingly. Note that this value must be unique per Application. Refer to the API Mapper Workflow section above for more information on Match Values and Patterns.
- Use the drop-down arrow to select which Asset Type to associate to this Mapper. This determines which Asset Type is enforced for access and would be represented by Attributes mapped to the API request being processed.
- In the Identity Source Association section, you can toggle whether Identity Sources should be filtered in the Mapper evaluation. You can choose filtering by choosing to either Include or Exclude identity sources. See the section on Unavailable Identity Sources for more information.
- Click Set an Identity Source to open a side panel with all available Identity Sources (Aux or Context). To complete this step, ensure that you choose a valid Identity Source for the relevant Mapper. This capability complements the management of unavailable or unnecessary sources during PDP calculations.
- Note: If the Identity Source toggle is off, all Identity Sources will be part of the access decision calculation.
- Click Set an Identity Source to open a side panel with all available Identity Sources (Aux or Context). To complete this step, ensure that you choose a valid Identity Source for the relevant Mapper. This capability complements the management of unavailable or unnecessary sources during PDP calculations.
- Click Save. The new Mapper is added to the API Mapper List.
API Mapping Priority
When multiple Mappers are defined in an Application, you can customize their order in the list in the Platform UI by dragging and dropping them or through the APIs. This determines the API Mapper priority in the PDP calculation for Access Decisions.
Check out our documentation on Working with Mapper Sets for more details.
Defining the Attribute Mapping Logic
When creating the API Mapper and associating one or more Asset Types to it, you need to define the Attribute mapping logic. Essentially, this defines the location where the Authorization Platform can find the Attribute values.
For example, if a global bank has a Policy that states that bankers can only access accounts in their region, the API Mappers would define where the Authorization Platform can retrieve the Attribute values to determine whether the banker and account are in the same region. If this is confirmed, the Authorization Platform can return a response indicating that the Authorization decision would be to allow access.
Associating an Identity Source to an API Mapper
When creating or editing an API Mapper, you can enable or disable the association of Identity Sources to the mapper. This allows customers the ability to granularly define which Identity Sources are used for a specific API access calculation while allowing unneeded sources to be filtered to avoid data fetching and reduce performance impact.
Since Main sources cannot be filtered, this option is limited to AUX/Context sources.
This API Mapper association leverages the operationalFilters parameter in the relevant Runtime APIs and creates a filter as part of the preprocessing phase in the PDP based on the mapping.
Note that if operationalFilters are provided in the Runtime request directly, they will override the Mapper's settings. This override mechanism is particularly useful for troubleshooting and testing scenarios, such as when using Postman to manually adjust and refine the API response.
Associating an Asset Attribute to an API Mapper
Associating an API Mapper with an Asset Type allows you to use its Attributes to define the logic that maps the organization's APIs to the Attributes in the Authorization Platform. After associating the Asset Type(s) to the API Mapper, the API Attribute Mappers section under the Asset Attributes tab becomes visible, where you need to define the Attribute mapping logic.
Associating an API Mapper with an Attribute enables the matching of values from the API request to determine the appropriate Attribute to process, facilitating precise authorization logic in the Authorization Platform. For details on the Source and Path inputs, refer to the Defining the Source and Path section.
To map an Asset Attribute to an API Mapper:
- Select the relevant Policies Workspace. Click on the Asset & Conditions tab on the top right
- Select the relevant Asset Type (which should be associated with Application API Mapper) to open the Asset Type Settings screen and manage the Asset Type settings and Attributes.
- Select the Asset Attribute tab.
- Select the relevant Asset Attribute from the list or create one.
- In the Policies Workspace, select the relevant Asset Type, which was already associated with Application API Mapper, to open the Asset Type Settings screen and manage the Asset Type settings and attribute
- Navigate back to the relevant Asset Attribute to map it to an API Mapper.
- When managing Asset Attributes for an Asset Type already associated with an Application API Mapper, the Attribute Settings will include an Set API Attribute Mapping button.
- Under Asset Attribute Mapping Settings, select Set API Attribute Mapping.
- The Set API Attribute Mapping panel opens.
- Add a new API Mapper by clicking Add.
- Assign an API Mapper Name to the new API Mapper.
- Select the Source (options: Body, Header, JWT, Path, Query, or URI Regex)
- Enter the Path. This can be a JSON Path or other relevant Path.
- Click Done.
For more details on Asset Attributes Mapping, check out Defining the Attribute Mapping Logic section.
Associating an Action to an API Mapper
When managing an API Mapper, you can associate it with specific Actions connected to an Asset Type.
Note that the Action must be linked to an Asset Type before associating it with an API Mapper.
Associating an API Mapper with an Action enables the matching of values from the API request to determine the appropriate Action to process, facilitating precise authorization logic in the Authorization Platform. For details on the Source and Path inputs, refer to the Defining the Source and Path section.
To map an Action to an API Mapper:
- Select the relevant Policies Workspace. Click on the Asset & Conditions tab on the top right
- Select the relevant Asset Type(which should be associated with Application API Mapper) to open the Asset Type Settings screen and manage the Asset Type settings and Attributes.
- Select the Actions tab.
- Select the relevant Actions from the list or create one.
- When managing Asset Attributes for an Asset Type already associated with an Application API Mapper, the Attribute Settings will include an Set API Action Mapping button.
- Navigate back to the relevant Asset Type's Action to map it to an API Mapper.
- Under API Action Mappers, select Set API Action Mapping.
- The Set API Action Mapping panel opens.
- Add a new API Mapper by clicking Add.
- Assign an API Mapper Name to the new API Mapper.
- Select the Source field (options: Body, Header, Method, JWT, Path, Query, or URI Regex).
- Enter the Path. This can be a JSON Path or other relevant Path.
- Enter the appropriate value that should be matched with the value extracted by using the Source and Path.
- Click Done.
Defining the Source and Path
For each Asset Attribute or Action in the Policy, you can define the Source and Path that the API Mapper will use. Ensure that you connect the relevant Asset Type to an Application first. Only then can you view the API Mappers buttons in the Asset Attributes and Action in the Asset Type Settings Screen tabs
| Source | Explanation | Sample of Expected Value |
|---|---|---|
| Path | Indicates the Path location value where the Attribute is located. For example, [4] would indicate the fourth element in the URL path. For more information, see below. | [4] |
| Body | Indicates the value of the Attribute is included in the REST API Request Body. | account_location |
| Header | Indicates the value is included in the REST API Request Header | x-profile-client-loc |
| Query | Indicates the value is included in the REST API Request Query | .../app/environments/34452466634?action=approve_loan |
| URI Regex | Indicates the Attribute's value is derived using a regex pattern applied to the full URI of the request. The Regex pattern will define matching and extraction of specific value from a URI matching the pattern. |
^/app/environments/\d+\?action=(\w+)$ |
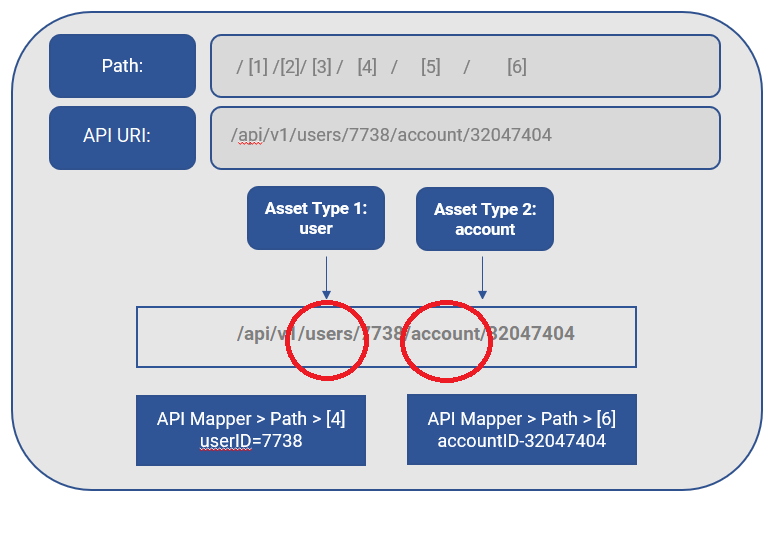
Path Mapping Example
In the following example, two Attributes are included in the API call. The API Mapper defines the user Attribute value by the path [4] and the account Attribute by the path [6].
Editing an API Mapper
To edit an API Mapper:
- Select the relevant Policies Workspace
- Select an Application. The Application Settings screen is displayed.
- Select the API Mapper tab. The API Mapper List is displayed.
- Select the API Mapper in the API Mapper List and click Edit. You can now edit all fields as needed.
- Click Save to save your changes.
Deleting an API Mapper
To delete an API Mapper:
- Select the relevant Policies Workspace
- Select an Application. The Application Settings screen is displayed.
- Select the API Mapper tab. The API Mapper List is displayed.
- Hover over the API Mapper you want to delete and click the trash icon.
- In the Delete this API Mapper? warning message, click Delete.