Installation
- Obtain the Istio Sidecar Authorizer zip archive from PlainID Support.
- Unpack the Authorizer archive.
- Configure authz image versions:
- Update the appVersion value in Chart.yaml file: Set tag of the authz-operator image from the images.txt file.
- Update spec.container.image value tag in samples/authz_v1_plainidinjector.yaml file: Set tag of authz-envoy-sidecar image from file images.txt
- Update specific settings in values.yaml.
- Update specific settings of the PlainidSidecar kind (example in samples/sidecar-echo.yaml).
- Install Helm if not installed (
 Helm | Helm ).
 - Install using the Helm Chart:
helm install sidecar-test plainid-sidecar
- Label target namespace for PlainID Injection.
kubectl label namespace default pid-injection=enabled
- Deploy authz-sidecar injector.
kubectl apply -f samples/authz_v1_plainidinjector.yaml
- Deploy authz-sidecar configuration (PlainidSidecar kind).
kubectl apply -f samples/sidecar-echo.yaml
- Restart a pod with the target microservice, so authz-sidecar will be injected.
kubectl delete pod echo
Sidecar Workflow
In addition to running the Sidecar itself, the Helm Chart is responsible for installing and configuring the Sidecar to integrate with other components. Helm v 3.8.0 is required to properly install and configure the Sidecar solution with your Kubernetes cluster.
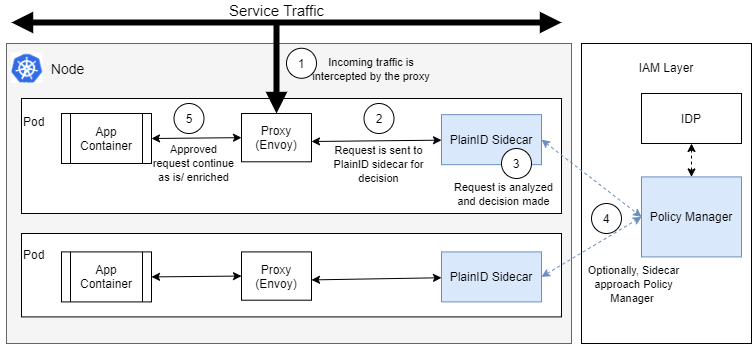
The benefit to this approach is that all decisions are made locally on the same server as the microservice and require no network hops. This delivers a higher level of availability and performance.
Following is a typical workflow for integration of the PlainID sidecar and the Authorization Platform.
- The client sends their access/ID token in the request header.
- The request is intercepted by the Envoy Proxy and passed to the PlainID Sidecar.
- The PlainID sidecar is another container that is automatically injected to the pods, similar to the Envoy proxy.
- The PlainID sidecar makes a Permit/Deny decision, based on the defined policies. The PlainID sidecar can base this decision on the request URL, request header, and request body.
- In addition, there is an option to inject Entitlements/additional information to the request header, to provide specific access data to the service.
- Optionally, the sidecar approaches the Authorization Platform.
- If the Authorization Decision is Permit, the Envoy proxy passes the request to the service container. Otherwise, If the Authorization Decision is Deny, the request never reaches the actual service container and a 403 response is returned immediately.
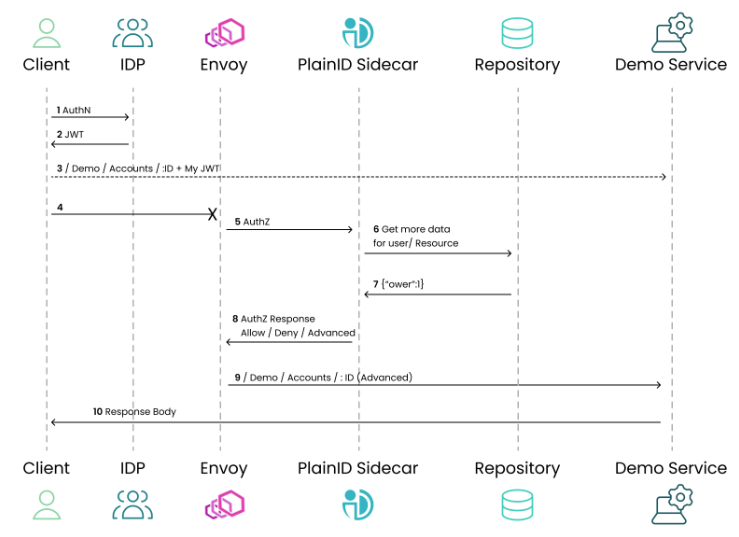
For more information about the Permit/Deny end point, see Authorization APIs.